This Post May Contain Affiliate Links. Please Read Our Disclosure Policy.
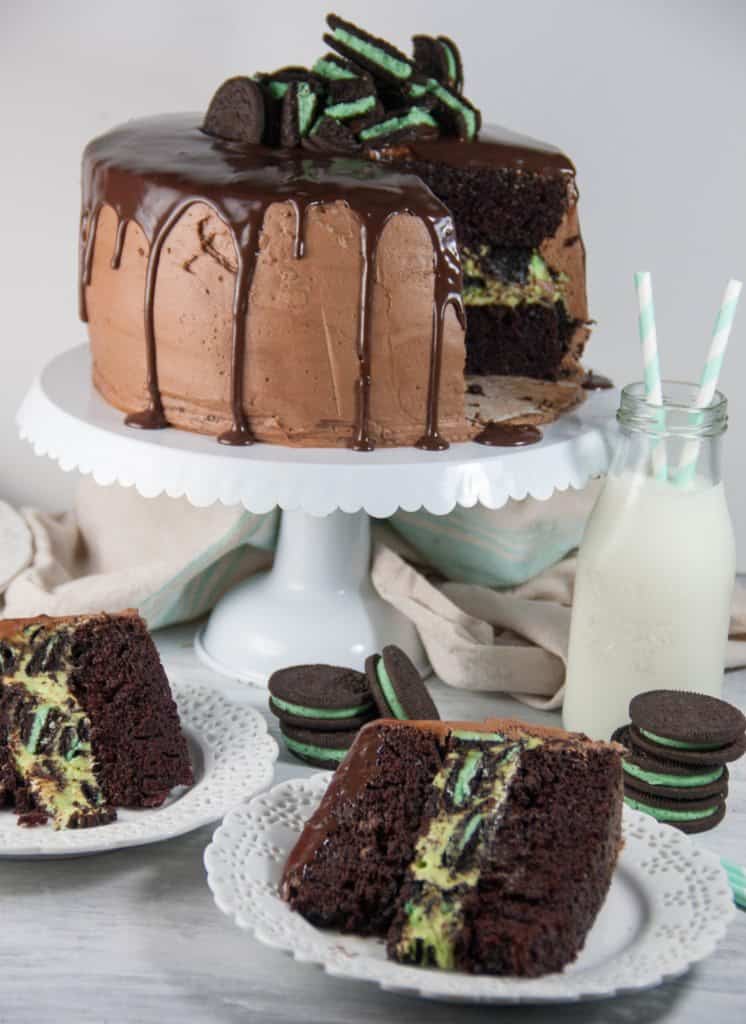
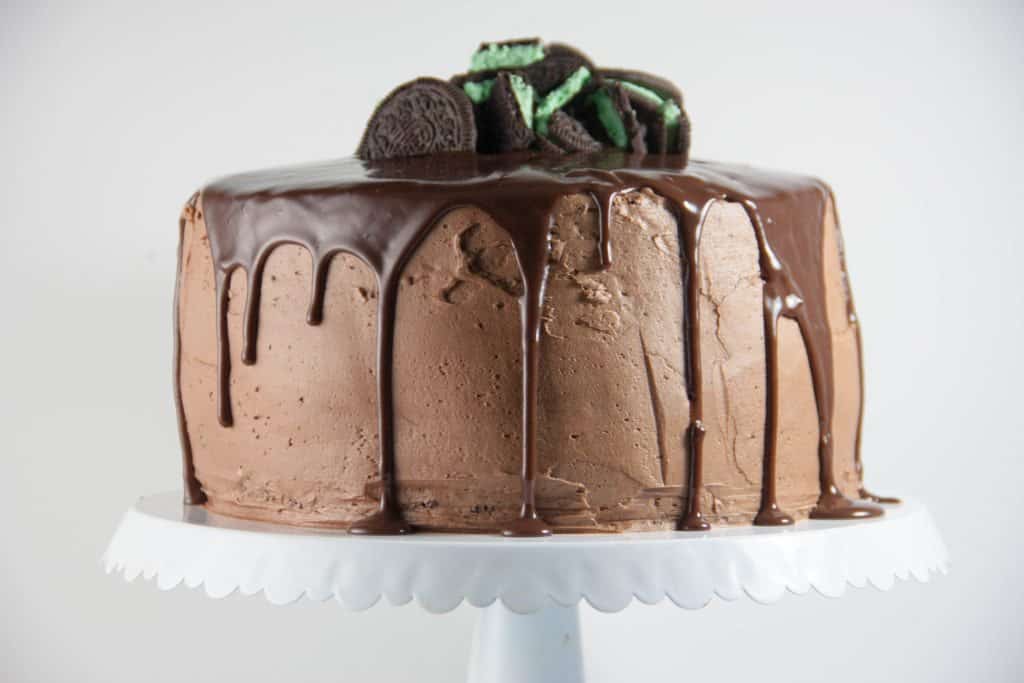
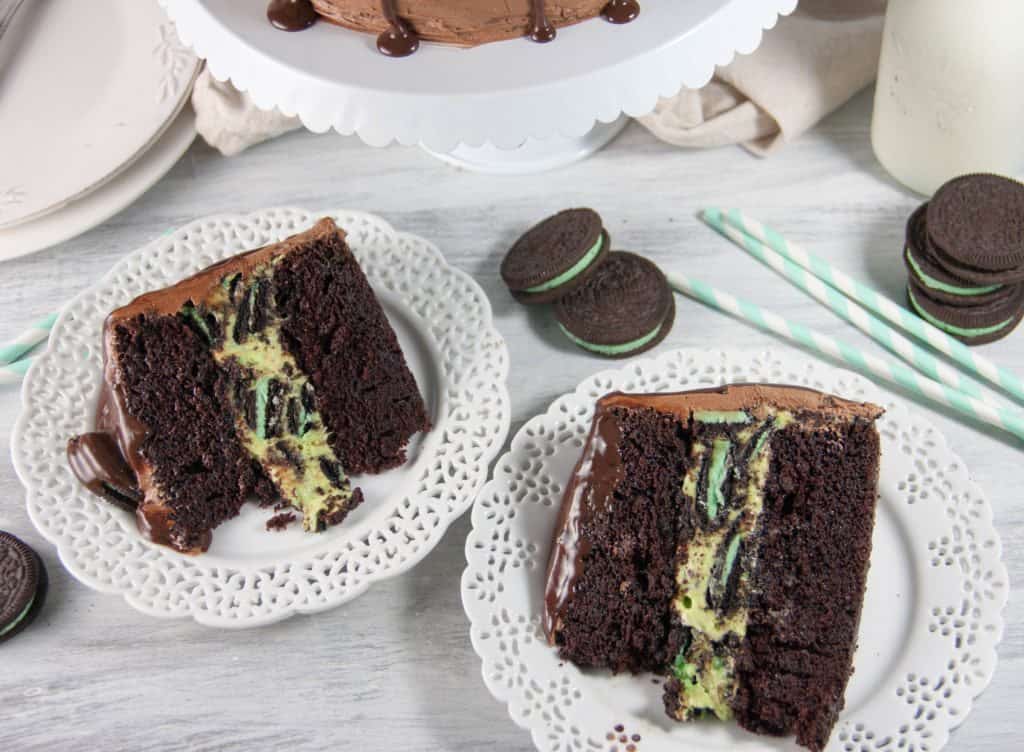
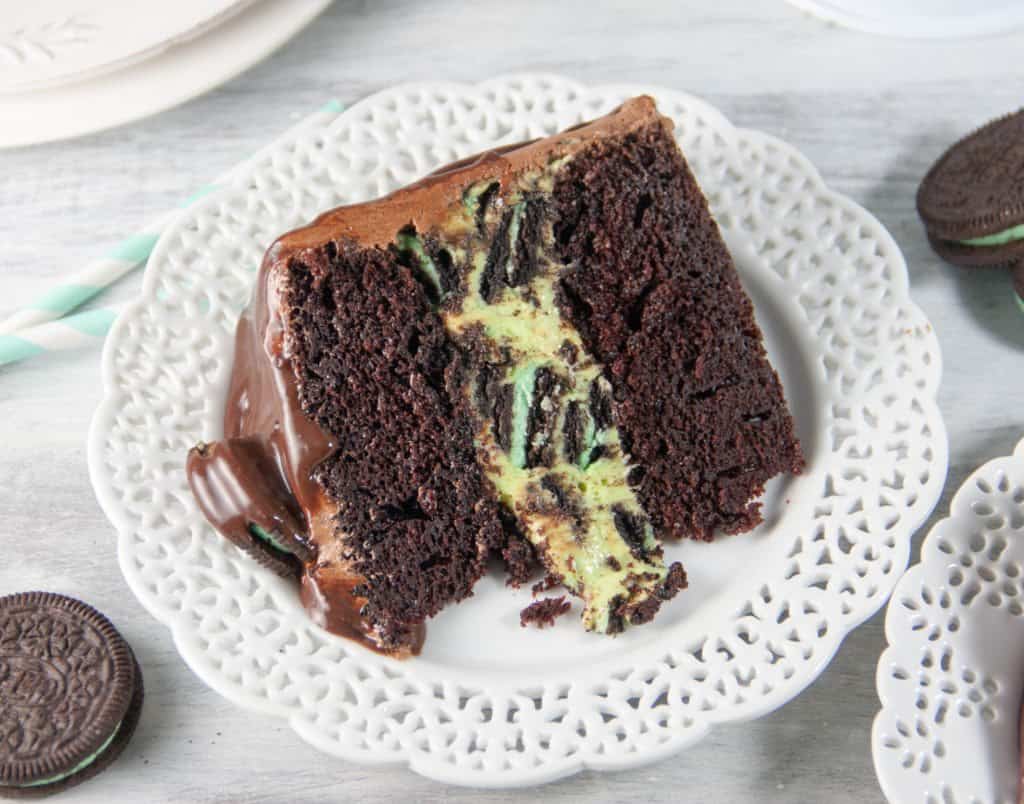
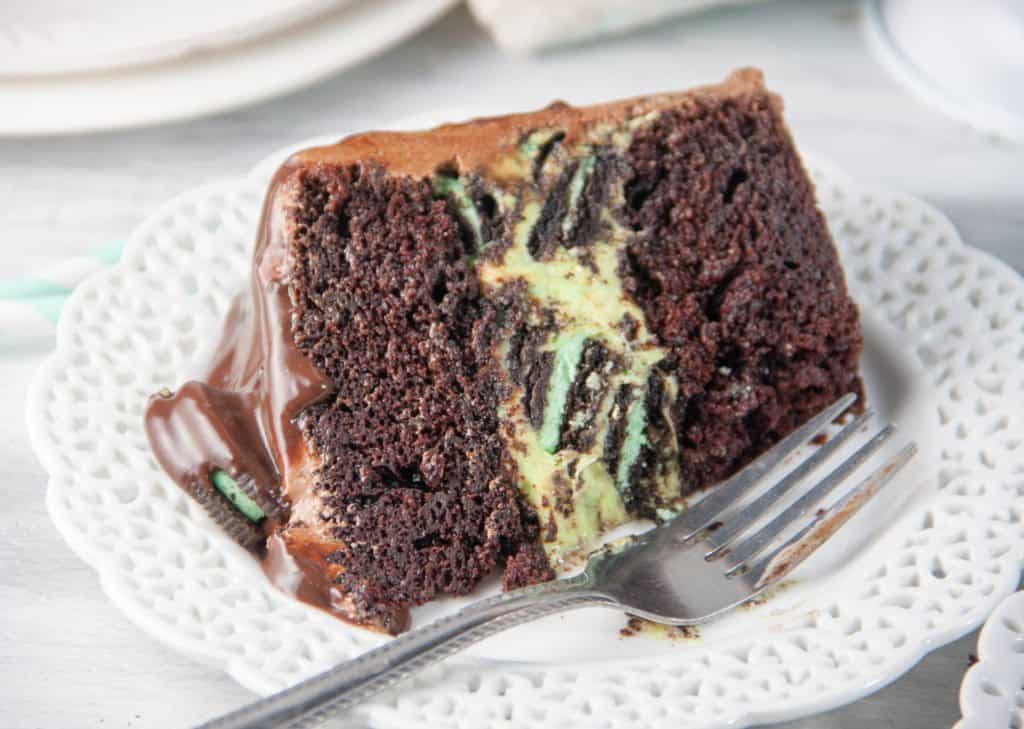
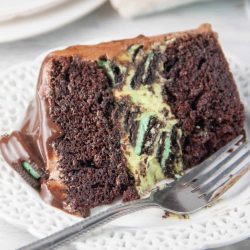
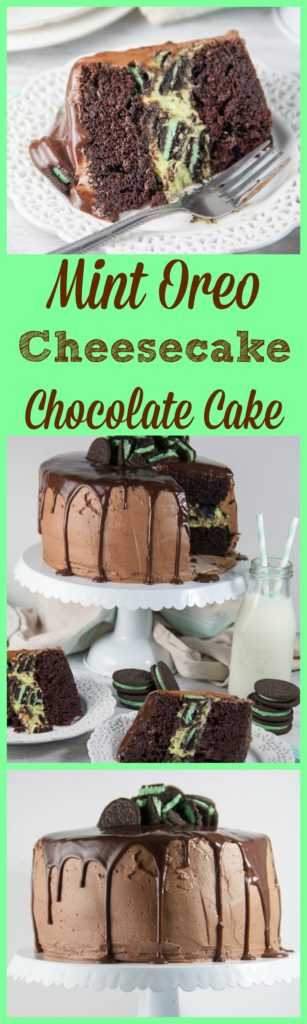
A Mint Oreo Cheesecake Chocolate Cake that would make a stunning dessert for your Holiday table! It is two layers of a rich chocolate cake with a layer of a no bake mint oreo cheesecake in the middle. Topped with a chocolate buttercream frosting, chocolate ganache and more mint Oreos on top!

Ok at first glance, you might be thinking this cake is way too complicated for you to tackle. What if I told you that the cake is made in one bowl, the cheesecake layer is a no bake cheesecake, the frosting is just a simple chocolate buttercream, and the glaze is all made from just two ingredients! Ok, now does that sound a little more doable? Don’t worry I’ll also break it down for you of how to make this over a few days so it’s a total stress free dessert in the end.
And I mean what’s not to love? Mint Oreos are my jam. If mint oreos were a jam, I’d eat it. Confession time though. I actually hated- no loathed because that sounds even worse- anything mint growing up. I know! I just never understood why someone would ruin their chocolate with mint. Now however, I can’t get enough. Hence, this cake. I can just totally see this cake being the star of your dessert table this holiday season. I mean how could it not be? Just look at it…
So lately, I’ve been making a few more elaborate desserts lately. But here is my little secret to tackling impressive desserts and not losing your mind doing so.
Complete the steps over several days. If you’re like me, you have a full time job and other responsibilities so making elaborate desserts in one day is just so not feasible. I hear you. I’m with you. I can tell you though they can still be made. Just make them over several days.
For this cake this is how I tackled it:
Day One: Make the frosting. The frosting is quick to whip up and stores well in your refrigerator. Just be sure to re-whip the frosting when you go to frost the cake to bring it back to the right consistency.
Day Two: Make the no bake mint oreo cheesecake. I adapted a Martha Stewart no bake cheesecake for this recipe so it was super simple to throw together. This cheesecake needs to set up in the fridge anyway so let it set up and be waiting for you. Not the other way around. Just wrap the cheesecake in plastic wrap and set it in the fridge.
Day Three: Make the chocolate cake. After you make this cake, allow the cake layers to cool completely. Then wrap each layer individually tightly in plastic wrap and allow to sit on your counter overnight.
For cakes that come out of your cake pans with no fuss, read this post on how to prepare your cake pans.
Day Four: Make the ganache and assemble the cake. At this point everything is basically done you just need to put it all together! I save the ganache until last, so it’s easily pourable over the cake. You could also make the ganache ahead and store it in the fridge. You would just need to gently re-heat the ganache again so that you can pour it over the cake.
And there you go- a gorgeous dessert spread out over 4 days- no fuss, no muss.
Tip: For whatever reason my springform pan and cake pans do not seem to be the exact same size (although they say they are both 8-inches). If you run into the same problem, where the cheesecake seems to be a bit larger than your cake. Just simply trim the cheesecake around the edges. I would be lying if I said those trimmings went straight to the trash and not to my mouth. #nojudgementplease
I seriously couldn’t get enough of this cake. Even my 3 year old nephew was attacking it!
For the chocolate cake, I used this epicurious chocolate cake. I love the addition of the hot coffee in the cake. The coffee makes the cake super moist while also playing very well with the chocolate. This chocolate cake may be my new go to chocolate cake recipe.
For the cheesecake, I adapted a no bake cheesecake from Martha Stewart. I added peppermint extract, mint Oreos, and green food coloring. The green food coloring is totally optional of course. But I thought it helped make this dessert look extra festive!
Listed below are the essential pieces of equipment to make this cake. These are affiliate links that will re-direct you to Amazon. If you make a purchase, I will receive a small commission that costs you nothing extra! That little extra goes back into this blog to help me to continue to crank out crazy good desserts for you all. So thank you in advance!
To Make This Mint Oreo Cheesecake Cake You Will Need:
- 2 8×8 round cake pans (I use Fat Daddio’s because they have high walls and are very durable)
- Stand mixer or hand mixer (Both of mine are a Kitchenaid)
- Liquid Measuring Cup
- Dry measuring cups and measuring spoons
- Cake Tester (or a toothpick works too!)
- Offset spatula
- 8-inch springform pan
- Parchment Rounds
If you like this cake or have any questions let me know and leave me a comment! I love hearing from you all! And be sure to snap a photo of the cake if you make it it- just include the #bostongirlbakes so I can see!
Be sure to follow along with me on Twitter, Facebook, Instagram, and Pinterest so you don’t miss any tasty treats!

More Recipes You Might Like:
Mint Oreo Stuffed Bailey’s Chocolate Cupcakes
Ingredients
- For the cake:
- 2 cups sugar
- 1 3/4 cups all-purpose flour
- 3/4 cup unsweetened cocoa powder
- 2 teaspoons baking soda
- 1 teaspoon baking powder
- 1 teaspoon kosher salt
- 2 eggs
- 1 cup buttermilk
- 1 cup strong black coffee
- 1/2 cup vegetable oil
- 2 teaspoons vanilla extract
- For the cheesecake:
- 2 8- ounce packages cream cheese room temperature
- 1 14- ounce can condensed milk 1 1/4 cups
- 1 teaspoon vanilla extract
- 2 teaspoons peppermint extract
- 20 crushed Mint Oreo cookies
- For the chocolate buttercream frosting:
- 2 1/2 sticks unsalted butter softened to room temperature
- 2 1/2 cups confectioner sugar
- 1 teaspoon vanilla extract
- 2 teaspoons peppermint extract
- 2 Tablespoons heavy cream
- 1/2 cup cocoa powder
- For the ganache:
- 8 ounces semisweet chocolate
- 1 cup heavy cream
- addtional Mint Oreos for garnish
Instructions
- 1. Heat oven to 350°F. Grease and flour two 8-inch round baking pans. Set aside.
- 2.In the bowl of a stand mixer fitted with the whisk attachment or in a large bowl with an electric mixer, combine the sugar, flour, cocoa, baking soda, baking powder and salt. Mix on low until dry ingredients are thoroughly combined.
- 3.Add eggs, buttermilk, coffee, oil and vanilla. Beat on medium speed for about two minutes; the batter will be thin.
- 4.Pour batter evenly into prepared pans.
- 5 Bake in preheated oven for 30 to 40 minutes for round pans, or until wooden toothpick inserted in center comes out clean.
- 6. Cool 10 minutes; remove from pans to wire racks. Cool completely.
- 7. Meanwhile, make the cheesecake. Prepare an 8-inch springform pan by lining the bottom with parchment paper. To do this, use prepared parchment rounds or trace the bottom of the pan on parchment paper then cut the circle out. Set aside.
- 8. Using an electric mixer set at medium-high speed, beat the cream cheese in a large bowl until smooth. Beat in the condensed milk a little at a time, scraping the sides of the bowl, as necessary. Beat in the extracts.Fold in the crushed Oreos.
- 9.Pour the filling into the prepared pan; smooth the top with a rubber spatula. Cover with plastic wrap, and refrigerate until firm, 2 1/2 to 3 hours.
- 10. Unclasp sides of pan, and remove cheesecake.
- 11. Make the buttercream frosting. In a stand mixer with paddle attachment, cream the butter until light and fluffy about 2 to 3 minutes. Add the powdered sugar in 1 cup at at time with the mixer on low. Gradually add in the cocoa powder and mix to combine. Then add the heavy cream and extracts. Mix on low until combined, then turn the mixer to medium-high and mix for 8 minutes until very light and fluffy.
- 12. To make the ganache measure out your chocolate in a medium sized bowl and set aside. Heat the heavy cream in a saucepan on stovetop on medium high heat until until boil. Pour over the chocolate and let sit for 5 minutes undisturbed. Then whisk until smooth. If not using right away, cover in saran wrap and place in the fridge. When ready to use the ganache will have hardened, so heat on low until smooth or microwave in 30 second intervals until liquid again.
- 13. To assemble the cake, place one cake round on a cake stand or platter for serving. I like to use a round cardboard cake circle underneath the cake. Remove the cheesecake from pan and place on top of the first cake. You may need to trim the cheesecake if it hangs over the cake. Top with the second cake. Frost with the chocolate buttercream frosting, Pour ganache over and top with additional Mint Oreo cookies.

Justine @ Little Dove says
Oh my word, not only does this look amazing (so gorgeous, love the presentation), but sounds amazing! I love mint and chocolate together!
Heather @Boston Girl Bakes says
Thanks Justine!! 🙂 It was such a showstopper I had a hard time cutting into it…well almost..after I did I had a hard time walking away from it!
Patti Winters says
Chocolate, mint and cheesecake together! What an amazing combination!
Heather @Boston Girl Bakes says
Thank you Patti..I couldn’t agree more this combo rocked!
Platter Talk says
I love mint and chocolate together & the kids are going to love this cake.
Heather @Boston Girl Bakes says
Oh wonderful 🙂 enjoy!!
Claudia | Gourmet Project says
Mint & chocolate reminds me of my first years in italy. There were always around on Christmas days. I’m making this cake for my family, to remember 🙂
Heather @Boston Girl Bakes says
Oh that’s so cool to know! Well happy to bring back fond memories for you 🙂 Enjoy!
JoJo @ Every Nook & Cranny says
Oh. My. GAWD! This looks amazeballs! As a chocolate mint and cheesecake fiend, this is some sort f dessert Holy Grail to me lol!
Heather @Boston Girl Bakes says
You crack me up JoJo! And thank you I’ll take amazeballs as very high praise 🙂
Dahn @savor the Best says
oh my goodness this is an insane cake. Looks incredible!!
Heather @Boston Girl Bakes says
Thanks Dahn 🙂 It truly truly was!