This Post May Contain Affiliate Links. Please Read Our Disclosure Policy.
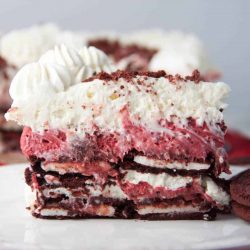
This no bake red velvet cheesecake is a light and airy no bake cheesecake with layers of red velvet Oreos, red velvet cheesecake mousse, white chocolate cheesecake mousse and a homemade whipped cream!

Ahhh no bake desserts…how I love thee. Let me count the ways. I mean what’s not to love of a dessert that doesn’t require you to ever turn the oven on? Especially in summer!
I whipped up this no bake dessert with Oreos. Red Velvet Oreos to be specific. Oh my goodness, have you gotten a hold of these yet? OMG my friends. First of all, I love me anything Red Velvet. Cupcakes stuffed with Nutella. Red velvet bars with Oreos. Heck, I’ve even made red velvet donuts. I seriously can’t get enough.
How To Make This No Bake Red Velvet Cheesecake
I used a 9-inch springform pan for this cake to be able to release the sides of the cake easily.
Pro Tip: You want to be sure to line the sides of your pan with parchment paper or plastic wrap to be sure the sides don’t stick.
Then make the mousse layers- they are a red velvet cheesecake mousse and a white chocolate mousse layer. The mousse layer begins with softened cream cheese lightened up with a homemade whipped cream.
To Make The Mousse Layers:
To make the mousse, beat the cream cheese and sugar for together in a large mixer bowl until smooth. Add the milk and beat until smooth. Set cream cheese mixture aside and make whipped cream.
Whip the 2 1/2 cups of heavy whipping cream on high with a mixer until it begins to thicken. Add vanilla extract and powdered sugar and continue to whip on high until stiff peaks form.
Carefully fold 1/3 of the whipped cream into the cream cheesecake mixture until combined. Add the remaining whipped cream and fold mixtures together until well combined.
Divide the mousse into two bowls. You’ll want twice the amount in one bowl as the other. You should have about 2 1/3 cups in one bowl and the rest in another.
Add the cocoa powder and red food coloring to the bowl with the larger amount of mousse and combine.
Add the slightly cooled white chocolate to the smaller amount and combine.
How To Assemble This No Bake Red Velvet Cheesecake:
-
Pour the milk for the cookie layers into a small bowl. Place a single layer of cookies into the bottom of the pan, dipping each into the milk before adding.
-
Top the cookies with half of the red velvet mousse and spread into an even layer.
-
Add another layer of cookies on top of the red velvet mixture, dipping each into the milk before adding.
-
Top the cookies with the white chocolate mousse and spread into an even layer.
-
Add another layer of cookies on top of the chocolate mixture, dipping each into the milk before adding.
-
Top the cookies with the remaining red velvet mousse and spread into an even layer.
To make the whipped cream for topping:
Once you have it all layered, this dessert just needs to sit in the fridge. Before you serve, whip up some whipped cream to spread on top. I got all fancy and piped the whipped cream on top and then sprinkled with some Oreo crumbs, but you don’t have to get all that fancy if you don’t want to.
This dessert is so crazy good no one will complain. Trust me.

Do I Have To Use Red Velvet Oreos?
Absolutely not!
In fact, a reader made the recipe and she said she couldn’t find the red velvet oreos so improvised with using regular Oreos. She said the cake was delicious and her co-workers gobbled it up!
For More No Bake Recipes:
To Make This Red Velvet Icebox Cake You Need:
- 9-inch Springform Pan
- Stand or hand mixerr to make the whipped cream
- Mixing Bowl
If you love this recipe then be sure to leave me a comment and star rating below! Happy baking!
Red Velvet Oreo Cheesecake Icebox Cake
Ingredients
Mousse Layers
- 12 oz cream cheese room temperature
- 3/4 cup 155g sugar
- 2 tbsp milk
- 2 1/2 cups heavy whipping cream cold
- 1 tsp vanilla extract
- 1 1/4 cups 144g powdered sugar
- 2 tbsp natural unsweetened cocoa powder
- 1 ounce red food coloring
- 1/2 cup white chocolate chips melted, slightly cooled
Cookie Layers
- 1/2 cup milk
- Two 15.25 oz boxes Red Velvet Oreos
Whipped Cream
- 1 cup heavy whipping cream cold
- 4 tbsp powdered sugar
- 2 teaspoon vanilla extract
- red velvet Oreo crumbs optional
Instructions
- Prepare a 9-inch springform pan by lining the sides with parchment paper that sticks about an inch above the sides of the pan.
- To make the mousse, beat the cream cheese and sugar for together in a large mixer bowl until smooth.
- Add the milk and beat until smooth. Set cream cheese mixture aside and make whipped cream.
- Whip the 2 1/2 cups of heavy whipping cream on high with a mixer until it begins to thicken. Add vanilla extract and powdered sugar and continue to whip on high until stiff peaks form.
- Carefully fold 1/3 of the whipped cream into the cream cheesecake mixture until combined. Add the remaining whipped cream and fold mixtures together until well combined.
- Divide the mousse into two bowls. You’ll want twice the amount in one bowl as the other. You should have about 2 1/3 cups in one bowl and the rest in another.
- Add the cocoa powder and red food coloring to the bowl with the larger amount of mousse and combine.
- Add the slightly cooled white chocolate to the smaller amount and combine.
- Pour the milk for the cookie layers into a small bowl. Place a single layer of cookies into the bottom of the pan, dipping each into the milk before adding.
- Top the cookies with half of the red velvet mousse and spread into an even layer.
- Add another layer of cookies on top of the red velvet mixture, dipping each into the milk before adding.
- Top the cookies with the white chocolate mousse and spread into an even layer.
- Add another layer of cookies on top of the chocolate mixture, dipping each into the milk before adding.
- Top the cookies with the remaining red velvet mousse and spread into an even layer.
- Refrigerate cake until firm, 4-5 hours. Once firm, remove icebox cake from pan.
- To make whipped cream for topping, whip heavy whipping cream on high until it begins to thicken. Add the powdered sugar and vanilla extract and continue to whip on high until stiff peaks form.
- Spread a layer of whipped cream on top and then pipe the whipped cream around the top edge of the cake.
- Refrigerate until ready to serve. Top with additional red velvet Oreo crumbs.
Notes
- You want to be sure to line the sides of your pan with parchment paper or plastic wrap to be sure the sides don't stick.
Nutrition

Courtney Connolly says
Omg that looks absolutely mouthwatering! I LOVE oreos and I LOVE red velvet so that sounds like pure heaven!
Cricket Plunkett says
This looks like the perfect party dessert!
Heather says
Thanks!!
Igor @ Cooking The Globe says
This cake looks divine. I think I am going to make it this weekend. Thanks for the recipe!
Elizabeth says
Utter heaven on a plate, this! I’m afraid that if I started eating this I wouldn’t be able to stop! Beautiful!
Mary says
This looks absolutely incredible! I’m not a huge Oreo fan (don’t judge) but I’d definitely like to try this.
Platter Talk says
This is going to be the kids favorite new recipe to make. I wonder how many oreos will slip into their moths before they get soaked in the milk? lol
Heather says
Oh I know I couldn’t help but sneaking a few myself while making this! Enjoy 🙂
Lauren White says
Oh goodness — this looks so tasty! I think my husband would eat the whole thing!
Heather says
Not going to lie to you it was hard to put the fork down!
Beth says
I made this with peanut butter oreos because there were no red velvet available. My coworkers agreed that it was delicious with the pb ones! I would make this again.
Heather says
Beth I am so happy you tried my recipe!! And peanut butter..I might have to steal that idea 😉
Kelly says
No bake treats are my favorite especially during the summer! This icebox cake looks amazing! Love the red velvet oreos!
Heather says
Thanks Kelly! Me too. Turning the oven on during the summer is something I try to avoid if possible! And I have to admit the first package of Oreos may have been used for taste testing 😉