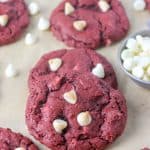
Red Velvet Chocolate Chip Cookies
These are a perfect cooking to make around Christmas or Valentine’s Day. Like true red velvet, they have a hint of cocoa and a little bit of tang from the buttermilk. This dough does need be refrigerated before baking, so it’s best to make these the day before. I used white chocolate chips, but semi-sweet chocolate chips would work as well.
Servings: 18 cookies
Calories: 203kcal
Ingredients
- 2 cups (8 ½ ounces, 240 g) all-purpose flour
- 1/4 cup (¾ ounces, 21 g) unsweetened cocoa powder
- 1 teaspoon baking soda
- ½ teaspoon baking powder
- ½ teaspoon table salt
- ½ cup (1 stick,113 g unsalted butter) softened
- ¾ cup (5 ½ ounces, 160 g) light brown sugar
- ¼ cup (1 ¾ ounces, 50 g) granulated white sugar
- 1 large egg room temperature
- 1 ½ tablespoons buttermilk or regular milk
- 1 ½ teaspoons vanilla extract
- 1 tablespoon red food coloring
- 1 cup (6 ounces, 170 g) white chocolate chips
Instructions
- Preheat and prepare pans. Preheat oven to 350oF. Line baking sheets with parchment paper or silicone baking mat.
- Combine dry ingredients. Whisk flour, cocoa powder, baking soda, baking powder, and salt together in a bowl.
- Cream butter and sugar. Beat butter with an electric mixer until fluffy, about 2 minutes; beat in brown sugar and white sugar until smooth, about 1-2 minutes.
- Add remaining wet ingredients. Beat egg, milk, and vanilla extract into butter mixture; beat in food coloring until uniformly colored.
- Add dry ingredients. Stir flour mixture into butter mixture gradually with electric mixer on low speed until combined; stir in 1 cup chocolate chips.
- Scoop the cookies. Using a 1-inch cookie scoop, or tablespoon, scoop the cookies into 1 ½-inch balls onto prepared cookie sheets about 2 inches apart. Roll dough into 2-inch balls; place on prepared baking sheets and flatten slightly.
- Bake and cool cookies. Bake in preheated oven until edges are lightly browned, about 10 minutes. Cool cookies on the cookie sheet for 5 minutes, then transfer to a cooling rack to continue cooling.
Notes
- To freeze unbaked: Scoop the cookies onto a cookie sheet, and freeze solid. Then place into a sealable plastic bag. You can bake frozen, without thawing, but add on a few extra minutes of baking time. To freeze baked: Allow the cookies to cool completely. Then when ready to eat, allow to thaw. I like to pop them into the microwave for about 20 seconds to bring them back to ooey gooey life.
- You can also now buy all natural food coloring! How awesome is that? You might like India Tree Nature’s Colors from Craftsy. Or Amazon has a few varieties of natural food colorings that I think are worth checking out.
- These would be just as good with semi-sweet chocolate chips.
- For a pretty presentation, right before baking these top each cookie dough ball with a few extra chocolate chips.
- No buttermilk? No problem. Go ahead and whip up homemade buttermilk in a few easy steps.
- Measure your flour correctly. I use the spoon and level method. Meaning I spoon my flour into my cup then level off with a spatula or the back of a knife. By measuring your incorrectly means you could end up with more flour then you want. Added flour in your cookie recipe means your cookie may end up cakier or tougher than you would like.
- You need to use room temperature butter so your dough is properly creamed and aerated. To soften your butter quickly, here are 3 quick ways.
- Make sure to use room temperature eggs so they are easily incorporated into the cookie dough. I place mine into a bowl of warm water for 10 minutes before using them.
Nutrition
Calories: 203kcal | Carbohydrates: 29g | Protein: 2g | Fat: 8g | Saturated Fat: 5g | Cholesterol: 24mg | Sodium: 143mg | Potassium: 88mg | Sugar: 17g | Vitamin A: 175IU | Vitamin C: 0.1mg | Calcium: 40mg | Iron: 0.9mg