
Chocolate Lava Cakes For Two

This Post May Contain Affiliate Links. Please Read Our Disclosure Policy.
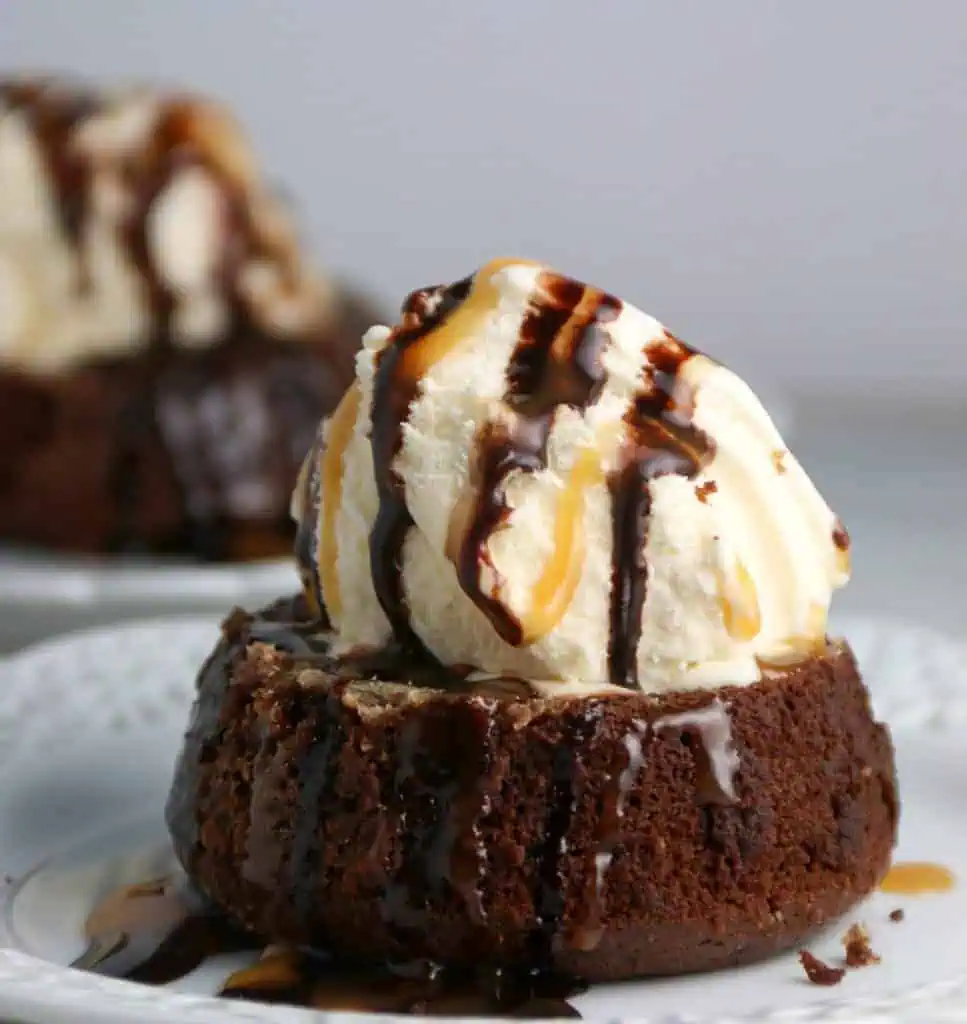
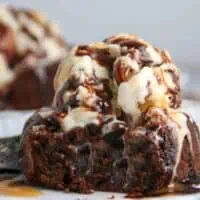
These chocolate lava cakes for two are the perfect romantic Valentine’s day treat that is so easy to make! They come together super fast. Top them with ice-cream for a perfect way to end a dinner!

I think if I had to rename this dessert, I would call it “How To Get A Valentine” chocolate cake. Many years ago now I was living with my best friend in Buffalo. And she had met who she called her “McDreamy”. And asked him over for dinner.
The plan was for her to make the dinner and impress him. The only thing was she didn’t know how to cook. Enter me.
I planned this elaborate dinner for her ending with the lava cakes at the end for her to make. We were going to make the dinner together step by step. She, however, decided we needed new plates. We couldn’t possibly serve “McDreamy” on mismatched plates leftover from our college days. Heavens no!
So off she went to Target. I got to cooking. So in the end..yup I made the dinner. She had to pretend like she did and act her a** off. And act she did. Until…The timer went off. “What’s the timer for?” He asked.
Well she had no idea. Luckily, she peeked into the oven, and realized it was for these cakes. Managed to play it off..and he was never the wiser. Oh did I mention those two are now happily married with two children? Like I said these lava cakes should be renamed.
Looking for more desserts for two? Check out these 40 desserts for two, perfect for Valentine’s Day or whenever you’re craving a small batch treat. From cookies and cakes to brownies and cheesecake, there’s something for every occasion!
Ready To Take Your Baking To The Next Level?
Join the Ultimate Baking Bootcamp and master essential techniques like mixing methods and the why behind every recipe! Whether you’re a beginner or looking to refine your skills, this step-by-step class will help you bake with confidence and create flawless desserts every time. Start your baking journey today!
What Ingredients Do You Need To Make A Chocolate Lava Cake?
The best part about these lava cakes is the simplicity of ingredients.
- Butter – You want to use unsalted butter for this. Not all brands use the same amount of salt in their salted butter so you could end up with a dessert that’s too salty.
- Bittersweet chocolate – You want to use good quality chocolate here. If you don’t prefer dark chocolate you could use semi-sweet or milk chocolate. I don’t recommend using chocolate chips. You won’t get as much “lava”. I prefer and recommend using chocolate bars (sold as 4-ounces) and then chop the chocolate myself. For this recipe you will need 1 and 1/2 bars total. I love using Ghirardelli but other brands work well too – Lindt, Nestle, or Baker’s.
- Eggs – You will use both eggs and egg yolks. Make sure they are room temperature before using. Place them in a bowl of warm water for 10 minutes before using.
- Sugar – I’ve started using organic cane sugar in my recipes! I love the hint of natural molasses flavor it imparts.
- Salt – Not all salt is created equally. I generally use table salt in my recipes.
- Flour – You simply need a little all purpose flour to bind the recipe together.
- Cocoa Powder – For dusting the ramekins
Related: You might also like the rest of these 5 Ingredient Desserts
How Do You Make A Lava Cake?
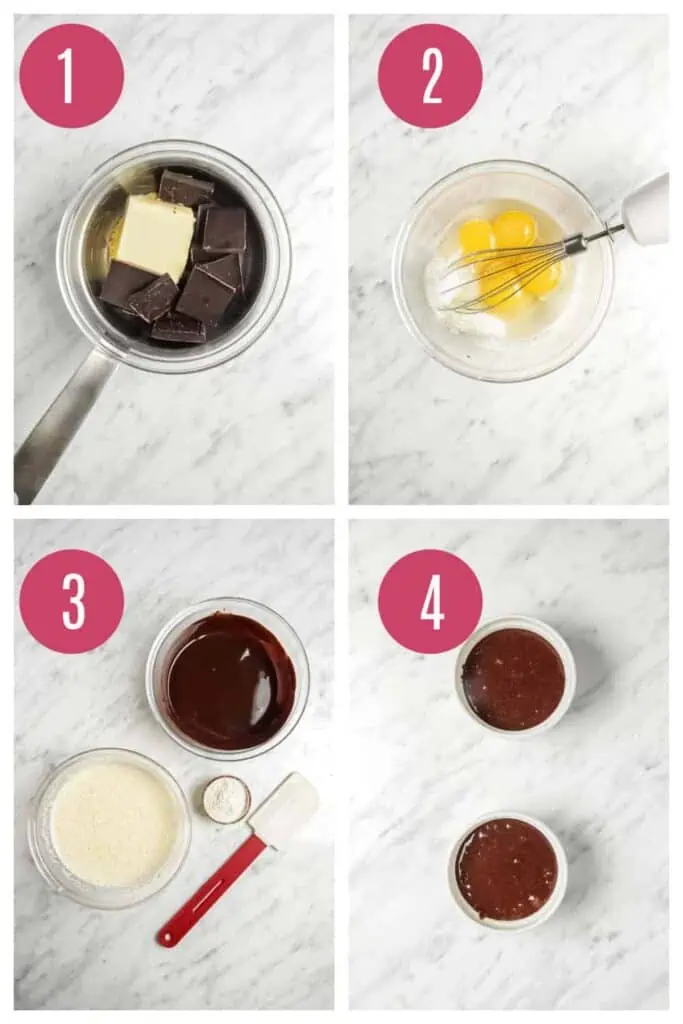
Prep your ramekins. You want to butter and dust the 6-ounce ramekins with cocoa powder (readers have mentioned the flour clumping on the outside of the cakes when they come up but cocoa powder will help prevent that!) so they are ready for you when your batter is. And don’t forget to preheat the oven! Having a hot oven is key to making sure these rise and bake correctly.
Preheat the oven to 450oF.
Melt the chocolate and butter. To start making these cakes, you are going to melt your chocolate and butter over a double boiler. Basically set a heatproof bowl of a pot of simmering water. And allow the chocolate and butter to melt. You want to use good quality chocolate in this dessert. My two favorite choices are Valhrona and Ghirahdelli.
Whisk the remaining ingredients together. Then whisk your eggs and yolks, sugar, and salt until light and fluffy in a second mixing bowl.
Combine the ingredients. Once the chocolate and butter mixture has cooled slightly, you can add it to the egg mixture and stir to combine. Then add in your flour. That’s it. Seriously.
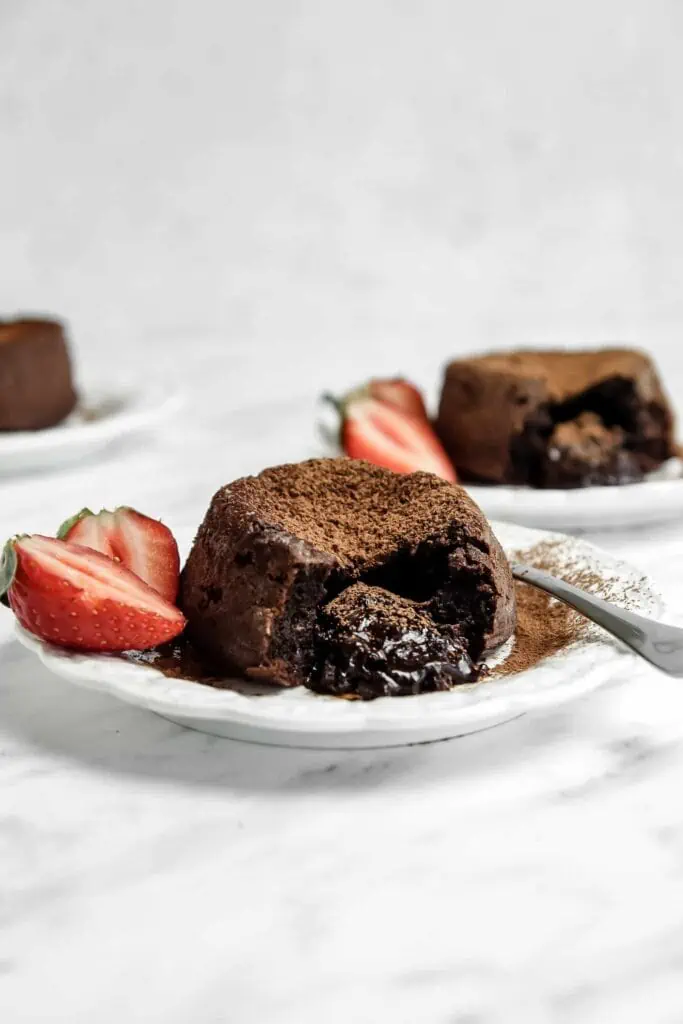
Time To Bake! Are you starting to wonder why you haven’t made these before? Then time to pour into your ramekins. These only take about 7-9 minutes in the oven. Allow them to cool about a minute then invert them onto a plate. The point is that the center of course isn’t baked and flows out like lava when you cut into it.
Note: Below are the step by step instructions on how to make my chocolate lava cakes (the amounts in the photos are doubled compared to this recipe but the instructions are the same).
How Do You Know When A Lava Cake Is Done?
So telling when a lava cake is done can be tricky. Because it is meant to be underbaked slightly so it has that lava center. To tell if your cakes are done:
- The edges of the cakes become firm while the center will still have some jiggle to it.
- A toothpick stuck in the cake – only about a half inch from the edge comes out clean.
- Some of the cakes start to rise above the ramekins with sharp edges protruding. The edges don’t always protrude, but if they do, then that is a sign the cake is done.
Tips For Making These Lava Cakes
- Use good quality chocolate. You really will taste the difference. And I recommend bars over chips. You won’t get as much lava otherwise.
- Prep Your Ramekins! Make sure to grease your ramekins well with butter and dust with cocoa powder so they can be easily released.
- Cool For A Minute. Let the cakes sit for a minute after tipping them upside down. I find that if I immediately tip them out they tend to fall apart. So give them a minute before tipping them over.
- Cool The Chocolate Mixture Slightly. Be careful to let the chocolate mixture cool before adding to the egg mixture or you risk ending up with chocolate scrambled eggs and nobody wants that! You can always temper the eggs, but adding a little bit of the melted chocolate first to the eggs and stirring before adding the rest of it. This helps bring the eggs up to temperature and avoids a scrambled mess!
What Do I Top These Lava Cakes With?
There are so many wonderful ways to enjoy this decadent chocolate lava cake. Here are some of my favorites:
- Whipped cream <– add a couple tablespoons of cocoa powder and make it chocolate whipped cream.
- Ganache – A 2-ingredient chocolate sauce you can drizzle over for chocolate heaven.
- Powdered sugar – Just dust it with a little powdered sugar before serving.
- Ice-cream – A warm chocolate lava cake and a scoop of ice-cream is one of my favorite things in the world.
- Fresh raspberries – I mean chocolate and raspberries, is there anything better?! I think not.
Recipe FAQs
Well when I make them…um…minutes. I mean I want to enjoy them immediately. However…
These can last 1 to 2 days at room temperature. Just make sure they are properly covered so they do not dry out.
Here’s the best part. Yes!
You can make the batter up to day in advance. Place the batter into the molds, and then cover with plastic wrap and store in the fridge until ready to bake. Then let them come to room temperature before baking.
I do NOT recommend baking these ahead of time and then re-heating them. I’ve tried it and all it ends up doing is cooking the center too much. All you will have in the end is a chocolate cake. No lava.
You want to use good quality chocolate here. If you don’t prefer dark chocolate you could use semi-sweet or milk chocolate.
I don’t recommend using chocolate chips. You won’t get as much lava. I prefer and recommend using chocolate bars (sold as 4-ounces) and then chop the chocolate myself. For this recipe you will need 1 and 1/2 bars total. I love using Ghirardelli but other brands work well too – Lindt, Nestle, or Baker’s.
You can freeze them. Allow to cool completely and wrap well. Freeze for up to 3 months. You can reheat in the microwave (you may lose some lava).
You can! Try my regular Chocolate Lava Cakes!

More Recipes To Try
- Self Rising Flour Biscuits
- Lemon Cookies
- Brown Sugar Chocolate Chip Cookies
- 20 Self Rising Flour Recipes
- Milk Bar Cake
Master The Art Of Baking!
Don’t miss out on the chance to elevate your baking skills! Join the Ultimate Baking Bootcamp today and unlock the secrets to creating perfect desserts every time. With expert guidance, step-by-step lessons, and insider tips, you’ll be baking like a pro in no time. Sign up now and start mastering your baking!
Chocolate Lava Cakes For Two
Ingredients
- 1/4 cup (57 g, 1/2 stick) unsalted butter
- 2 ounces bittersweet or semisweet chocolate
- 1 egg room temperature
- 1 egg yolk room temperature
- 2 tablespoons granulated sugar
- 1 Tablespoon flour
- cocoa powder for dusting ramekins
Instructions
- Put the butter in a medium bowl and melt it in the microwave. Add the chocolate to the hot butter and stir until melted. 1/4 cup (57 g, 1/2 stick) unsalted butter 2 ounces bittersweet or semisweet chocolate
- Crack your egg into a bowl, and add the 1 yolk. Add the sugar, and beat or whisk until light and thick, about 1 minute. Add egg mixture and 1 teaspoon flour to the melted chocolate; beat until combined. 1 egg 1 egg yolk 2 tablespoons granulated sugar 1 Tablespoon flour
- Butter and lightly dust with cocoa powder two 4-ounce molds or ramekins (make sure not to miss any spots, or the cakes will stick). Tap out the excess cocoa powder. Divide the batter among the molds. (At this point you can refrigerate them for up to 3 hours; just bring them back to room temperature before baking.)
- When you’re ready to bake, heat the oven to 450°F. Put the molds on a rimmed baking sheet and bake until the cakes have puffed up a bit, the tops are barely set and the cakes still jiggle slightly when shaken, 7 to 9 minutes (better underbaked than overbaked). Let sit for 1 minute.
- Put a plate on top of the ramekin and (with a potholder to protect your hand) carefully invert the cake onto the plate. Let it sit for 10 seconds, then lift up the ramekin. Serve immediately. My preference is a scoop of vanilla ice-cream on top!
Notes
- You can freeze them. Allow to cool completely and wrap well. Freeze for up to 3 months. You can reheat in the microwave (you may lose some “lava”).
- These can last 1 to 2 days at room temperature. Just make sure they are properly covered so they do not dry out.
- Use good quality chocolate. You really will taste the difference.
- Make sure to grease your ramekins well with butter and flour so they can be easily released.
- Let the cakes sit for a few seconds after tipping them upside down.
Nutrition
More Desserts For Two Recipes:
- Easy Chocolate Fondue For Two- Dessert For Two
- Creme Brulee For Two – Boston Girl Bakes
- Mini Oreo Cheesecakes For Two (Home Cooking Memories)
- Chocolate Cherry Cupcakes For Two (Cooking Light)
- Apple crisp for two (Live Well Bake Often)
- Chocolate Chip Cookie Skillet For Two (Fox And Briar)


Hello fellow Bostonian! I’ve been using your recipe for years now. It’s my husband’s favorite dessert and I make it for him on our anniversary. Which is today. We are enjoying this rich delicious right now, and I just want to say thanks!
Hello from Boston! It’s wonderful to hear that the lava cakes have become such a special part of your anniversary tradition. Thank you for sharing this sweet note—it truly warms my heart. Wishing you and your husband a delightful anniversary and many more delicious celebrations!
Not a comment so much as a question…
How do you get the flour to stay in the ramekin without clumping? I tried to shake it out but it clumped on my lava cakes.
Also one came out PERFECTLY goooey inside, and the outside was PERFECT. But my second took MUCH longer for the top to set and it was only a little gooey inside. Did I overfill it? I am just confused and would love some help <3
Hi Danielle, you can always try cocoa powder as well for dusting the ramekins, or just spray the ramekins and skip the flouring. Sounds like one may have had more batter or perhaps just overbaked if it was only a little gooey on the inside. You can check with a toothpick to see if the middle has raw batter but the edges are set. Hope that helps!
Not sure how to give this a like or thumbs up, but thank you so much! I’ll try the Coco powder 🙂
I’m also from Boston, though I live in OK now. I plan on following you. Going to try the creme brulee when I get a kitchen torch! 😀
Thanks again!!
aw wonderful Daniella! I’m so glad you loved this recipe – and hello from Boston to OK 🙂 – and yes you have to try the creme brulee!!
They were delicious but I had trouble with the bottom sticking even after butter and flour. Next time I might try in a silicone muffin pan instead of ramekin.
glad you loved the cakes! And yes let me know how it works with silicone pan 🙂
Do you know if this will work with a gluten free flour?
I dont’ see why not 🙂