
Carmelitas
This Post May Contain Affiliate Links. Please Read Our Disclosure Policy.
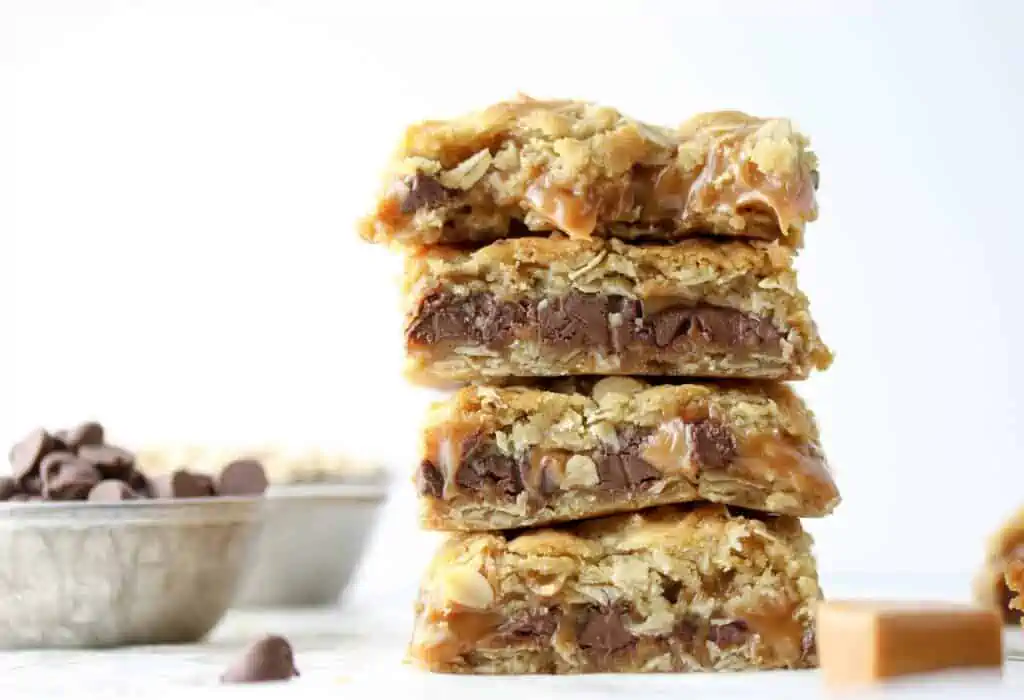
An easy buttery brown sugary chocolate caramel oatmeal bar, known as carmelitas, are layered with salted caramel and milk chocolate chips. You don’t even need a mixer to whip up these milk chocolate oatmeal bars with caramel. This recipe can be made in one bowl and take about 15 minutes or less to prep!

I’m going to get right to the point today friend. These caramelitas bars have everything I love. Salted Caramel. Swoon. Chocolate. Check. Sugar. Check, Check. Simple to throw together. Sweet. Did I mention you don’t even need a mixer for these bars? Like I said, super easy and super delicious.
These chocolate caramel oatmeal bars start with making a simple one bowl oatmeal cookie dough. You will press half into the pan and partially bake. Then drizzle some caramel and chocolate chips over. Top with the remaining dough and finish baking! That’s it! Told you they were easy.
Now you can make your own caramel sauce if you want, use some caramel candies that you can melt down on the stovetop, or just use some store-bought caramel sauce for maximum ease.
Ready To Take Your Baking To The Next Level?
Join the Ultimate Baking Bootcamp and master essential techniques like mixing methods and the why behind every recipe! Whether you’re a beginner or looking to refine your skills, this step-by-step class will help you bake with confidence and create flawless desserts every time. Start your baking journey today!
Why You Are Going To Love These Carmelitas
- Quick Prep – You can whip up these bars in about 15 minutes or less. So when you need a last minute dessert, these are it! And they will always be a huge hit, trust me.
- One Bowl – You can make the entire oatmeal cookie dough for the bars in just one bowl.
- Baked In Less Than 30 Minutes – These bars bake up in less than 30 minutes, so between a quick prep and a quick bake these bars are a perfect last minute dessert.

Where Did Caramelita Originate?
So these bars are known as “caramelitas” or “carmelitas”. Or caramel chocolate caramel bars as I’m going calling them. Basically, these bar are simple and hard to resist. As far as their origin. Google stumped me. And that rarely happens. I couldn’t find where these were made first.
Rumor on the internet has it that people have been making these since the 1960’s. One bite and you will know why. Who cares who made them first. Or where they came from. Just be glad they have come into your life.
Ingredients Needed
- Unsalted Butter – I recommend unsalted butter, but you can also use salted butter just omit the extra pinch of salt.
- Brown Sugar – Light or dark will work.
- Vanilla – I prefer pure vanilla extract, but imitation vanilla will also work.
- Flour – Just regular all-purpose flour is all you need.
- Oats – I recommend using old-fashioned oats for a heartier texture, but quick oats will work.
- Baking Soda
- Salt – I use sea salt for best flavor, but you can use table or kosher as well. but if using salted butter omit.
- Caramel – Homemade caramel sauce, caramel made from caramel candies (included in recipe below), or just use a THICK store-bought caramel sauce. If your store-bought caramel sauce that’s on the thinner side, try stirring in 1 tablespoon flour to thicken.
- Chocolate chips – Milk or semi-sweet chips work fine.
How To Make These Carmelita Bars
The first step is making what will become the bottom and top layer of these bars. You start with melted butter and add brown sugar and vanilla. After they are combined, stir in your flour, oats, baking soda and salt. Told you these were easy to make friend.
Measuring Flour 101
Measuring flour wrong is the biggest mistake beginner bakers make. I always recommend measuring by weight, but if you don’t own a scale then be sure to stir your flour first. Then spoon into your measuring cup and level it off. Do NOT pack it down or you will end up with WAY too much flour in your cup. Too much flour = dry, cakey bar.

Then take half of the flour-oat mixture and spread into a prepared 8 x 8 pan. It’s ok, just eyeball what half is. It’s ok if it’s not perfect. I lined my pan with tin-foil and gave the foil a quick spray, but you can also use parchment paper. If you don’t line the pan, the be sure to grease the pan so you can remove the bars easily.
Can I use a different pan?
If you don’t own a 8×8″ pan, a 9×9″ pan will also work your bars will just not be as thick. If you want you can also double the recipe this and make these in a 9×13″ pan. I used a metal pan, but if you use a glass pan, you will need to bake these slightly longer

Bake this layer for 10 minutes. Then it’s time for the ooey-goodness. On top of the oatmeal layer, cover it with chocolate chips.
You can use milk chocolate chips, semi-sweet chocolate chips, mini or regular sized. You could even use chocolate bars chopped up, or chocolate chunks. Heck, mix it up and use white chocolate chips!

Then pour salted caramel sauce over the chocolate chips. Be sure to leave a slight border, so the caramel doesn’t go right ot the edge or it can stick to the foil and be hard to remove later after baking.

Do I need to make my own caramel sauce?
Now you can go ahead and make your own salted caramel sauce. I made my own. Don’t feel like you need to. But do what is easiest. Sometimes I use a jarred caramel sauce. Sometimes I don’t.
For these bars, I took a shortcut though and made a caramel out of caramel candies and heavy cream. Add a pinch of salt and it’s perfect.

Then take the remaining oat-flour mixture and sprinkle on top. Then bake until the edges are golden brown. Mine took about 18 minutes. I started watching at 15 minutes. You can never be too careful. Nobody likes a burnt bar!
The hard part with these bars is waiting for them to cool. You want to let these cool for 1-2 hours to allow the caramel to set. If you don’t wait, you will end up with a hot sticky mess and caramel all over your fingers. And the bars might not be as pretty looking.
Recipe FAQ’s
Store at room temperature, covered, for 2-3 days. You can also store in the fridge for longer but will want to let soften slightly before serving.
You can freeze caramelita bars for up to 3 months. Be sure to let cool completely and wrap well. Let thaw at room temperature before serving.
If you’re making the quick caramel sauce, you want the soft, chewy square caramels like Werther’s baking caramels, (easiest to unwrap) or Kraft caramels. You don’t want to use hard caramel candies.
Time Saving Tips
- Make These The Day Before! – These bars need time to cool, so I prefer to make these the day before giving them ample time to cool so they are ready for me the next day when I need them.
- Line The Pan – Cutting these can be a big pain if you don’t the line the pan. Take the extra minute to line and spray the pan so getting them out is easy.
- Use Store-bought caramel sauce for fastest prep – If you are really in a bind, use store-bought caramel sauce. Just make sure it’s a THICK caramel sauce. If it’s too thin, try stirring in 1 tablespoon flour to thicken. If you do want to make the caramel from candies, I recommend the Werther’s soft caramels, as they are the easiest and quickest to open.
More Recipes To Try
If you’re craving more desserts using oats, be sure to try my easy peanut butter oatmeal cookies. The dough doesn’t require any chilling!
Or try my easy apple crisp recipe! I love making a caramel apple crisp or apple cranberry crisp version too!
Master The Art Of Baking!
Don’t miss out on the chance to elevate your baking skills! Join the Ultimate Baking Bootcamp today and unlock the secrets to creating perfect desserts every time. With expert guidance, step-by-step lessons, and insider tips, you’ll be baking like a pro in no time. Sign up now and start mastering your baking!

Carmelitas
Ingredients
Oatmeal bars
- ¾ cup (1 1/2 sticks, 170 g) unsalted butter melted
- ¾ cup (160 g) packed light brown sugar
- 2 teaspoons vanilla extract
- 1 cup (120 g) all-purpose flour
- 1 cup (100 g) old fashioned oats
- 1 teaspoon baking soda
- ½ teaspoon salt
- 1 ¼ cups semi-sweet chocolate chips
Caramel sauce
- 35 caramel candies *see note
- ½ cup (120 ml) heavy cream
- ⅛ teaspoon salt
Instructions
Make cookie dough
- Prep oven and pan. Preheat oven to 350°F (180°C). Line an 8×8-inch pan with aluminum foil or parchment paper and spray with cooking spray. Lining your pan is highly recommended for ease of cleanup due to the stickiness of the caramel; set pan aside.
- Combine wet ingredients. In a large mixing bowl, whisk together the melted butter, brown sugar, and vanilla until smooth. ¾ cup (1 1/2 sticks, 170 g) unsalted butter ¾ cup (160 g) packed light brown sugar 2 teaspoons vanilla extract
- Add dry ingredients. With a wooden spoon or spatula stir in the flour, oats, baking soda, and salt, and stir until combined. Mixture will be thick. 1 cup (120 g) all-purpose flour 1 cup (100 g) old fashioned oats 1 teaspoon baking soda ½ teaspoon salt
- Bake half of the dough. Add half of the mixture to the prepared pan and smooth the top. Set the remaining dough aside. Bake in a preheated 350°F for 10 minutes.
Make the caramel
- Combine caramels and cream in a medium saucepan, and heat over medium-low heat to melt, stirring nearly continuously, until mixture can be stirred smooth. Remove from heat and stir in salt. Set aside. 35 caramel candies ½ cup (120 ml) heavy cream ⅛ teaspoon salt
Finish assembling bars
- After 10 minutes, remove pan from the oven and sprinkle with the chocolate chips. Slowly pour the caramel sauce over the chocolate, leaving a small border to the edge. The caramel has a tendency to stick to the foil, so I make sure to not spread the caramel right to the edge. Crumble the remaining oatmeal cookie dough over the top. 1 ¼ cups semi-sweet chocolate chips
- Finish baking. Return pan to oven and bake for about 15-18 minutes, until edges are lightly browned and center is bubbling slightly. If using a glass pan, your bars may take slightly longer.
- Allow to cool. Allow bars to cool for 1-2 hours completely in the pan before slicing and serving to allow the caramel time to firm up. (Time may vary on cooling, and may take longer). You can speed up the process and cover the bars and place in the fridge.
Notes
- Storage – Store at room temperature for up to 2-3 days, covered.
- Freezing – You can freeze for up to 3 months. Be sure to cool completely and wrap well. Then thaw at room temperature before serving.
- Pan size – You can use a 9×9 pan but they won’t be as thick. Or double the recipe and bake in a 9×13 pan. You will need to bake these longer, 20-25 minutes. If baking in a glass pan, increase baking time slightly.
- Caramel – You want to use soft, chewy caramels (Werther’s chewy caramels are easiest to open, or Kraft caramels also work). Do not use hard caramel candies. If you don’t want to make your own caramel, then use 3/4 cup of store-bought caramel. The thicker the better. Different brands may lend different results in thickness and flavor of caramel. If yours is too thin, try stirring in 1 Tablespoon flour.
- Oats – I prefer old-fashioned, but quick oats will also work but will lend a slightly powdery texture and different consistency.
- Butter – I use unsalted but if using salted butter, then omit the extra salt.


Can gluten free flour be used in this recipe?
I haven’t tried but I don’t see why not!
To tell you the truth, we have never heard of these caramelita bars before, however it is checking all of our favorite flavors for sure. Chocolate Check👍 Caramel Check!👍 super yummy Check!😋🥰👍👌🙏
These bars are amazing! I misplaced a similar recipe that I had so I was so glad when I stumbled upon your recipe. Thanks for sharing it.
thanks Amy glad you loved them!
I wish I had known about caramelitas before, so easy to make and so delicious! My new favourite go to quick dessert!
This is my new favorite recipe! Made it yesterday and it’s already all gone! My hubby asked me to make them again this weekend 😉
These caramelitas look amazing! They remind me of my favorite chocolate caramel bars I buy so I’m excited to make my own at home!
Anything one-pan and I’m in! These were so easy and so good, especially with your salted caramel recipe 😉
I’ve never heard of this before, but you had me at salted caramel, chocolate and oats! What a great combo, the kids ate it up and asked for more!
I am seriously craving these right now. Can’t wait to make them again soon!
I’m gonna be honest here…I don’t even have much of a sweet tooth but I was drooling over this post. Those photos are so enticing and the recipe sounds easy even for people who may not be expert bakers. Thanks for this great recipe!
aw thanks Bernice!
I love quick and easy desserts which is why had to try these. And these caramelitas turned out amazing!
that’s awesome to hear Qashang!
I love that these only take 15 minutes to prep! I can’t wait to make them over the weekend!
These turned out SO yummy! I froze some so I could enjoy some treats later 🙂
Glad you loved them..and freezing is so smart!
These bars were a huge hit at my house!! Everyone loved it!
aw glad to hear!
These are so delicious and so so easy! Love bar recipes and will definitely make these gems again!
Where have these been my whole life?! Delish!