
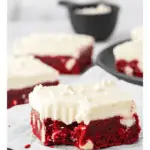
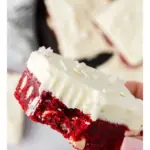
Red Velvet Bars
This Post May Contain Affiliate Links. Please Read Our Disclosure Policy.
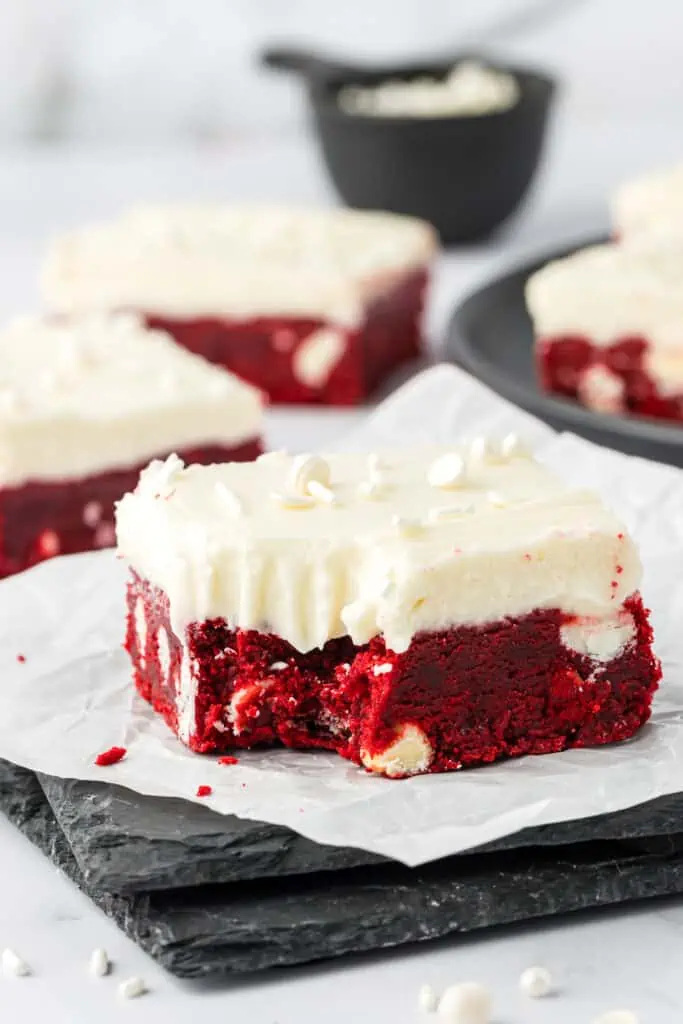
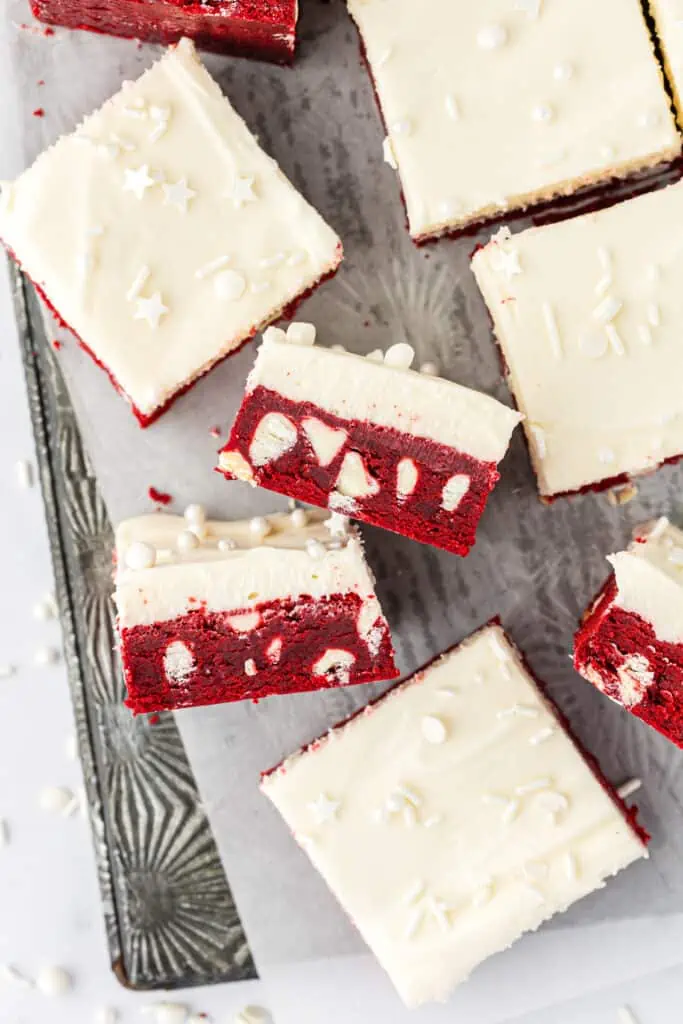
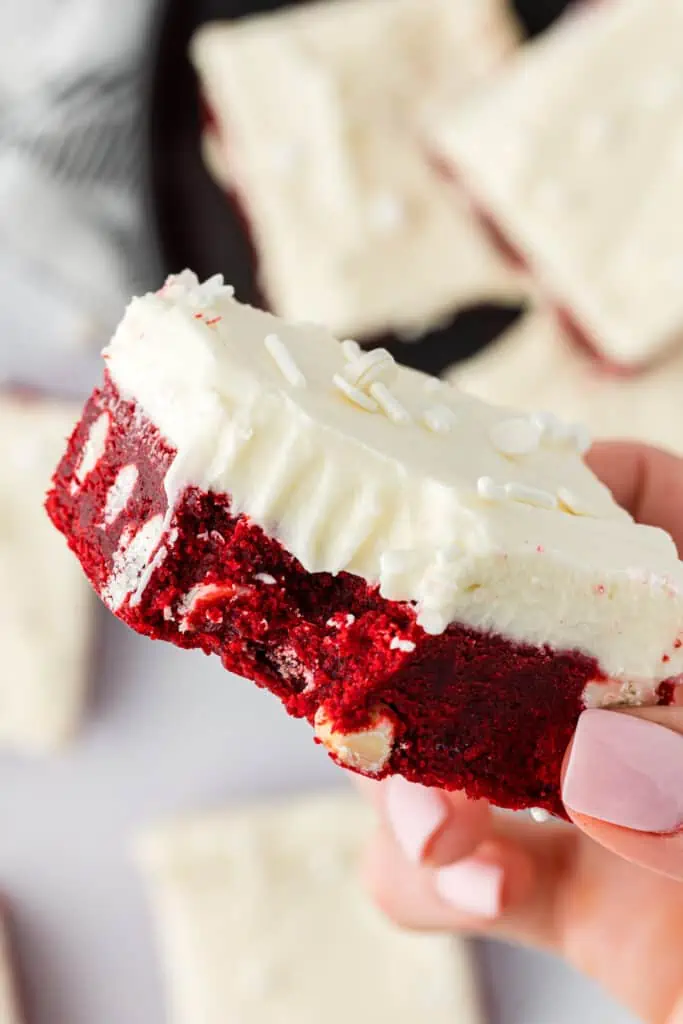
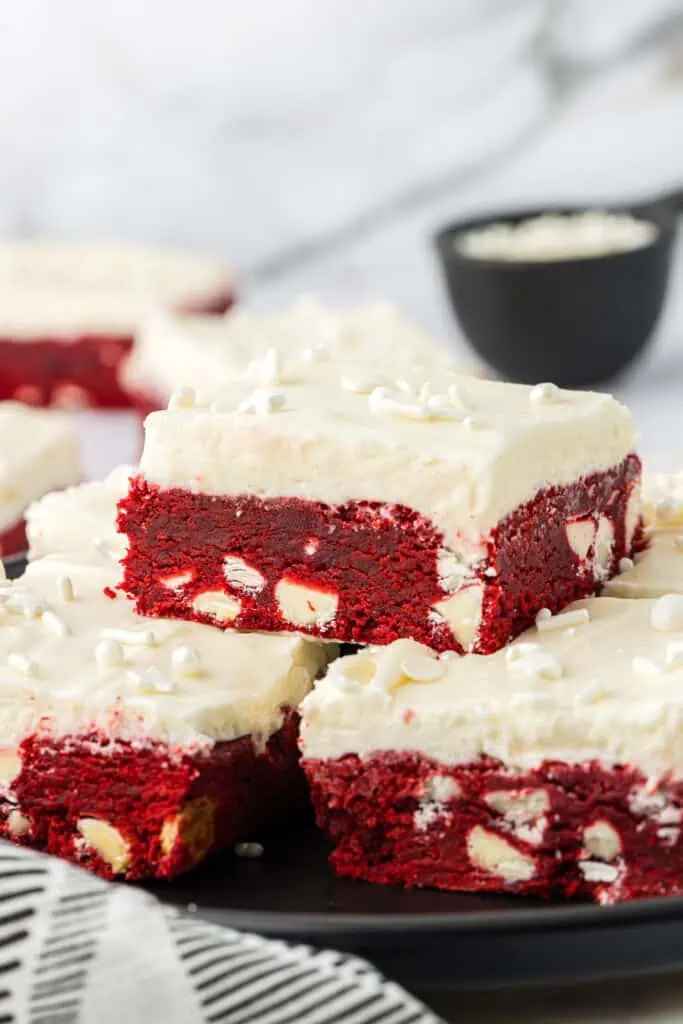
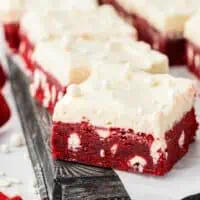
These red velvet bars are made with white chocolate chips and a tangy cream cheese frosting on top. They are like a soft sugar cookie bar made with a hint of cocoa powder perfect for Valentine’s Day, Christmas or whenever you need a pretty treat to eat.
So now that Christmas is over I’m already thinking of Valentine’s Day (don’t hate me please for this I can’t help it). So that means diet season is over right and we can move into Red Velvet season right? Please tell me you agree.
I was so excited to remember I had a couple bottles of red food coloring (sorry purists) that I had bought back during the Christmas baking season to make my red velvet cake that I had never used.
I’ve been trying to cut down my expenses lately and how much I spend on baking supplies was one of them. Believe me it’s hard. Really hard to do. Obviously I love to bake. And I tend to go way overboard at the grocery store.
So how pumped was I when I realized I had some red food coloring and also some cream cheese in the fridge. So these red velvet bars were destiny if you ask me. Please don’t tell me I’m being dramatic. I mean we’re talking red velvet friends.
Because let’s face it, red velvet desserts always need a thick layer of cream cheese frosting on top. Don’t you think so? I love a good bar recipe. So easy to make. Quick to throw together. You really can’t go wrong.
I was originally thinking red velvet cupcakes. But been there done that. And I love trying out a new recipe and also putting my twist on it. So when I came across this recipe from Epicurious I knew I needed to make them.
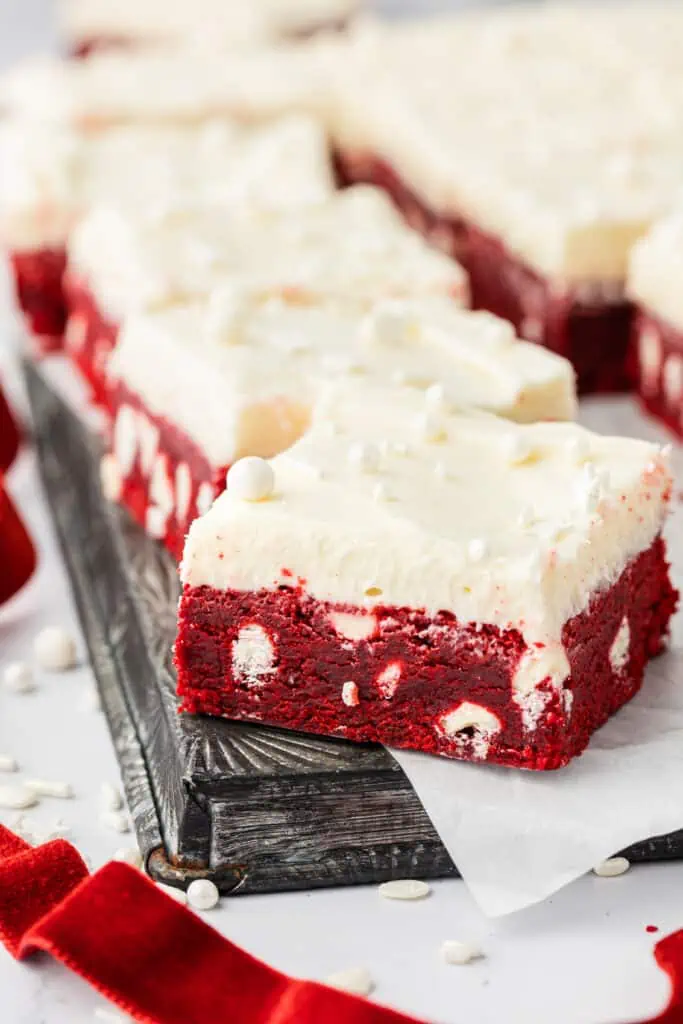
These red velvet bars have the texture of a good vanilla sugar cookie, but with the hint of cocoa that a true red velvet recipe should have! And the homemade cream cheese frosting of course completes it.
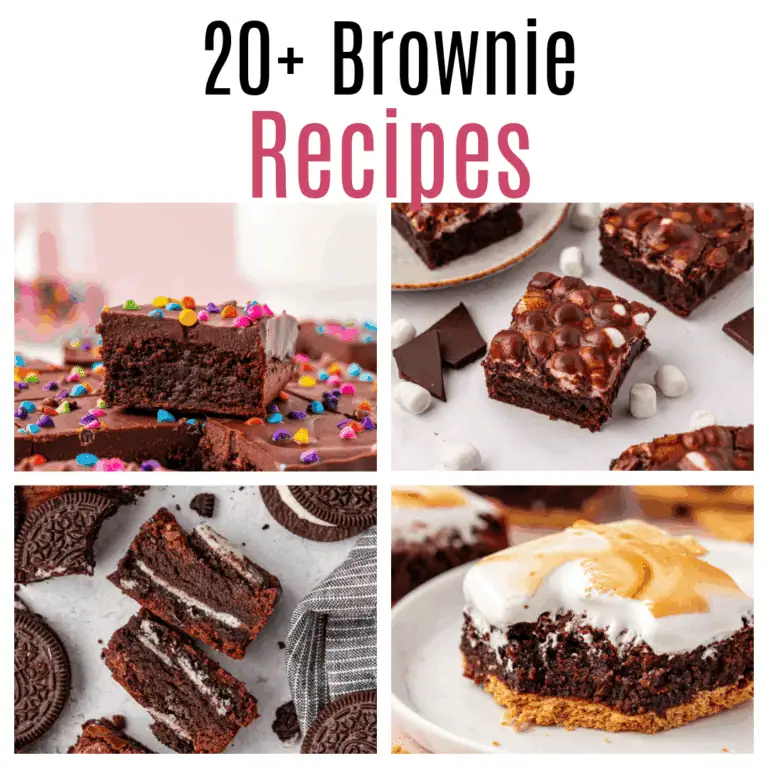
If you’re always the one bringing dessert to the 4th of July celebration, check out this roundup of 50 patriotic desserts for all your family and friend get-togethers!
Ready To Take Your Baking To The Next Level?
Join the Ultimate Baking Bootcamp and master essential techniques like mixing methods and the why behind every recipe! Whether you’re a beginner or looking to refine your skills, this step-by-step class will help you bake with confidence and create flawless desserts every time. Start your baking journey today!
See Also:
- One of my all time favorite desserts are these lemon bars! They are made in one bowl so clean up is a breeze!
- When it’s summertime, then it’s time grab some marshmallows and make these delicious, easy S’mores bars!
- These key lime bars are so easy to make and readers just love them! See for yourself!
Note: The entire recipe, with ingredient quantities and recipe directions can be found at the bottom of the page. Scroll to the bottom or click “Jump To Recipe” button at the top of the post.
Ingredients Needed
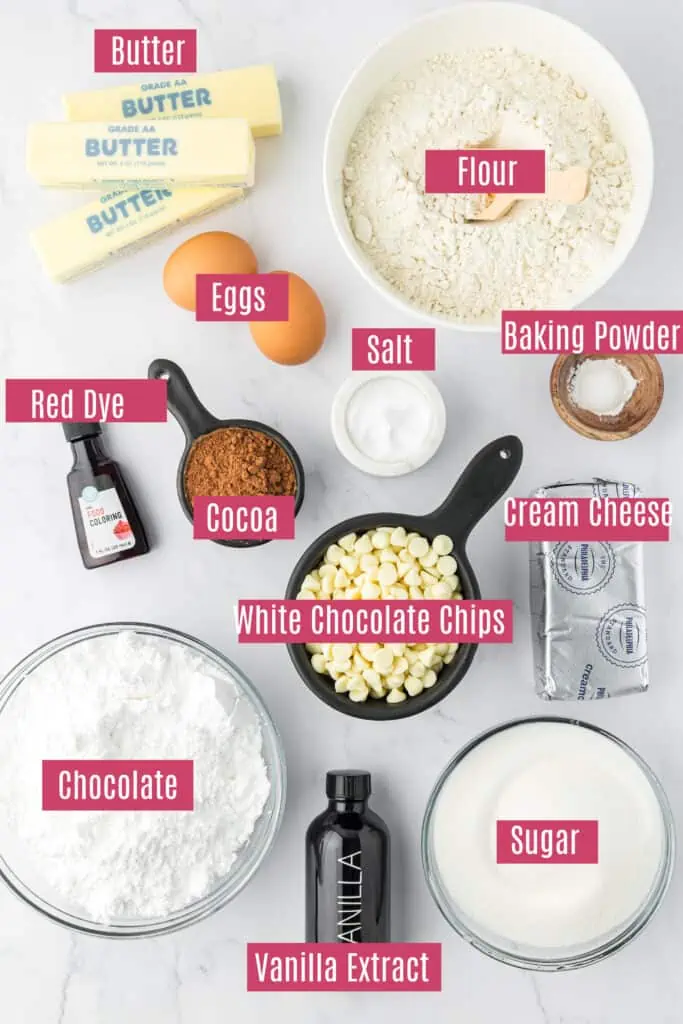
Essentially these bars are a simple sugar cookie bar but made red velvet with a little cocoa powder. Here are the ingredients you will need for the bars.
For the red velvet cookie bars:
- Flour – You will need all purpose flour for this recipe. Make sure you measure it correctly by either weighing your flour with a scale or by spooning it into a measuring cup and leveling it off (don’t pack it down.) You can read more here about How To Measure Flour
- Salt – Not all salt is created equally. I generally use table salt in my recipes. You can read more here about the The Role Of Salt In Baking
- Baking Powder – This is a leavening agent that will help your bread rise. Make sure it’s not expired by testing a spoonful in a bowl of hot water to see if it bubbles. You can read more here about Baking Powder vs. Baking Soda.
- Cocoa powder – You want to use unsweetened cocoa powder in this recipe, not dutch process as that would react differently. You can read more here about Natural Cocoa Vs Dutch Process Cocoa Powder
- Unsalted butter – You want to use unsalted butter for this. Not all brands use the same amount of salt in their salted butter so you could end up with a dessert that’s too salty. You can read more here about Unsalted Butter Vs. Salted Butter In Baking
- Sugar – I’ve started using organic cane sugar in my recipes! I love the hint of natural molasses flavor it imparts. The sugar will be creamed with the butter, which will help to aerate the butter. You can read more here about What Is The Creaming Method?
- Eggs – Make sure the eggs are room temperature before using. Place them in a bowl of warm water for 10 minutes before using. Learn more about how to bring eggs to room temperature here.
- Vanilla extract – Pure vanilla extract is always the best!
- Red food coloring – I love red velvet desserts but I’m not a big fan of the fake red dye stuff. Thank goodness they now have wonderful natural dye options. I used Watkins natural food coloring for these bars.
- White Chocolate Chips– These are optional, and you could always omit them. Or add chocolate chips, and I’ve even added Oreos before!
For the frosting:
- Cream cheese – I recommend using full-fat for the best flavor and richness. Make sure the cream cheese has been softened o it can mix it easily with the butter. You can read more here about easy ways to soften cream cheese quickly.
- Unsalted butter – Make sure it’s softened so it can blend with the cream cheese. Read more here about how to soften butter.
- Powdered sugar – Of course to sweeten and blend in easily to make for a smooth frosting. If you have run out, you can make your own homemade powdered sugar!
- Vanilla – For flavor! And pure is best since the frosting is not cooked and flavor will stand out.
How Do I Make Red Velvet Bars?
Start by preheating your oven to 350oF (180oC). And then prepare your 9×13 baking pan. I like to line mine with parchment paper and spray it with non-stick spray so that the bars easily lift out and are easy to cut.
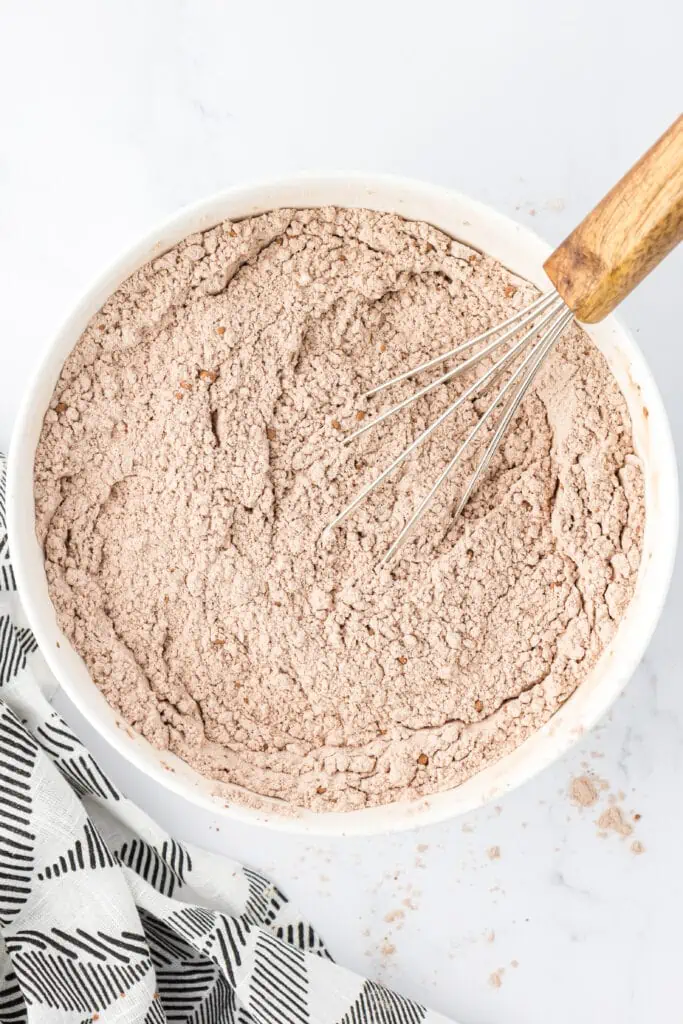
Next you will want to combine your dry ingredients. In a medium bowl whisk together the flour, cocoa powder, salt, and baking powder then go ahead and set that aside.
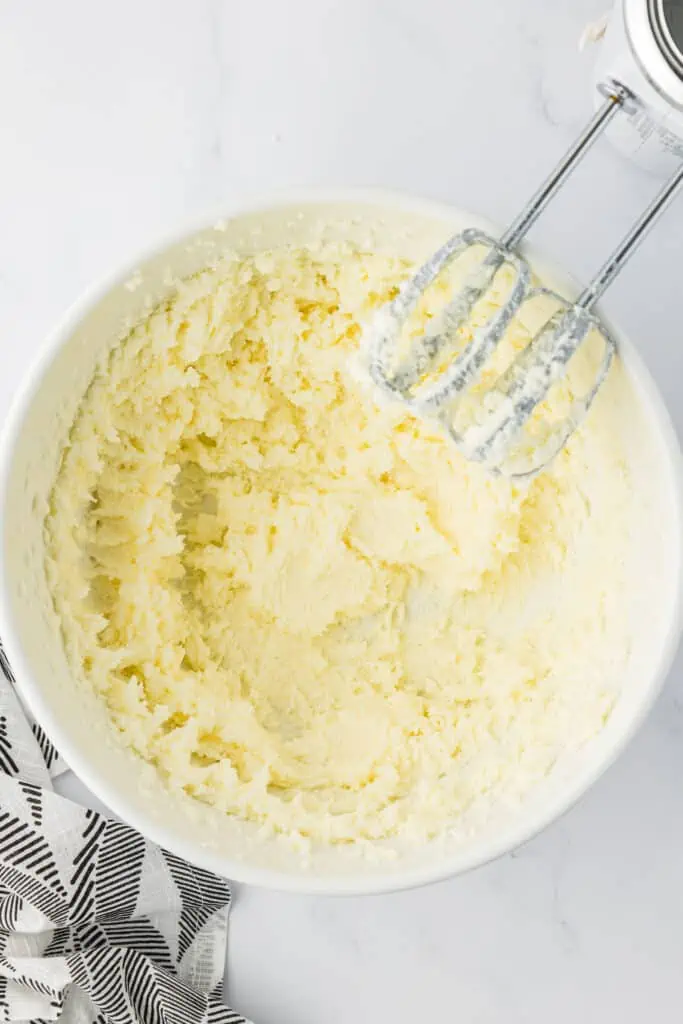
In a mixing bowl, cream together 1 cup butter softened and sugar until light and creamy. About 2-3 minutes on medium speed. Make sure to scrape down the bowl as needed.
You want to make sure your butter is softened, but not too much! Your butter shouldn’t be melted at all. When you indent your finger into the butter, there should still be some resistance. It’s important to cream your butter properly to aerate the ingredients and provide the best lift.
I like to make these bars in my stand mixer fitted with a paddle attachment but you could use any electric mixer you have like a regular hand mixer.
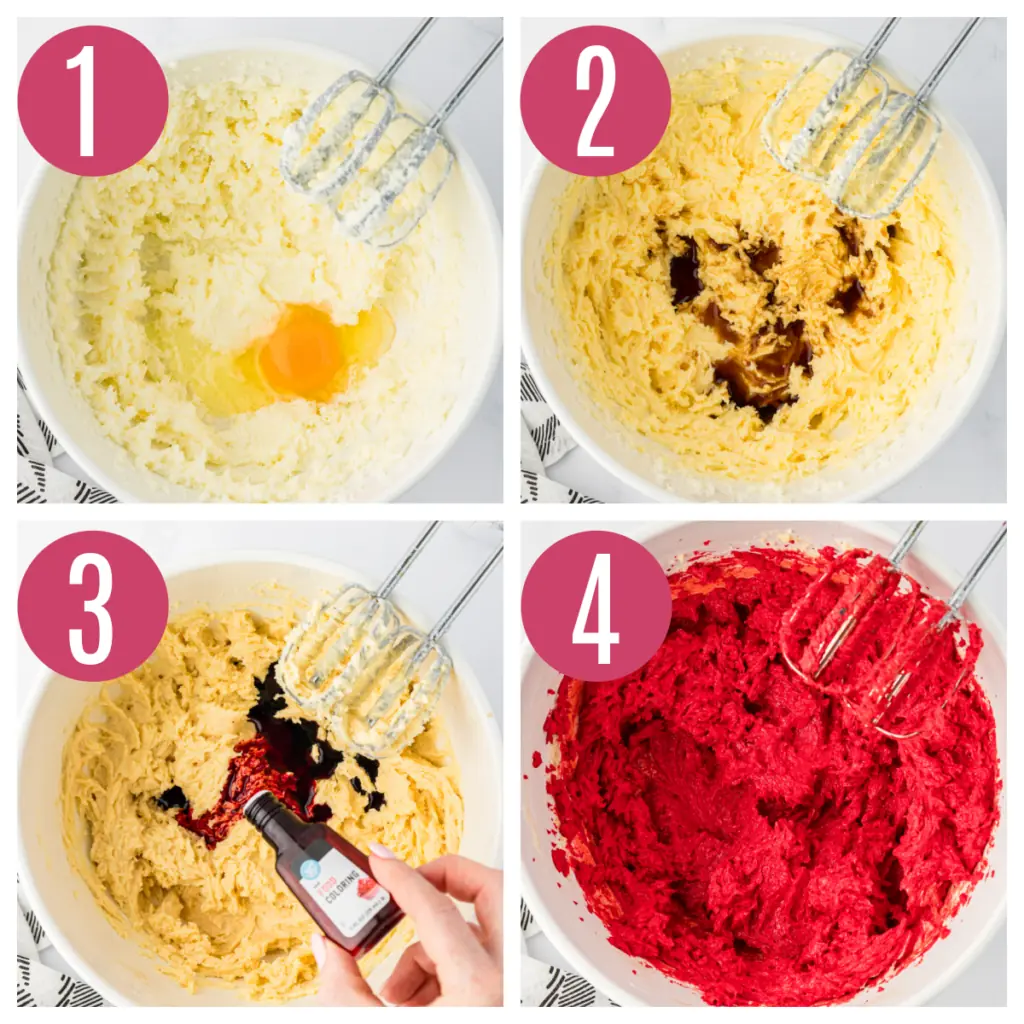
Beat in the eggs, vanilla, and food coloring until combined. If you are using traditional food coloring then yours will be more red than mine.
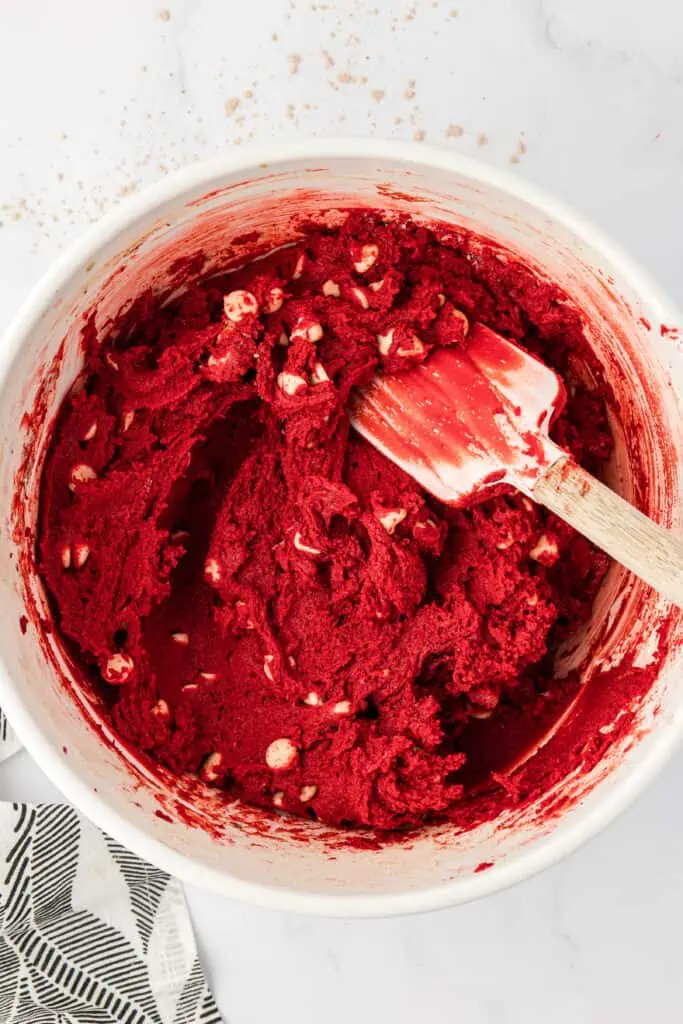
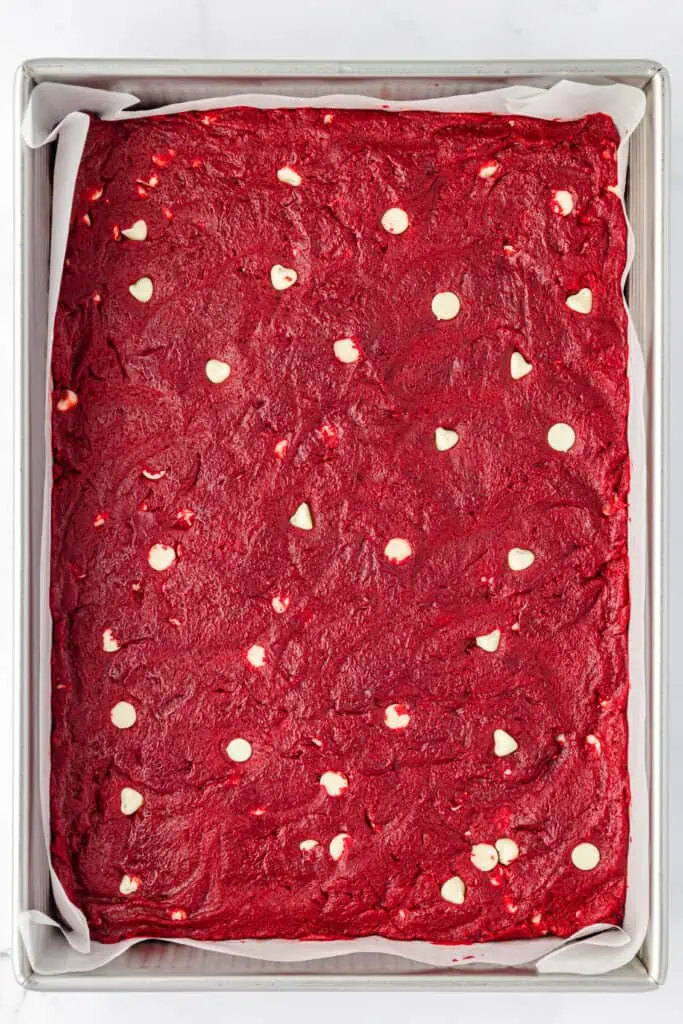
Add the flour mixture until a soft cookie dough forms. Add in the white chocolate chips if using. At this point make sure to not overmix. I like to fold mine in with a spatula.
Press the cookie dough into the bottom of the 9×13 baking dish. Then go ahead and bake!
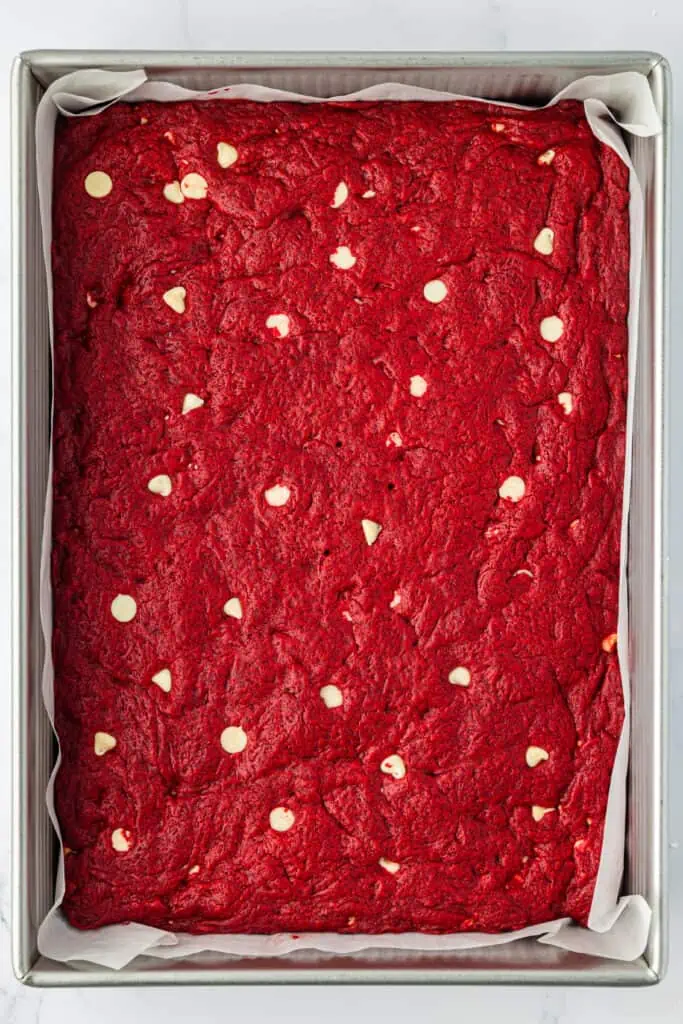
You will want to bake these bars for about 20 minutes until the edges start to pull away from the sides of the pan and a toothpick entered into the center comes out clean. Allow to cool completely before frosting.
Cream Cheese Frosting
While the bars are cooling it’s time to make the frosting (what might be the best part). I really think red velvet desserts are not complete without a cream cheese frosting. Like my red velvet cupcakes or red velvet layer cake!
And the best part is the frosting is just four ingredients and can be easily mixed up with a mixer. You can use a hand mixer or stand mixer (whatever you fancy!)
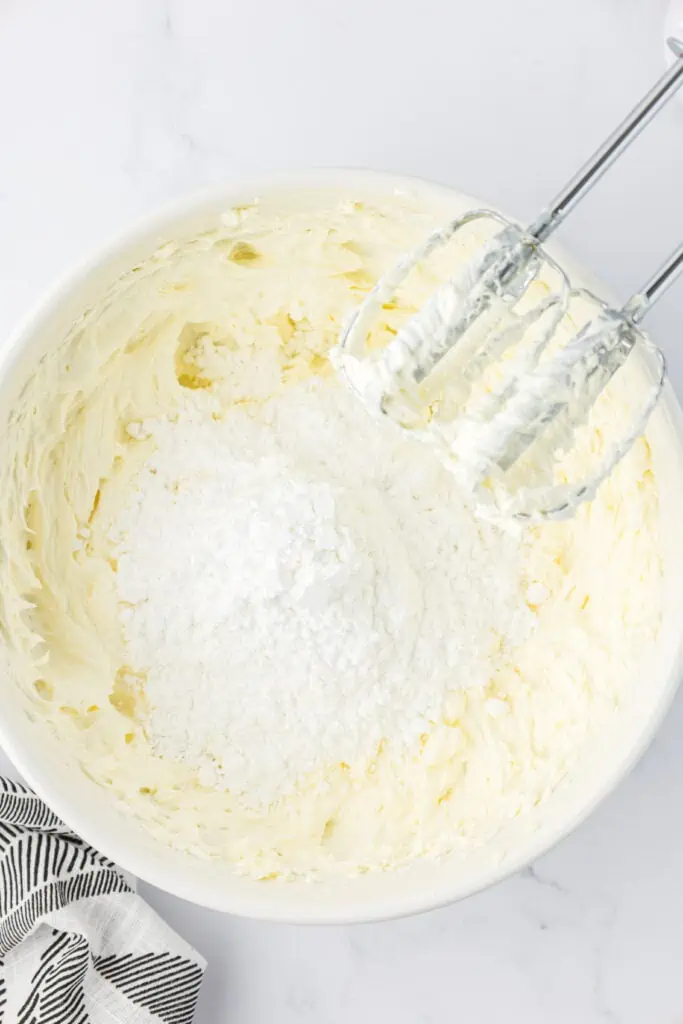
You’ll start by beating together the butter and sugar in your bowl. Then add the powdered sugar in gradually on low speed (unless you love powdered sugar all over your kitchen). And last don’t forget your vanilla extract! Easy peasy. And then it’s time to frost.
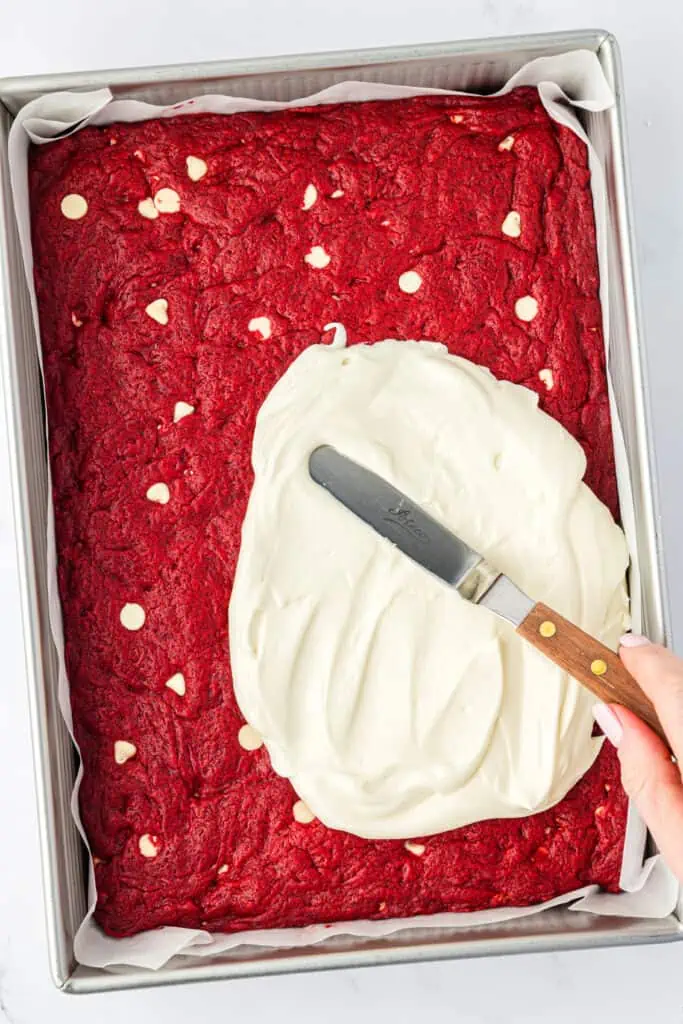
I like to use an offset spatula for frosting these bars.You get a nice smooth finish on top!
Recipe Tips
- Line your baking pan– You want to line your 9×13 baking pan with parchment paper and spray lightly with a cooking spray. When making bars or brownies, I really do recommend taking this extra step. It makes removing the bars so ridiculously easy and cutting them into squares.
- Bring your ingredients to room temperature– Your butter and eggs need to be at room temperature. Softened in the recipe is not just for kicks. It matters. If you forget to bring the butter and eggs to room temperature (basically ME all the time) then you have a couple options. For the butter, there are 3 different ways I used to soften my butter fast. For the eggs, place them in warm (not hot) water for about 10 to 15 minutes.
- Don’t overcream the mixture. I cream for 2-3 minutes on medium speed. If you continue to continue cream this will result in a cakier texture.
- Do not overmix. Make sure you don’t continue to mix the batter once the flour is added or it will result in a tough texture.
- Wait to cut and frost them. You want to make sure to not frost these while warm as the frosting will melt. And then make sure to wait to cut them as well (if you’re not frosting them) as it makes for easier, cleaner cuts.
Recipe Variations
- Chocolate Chips – I added white chocolate chips but you can swap and use regular semi-sweet chocolate chips.
- Add Oreos – I made a version of these with chopped up Oreo cookies and wow what a hit!
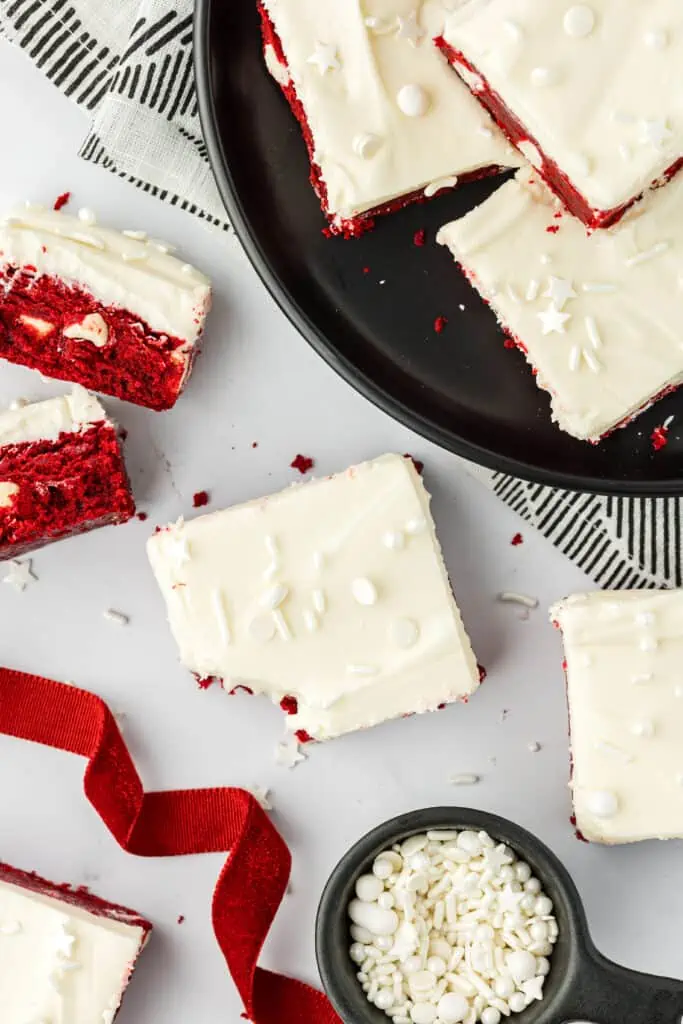
- Add sprinkles – You can add sprinkles to the top of the bars for a fun festive treat any time of year. For Christmas I like to add red and green sprinkles on top.
Allergy Swaps
- Gluten Free: Use a 1:1 gluten free flour – like King Arthur Flour measure for measure. I have been also using GF Jules gluten free flour blend lately with great success (no grittiness!). You will also want to use a gluten free baking powder and gluten free vanilla extract.
- Dairy Free: You will want to use a dairy free (aka vegan) butter and cream cheese. I like Miyokos but Earth Balance will work just fine (I’m just not a huge fan of the taste).
- Lactose Free: Green Valley makes wonderful lactose free butter and cream cheese you can use in the dough and frosting!
- Vegan: I haven’t tested as a vegan cookie bar yet, but with 2 eggs I think it could be done to replace with 2 flax eggs.
- Egg Free: Again, I haven’t tested as an egg free cookie bar but you could try replacing with 2 flax eggs.
Recipe FAQs
Because of the frosting I recommend storing these covered in your fridge for up to 4 days. You can also try freezing these as well for up to 3 months. Be sure to let them cool completely then freeze solid (I do this on a cookie sheet for an hour) then transfer to a freezer bag or airtight container. You can thaw overnight in the refrigerator or at room temperature quickly before enjoying. Check out my freezer baking guide for more help!
Nope you don’t! You can omit them. Just as tasty, but will be a muddy, light brown color. I also have used a natural red food dye with great success (the just won’t be as vibrant of a red color). I have used Watkins food coloring before with success.
I haven’t tried in a smaller pan, but you can always cut the recipe in half and bake in an 8×8 or 9×9 baking pan.
More Red Velvet recipes
If you’re craving more red velvet, then make sure to check out my:
Try My My Most Popular Recipes!
- Self Rising Flour Biscuits
- Lemon Cookies
- Brown Sugar Chocolate Chip Cookies
- 20 Self Rising Flour Recipes
- Milk Bar Cake
Master The Art Of Baking!
Don’t miss out on the chance to elevate your baking skills! Join the Ultimate Baking Bootcamp today and unlock the secrets to creating perfect desserts every time. With expert guidance, step-by-step lessons, and insider tips, you’ll be baking like a pro in no time. Sign up now and start mastering your baking!
Red Velvet Bars
Ingredients
For the bars
- 3 ⅓ cups (400 g) all purpose flour spooned and leveled
- ¼ cup (25 g) unsweetened cocoa powder
- ½ teaspoon salt
- 1 teaspoon baking powder
- 1 cup (2 sticks, 226g ) unsalted butter softened
- 1½ cups (300 g) granulated sugar
- 2 large eggs room temperature
- 2 teaspoons vanilla extract
- 2 Tablespoons (one 1-ounce bottle) red food coloring
- 1 cup (170 g) white chocolate chips
For the frosting
- 8 ounces cream cheese softened
- 1/2 cup (1 stick, 113 g) unsalted butter softened
- 3 cups (340 g) powdered sugar
- 2 teaspoons vanilla extract
Instructions
Make the cookie bars
- Preheat oven to 350°F/180°C. Lightly grease or line 9×13 baking pan with parchment paper.
- In a medium bowl, whisk together flour, cocoa, salt, and baking powder. Set aside.
- In a stand mixer fitted with paddle attachment, or you can use a hand mixer, on medium high speed, cream together butter and sugar until light and fluffy, about 2-3 minutes.
- Add in eggs, one a time, and beat until thoroughly combined. Beat in vanilla, and food coloring until combined.
- Add the flour mixture until a soft dough forms. With a wooden spoon, or spatula, stir in the white chocolate chips to combine.
- Press the cookie dough into the bottom of the prepared pan into an even layer.
- Bake for about 20 minutes until the edges start to pull away from the sides and a toothpick entered into the center comes out clean Remove from the oven and allow to completely cool in pan before frosting.
Make the cream cheese frosting
- In a mixing bowl, beat together the cream cheese and butter until smooth and combined, about 2-3 minutes.
- Slowly add the powdered sugar and beat to combine on low speed. Scrape down bowl as needed.
- Add vanilla and beat to combine.
- Frost the top of the bars and enjoy!
Notes
- Make ahead/Storage: Because of the cream cheese frosting, I like to store these covered in the fridge for up to 3 days. Bring to room temperature before serving, so frosting has time to soften.
- Freezing: You can also freeze baked bars for up to 3 months. Thaw at room temperature before serving.
- White chocolate chips: You can swap the white chocolate chips for semi-sweet or milk chocolate chips. Or try stirring in some M&M’s or crushed Oreo cookies!
- Gluten Free: Use a 1:1 gluten free flour – like King Arthur Flour measure for measure. I have been also using GF Jules gluten free flour blend lately with great success (no grittiness!). You will also want to use a gluten free baking powder and gluten free vanilla extract.
- Dairy Free: You will want to use a dairy free (aka vegan) butter and cream cheese. I like Miyokos but Earth Balance will work just fine (I’m just not a huge fan of the taste).
- Lactose Free: Green Valley makes wonderful lactose free butter and lactose free cream cheese you can use in the dough and frosting!
- Vegan: I haven’t tested as a vegan cookie bar yet, but with 2 eggs I think it could be done to replace with 2 flax eggs.
- Egg Free: Again, I haven’t tested as an egg free cookie bar but you could try replacing with 2 flax eggs.
- Red Food Coloring: You can always use a natural red food coloring (the bars won’t be as vibrant). I’ve used Watkins food coloring with success.


I’m not much of a baker but this is one recipe I always enjoy making! Easy to follow directions and comes out perfectly every time!
Thank you! I’m so glad you enjoy making the recipe and find it easy to follow! 😊
I made these red velvet bars for dessert last night and they were delicious! Definitely a new go to dessert!
Thank you! I’m so happy to hear they were a hit and have become a new go-to dessert!
OMG so gorgeous! And so much easier than a full on red velvet cake!
Thank you! I’m glad you found them gorgeous, they are definitely easier than baking a full cake!
These red velvet bars were utterly delicious. And the creamy topping was unbeatable!
Thank you, I’m so glad you enjoyed the red velvet bars!
These bars are a mashup of all the best things! My kids loved them.
Thank you! I’m so happy to hear your kids loved the bars!
These are delicious!! Great recipe!
aw thank you Michelle!!