This Post May Contain Affiliate Links. Please Read Our Disclosure Policy.
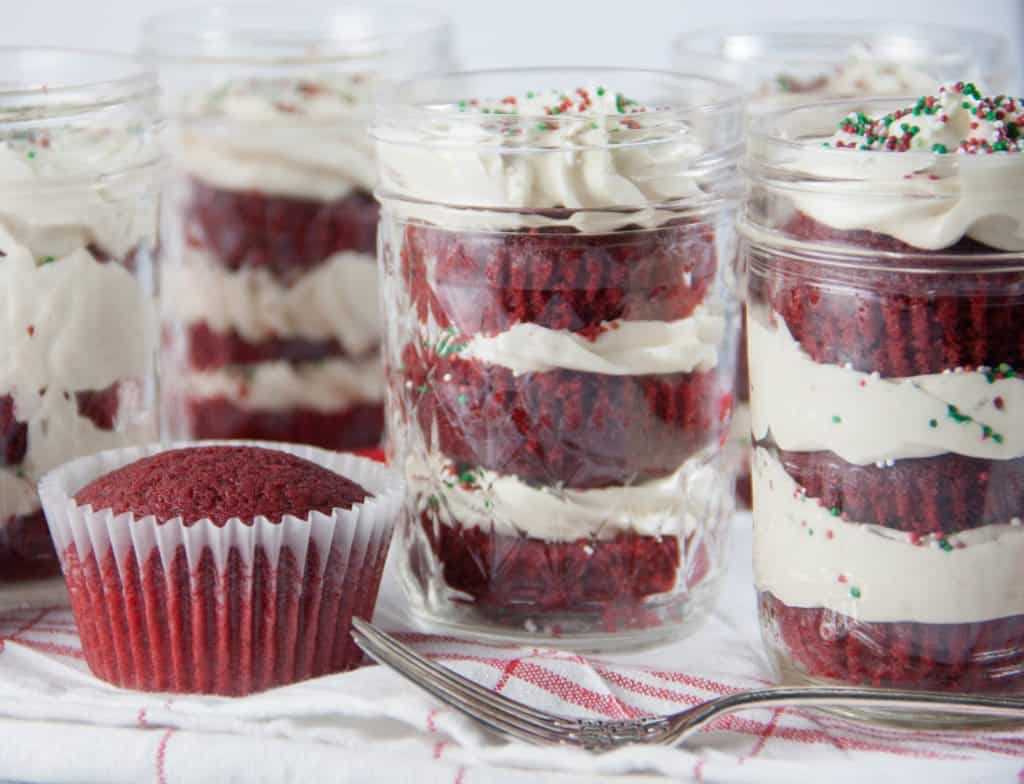
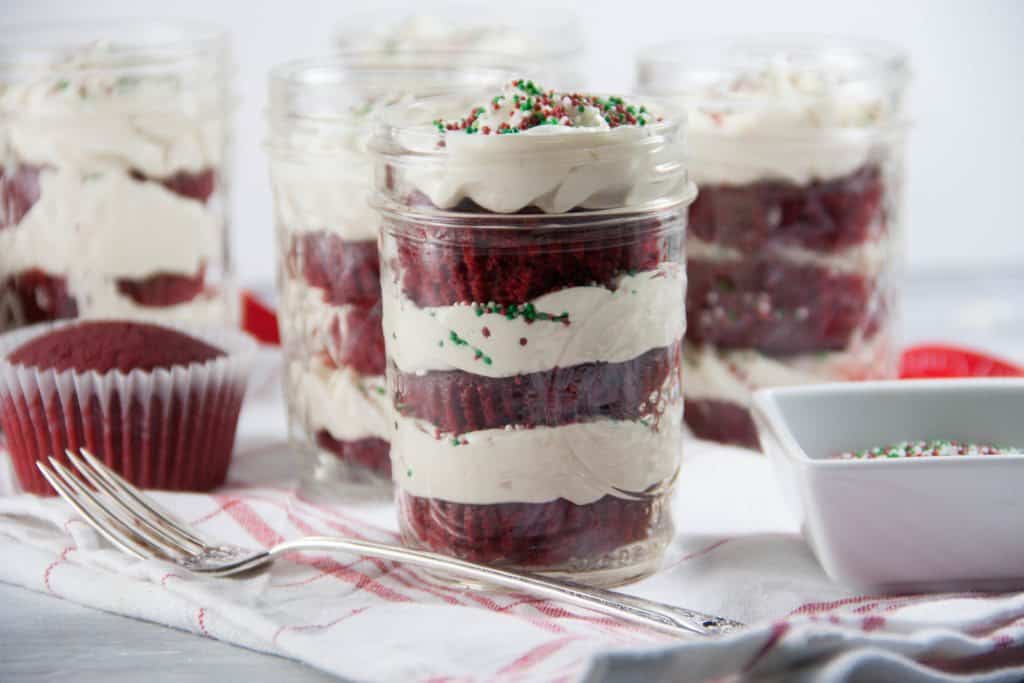
This red velvet cupcakes in a jar are easy to make and even easier to transport! They have a creamy cheese frosting in a fun mason jar- add sprinkles to make them super festive!
When it comes to bringing scratch made desserts to get togethers, sometimes it can be downright stressful. Traveling with those desserts, wondering if they will still look the same way you made them and carried them out of your house.
I’ve tried my fair share of cupcake holders too and only be disappointed.
My solution for you? Red velvet cupcakes in a jar. I used my red velvet cupcakes recipe with my favorite cream cheese frosting to make these jars and then topped them with some fun holiday sprinkles. Yes the holidays just got more fun.
What Is jar cake?
A jar cake, or mason jar cupcakes (whatever you call them!) are a genius way to enjoy your dessert. You layer the red velvet cake with the frosting into cute mason jars.
I baked mine as cupcakes so they were a perfect fit. You just need to cut them in half and layer with your frosting. I mean cake and frosting on repeat? Yes please.
Are red velvet cupcakes just chocolate?
Red velvet cupcakes, or red velvet cake, are sometimes confused as just simply a “chocolate cake”, but it’s definitely not! Although cocoa powder is added, it’s a small amount. It is a buttermilk based cupcake with a hint of cocoa, and of course red food coloring added in.
Before food coloring was added, during World War II, because foods were being rationed bakers used boiled beets to enhance the color of their cakes and also to help retain moisture.It wasn’t until the 1920s, that a man was trying to sell more vanilla extract and food dye that the supposed original Red Velvet Cake was born. 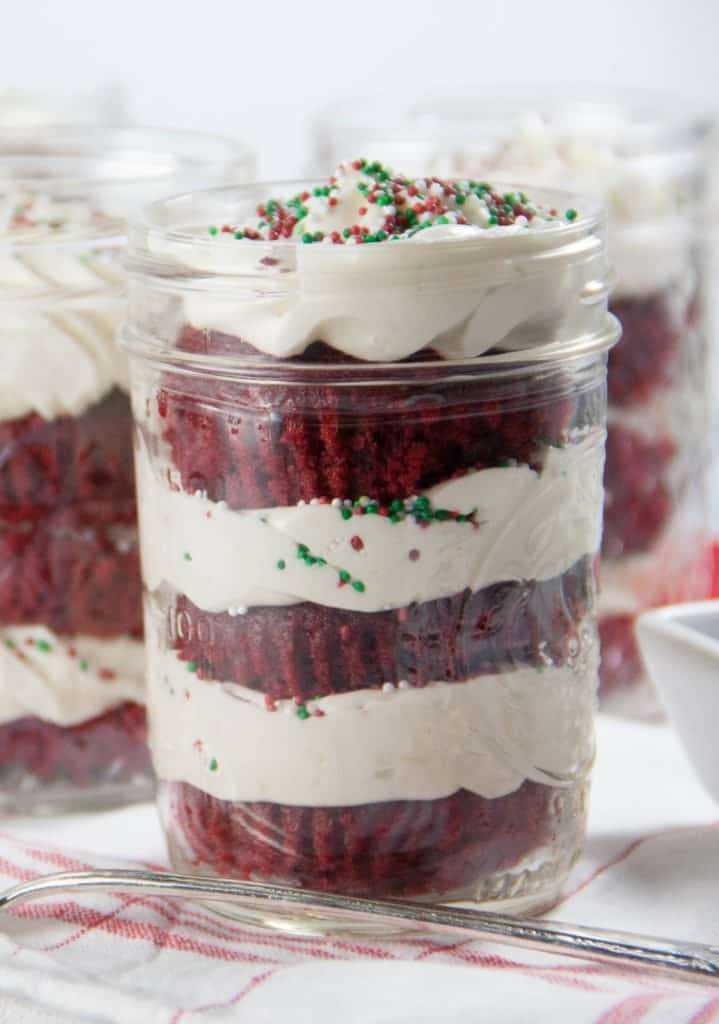
My Recommended Tools
 Buy Now →
  Buy Now →
  Buy Now →
 Ingredients needed
- Cake flour – I use cake flour because it has a lower protein content than regular all purpose flour which gives a more tender crumb.. If you don’t have any you can make your own cake flour.
- Sugar
- Baking soda
- Cocoa powder – Use unsweetened cocoa powder, and not dutch process which can react differently with the buttermilk. You can read more here about natural cocoa vs dutch process cocoa.
- Salt
- Eggs
- Unsalted butter – I like using some butter and cream it with the sugar, to not only give flavor but help make for a tender cupcake. I always bake and recommend with unsalted butter, but you can also use salted butter and just reduce the salt.
- Oil – I usually use canola oil, but vegetable oil or another neutral-tasting oil will also work.
- Buttermilk – Buttermilk gives the red velvet cupcake their signature slightly tangy flavor, adds moisture, and reacts with the baking soda. If you don’t have any you can make your own buttermilk.
- Vanilla extract
- Vinegar

To Make These Red Velvet Cakes In A Jar:
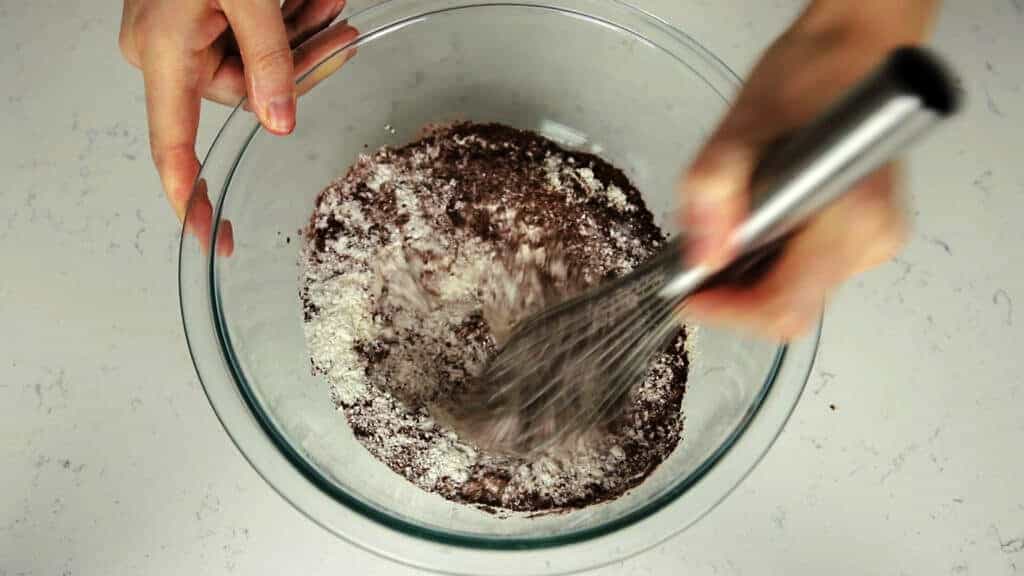
Combine dry ingredients.
In a mixing bowl, whisk the cake flour, baking soda, cocoa powder, and salt together. Set aside.
Cream butter and sugar.
In a second mixing bowl with an electric mixer (you can use your stand mixer with paddle attachment or a hand mixer), cream together the softened butter and granulated sugar together until light and fluffy, about 2 to 3 minutes on medium speed.

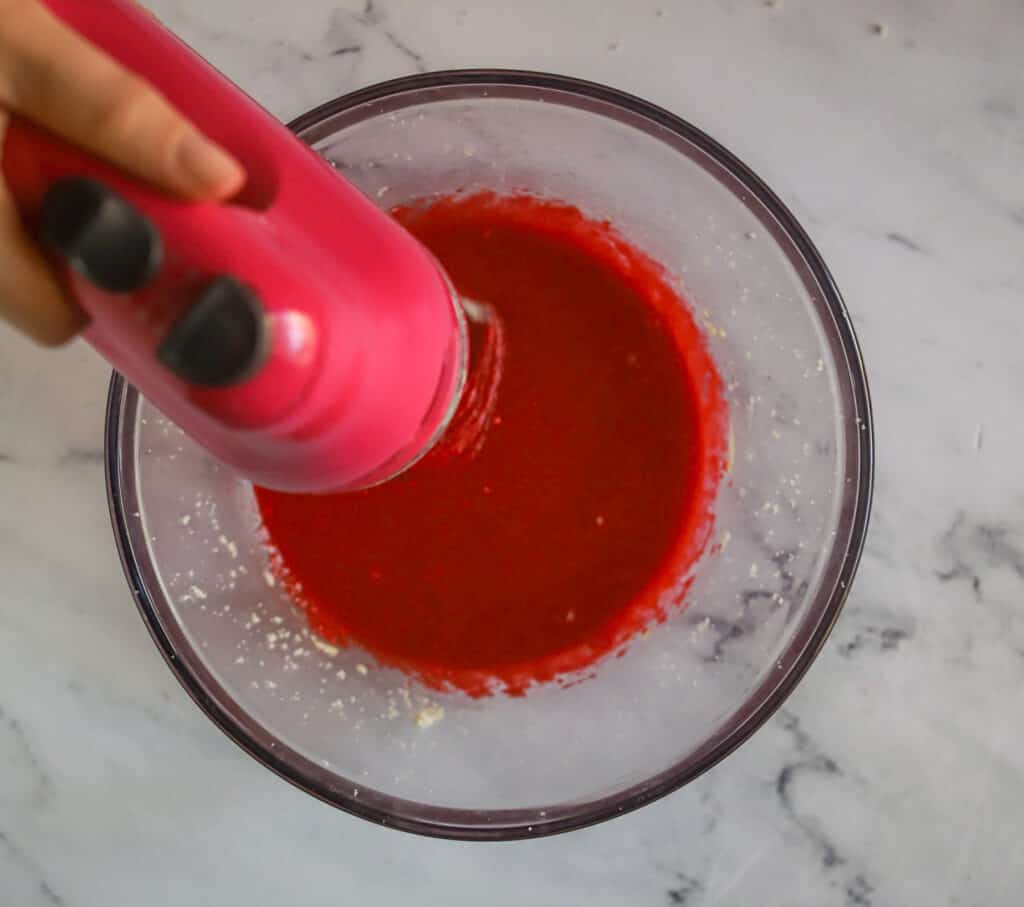
Add wet ingredients.
Add eggs one at a time to incorporate and beat to combine. Make sure they are room temperature so they incorporate easily into the butter and sugar mixture. Then add vanilla, oil, and red food coloring.
Alternate adding the dry ingredients and buttermilk.
Stir vinegar into buttermilk. Alternate the flour and buttermilk mixture, starting and ending with the flour mixture in three additions. Be careful to not overmix at this point, which can result in a tough, chewy cupcake.

Bake.
Divide the batter between the prepared paper liners, filling each cupcake well about 2/3 full. Bake for about 18 minutes, until the tops spring back to the touch and a toothpick inserted in the center comes out clean or with a few moist crumbs clinging to it.
Allow to cool in the pan for 5 minutes, then transfer to a cooling rack to cool completely.
Cream cheese frosting
I used my cream cheese frosting recipe for these red velvet cupcakes in a jar. But you can definitely switch things up.
Ermine frosting or flour buttercream, is a classic frosting that’s paired with red velvet cupcakes that you can also try!
Be sure to not assemble these cupcake jars with the frosting until the cupcakes are cooled completely.
Heather’s Baking Tips
- Measure correctly. Be sure to measure your flour correctly. Over measuring your flour could result in a tough dense cupcake. Use the spoon and level method.
- Check the freshness of your baking soda.. Make sure your baking soda is fresh. you can test to see if they bubble. Add a a teaspoon of baking soda to a a few tablespoons of vinegar.
- Do not overfill the pans. Make sure to not overfill your cupcake wells. Overfilled cupcakes can be one of the reasons your cupcakes sink in the middle after baking.
- Cool properly. Once baked, take them out of the pan and cool on a wire cooling rack. If you leave them in the pan, they will continue to bake then end up being being dry and overbaked if left in the pan.
- Rotate your pans. Most ovens have what are called “hot spots” where it’s hotter in certain areas. So cupcakes that are in the “hot spots” can bake faster than others, so by rotating your pans halfway through you can ensure they evenly bake.

To assemble these red velvet cakes in a jar:
You will need small mason jars for these red velvet cupcakes in a jar. Each jar holds 1 1/2 cupcakes. You can also use smaller mason jars and fill with one cupcake cut in half.
- Allow the cupcakes to cool fully and then remove the paper liners if you used them.
- Cut a cupcake in half.
- Place one cupcake half into the bottom of a mason jar.
- Pipe in a layer of cream cheese frosting.
- Repeat with another cupcake half, more frosting, third cupcake half and a final layer of frosting.
Recipe FAQs
How long are cakes in a jar good for?
I think my favorite part of mason jar cupcakes is that they last longer. These mason jar cupcakes will last 7-10 days, stored in the refrigerator (due to the cream cheese frosting).
And you can also freeze them for up to 6 months. I let them thaw overnight in the fridge before enjoying.
If you are traveling for the holidays or a get together, these desserts are exactly what you need in your life.Just simply pop the top on these and then you don’t have to worry about how they will look when you arrive to where you are getting to.
Instead of regular red food coloring, you can also use natural food coloring. Some natural food colorings that I like and use are India Tree Nature’s Colors from Craftsy or Amazon has a few varieties of natural food colorings that I think are worth checking out. I’ve tried the all natural food colors and they work just fine but your red velvet cupcakes won’t be “red red” is all. You can also color the cupcakes with these five alternatives to red food coloring.
Red Velvet Cupcakes In A Jar
Ingredients
For the cupcakes
- 2½ cups (300 grams) cake flour
- 1 teaspoon baking soda
- 2 Tablespoons unsweetened cocoa powder
- 1 teaspoon salt
- 1/2 cup 1 stick (113 g) unsalted butter softened to room temperature
- 1½ cups (300 g) granulated sugar
- 2 large eggs room temperature
- ½ cups (120 mL) vegetable oil
- 2 Tablespoons (1 oz.) liquid red food coloring
- 1 cup (224 grams) buttermilk
- 1 teaspoon vanilla extract
- 1 teaspoon distilled white vinegar
For the frosting
- 16 ounces (227 g) cream cheese softened
- 16 Tablespoons (227 g) unsalted butter at room temperature
- 4 teaspoons vanilla extract
- 5 cups (284 grams) confectioners’ sugar sifted
- 1/8 teaspoon salt
Instructions
- Prep pans and preheat. Preheat the oven to 350° F/180oC. Line cupcake pans with paper liners.
- Combine dry ingredients. In a mixing bowl, whisk together cake flour, baking soda, cocoa powder, and salt and set aside.
- Cream butter and sugar. In a second mixing bowl with a hand mixer or in your stand mixer with paddle attachment cream butter and sugar together until light and fluffy, about 2 to 3 minutes on medium speed. Add egg and beat to combine. Add vanilla, oil, and red food coloring.
- Alternate the flour and buttermilk. Stir vinegar into buttermilk. Add and alternate the flour and buttermilk mixture, starting and ending with the flour mixture into the butter mixture. Beat just until combined. Do not overmix.
- Bake. Divide the batter between the prepared paper liners, filling each about 2/3 full. Bake for about 18 minutes, or until a toothpick inserted in the center comes out clean. Allow to cool in the pan for 5 minutes, then transfer to a cooling rack to cool completely. Frost cooled cupcakes as desired.
- Make the frosting. To make the frosting, combine the cream cheese and butter in the bowl of an electric mixer. Beat on medium-high speed until well combined and smooth, about 2-3 minutes. Mix in the vanilla extract. Gradually beat in the confectioners’ sugar and salt until totally incorporated, increase the speed and then beat until smooth.
- Assemble jars. Once cupcakes are cooled, cut them in half. Layer in the mason jars, with half a cupcake, frosting, then repeat twice. If using smaller jars, layer with one cupcake half, and frosting and sprinkles.
Notes
- Storing the jars: These mason jar cupcakes will last 7-10 days, stored in the refrigerator (due to the cream cheese frosting). And you can also freeze them for up to 6 months. I let them thaw overnight in the fridge before enjoying.
- Making cupcakes and frosting ahead of time: You can make the red velvet cupcakes up to 2 days in advance, unfrosted. Just wrap in plastic wrap and keep at room temperature. You can also make the cupcakes and freeze for up to 2 months. The frosting can be made up to a week in advance. Just store in your refrigerator for up to a week. You may need to place them back in your mixer and rewhip back to the same consistency.
- Cake flour: If you don’t have cake flour, you can use AP flour but your cupcakes won’t be as light and fluffy. Or you can make your own cake flour by measuring out the 2 1/2 cups AP flour, remove 2 1/2 Tbsp. Replace with 2 1/2 Tbsp. cornstarch and then sift. Results won’t be quite the same but will come close!
- Buttermilk: If you don’t have buttermilk on hand, then you can replace with 1 cup milk, and 1 Tbsp. lemon juice (or vinegar) mixed together. Let it sit for 10 minutes to thicken/react.
- Red food coloring: You can reduce or omit the food coloring, or use an all-natural alternative. I haven’t tested with an all-natural coloring.
Dannii says
I love cake in a jar – it just tastes better some how. These look incredible.
Andrea says
I think this red velvet
jar cake is my new favorite way to have cake. I will be making these often!
Jen says
A whole batch wasn’t enough for my kids!! It disappeared quickly at my house!
Tayler says
I love how these are so easily transported! such a dun dessert that I can’t wait to make!
Fanta says
Hi there! This is SUCH a brilliant idea and can’t wait to try it so I can start shipping to my friends and family.
Can you link the mason jars again? It didn’t work for me for some reason.
Thanks!
Heather Perine says
Hi Fanta! Aw glad you liked it – here are the small mason jars I use.
Stephanie says
Probably a stupid question…but do you need to boil mason jars and lids for this?
[email protected] says
Never a stupid question 🙂 nope just a good wash is all I do!
Kshema says
Hey loved the recipe and information. Can you please tell me if these last for 7-10 days at room temperature without refrigeration ??
lastchance3 says
These look absolutely wonderful. I should definitely try to make these!
Heather @Boston Girl Bakes says
Thanks! Honestly I am finding I love them in the jars more because that means more frosting for each bite 🙂
Cynthia W says
These look so incredibly yummy and easy to create. I will definitely be trying this out. I’m off to buy mason jars right now!
Heather @Boston Girl Bakes says
You’re going to love them Cynthia! I mean you get more frosting in a bite than if it was a regular cupcake..so UM YEA need I say more?
Krysten says
Oh my god, I need to make these so bad! I love red velvet and the jars make them even etter!
Lauren says
I’m totally going to attempt to make these! They would make a perfect gift too!