Biscoff Cheesecake
This Post May Contain Affiliate Links. Please Read Our Disclosure Policy.
This Biscoff cheesecake is filled with the delicious and sweet Lotus Biscoff flavors you love! From the crust and filling to the toppings, you will taste the cookie butter flavor. It is easy and quick to make, perfect for all occasions and daily snacks.

There are a lot of Lotus Biscoff lovers out there, and I am one of them. It is sweet, versatile, and flavorful. They can be used for cakes, snacks, and even drinks. That’s why there are many Biscoff recipes available- except on this blog. Time to change all that!
So I thought, why not make Biscoff cheesecake?! I have a lot of cheesecake recipes, like triple chocolate cheesecake and key lime pie cheesecake, so why not make a Biscoff cookie cheesecake?
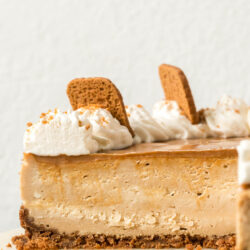
This Lotus Biscoff cheesecake recipe your whole family will surely appreciate. This Biscoff cheesecake starts with a Biscoff cookie crust, Biscoff cookie butter in the cheesecake filling, and then Biscoff cookie butter spread on top. I topped it with whipped cream and crushed Biscoff cookies.
Biscoff cookies and the spread (made from the cookies) have caramel, cinnamon, and ginger flavors. So you know this Biscoff cheesecake (with Biscoff 3 ways!) is going to have some serious flavor.
Are you sensing a theme here? Oh yes – it’s Biscoff all the way baby!

Grab My Cheesecake Book Now!
Discover the joy of baking with my digital cookbook, ‘Cheesecake for All Seasons‘! This comprehensive eBook features over 50 delectable cheesecake recipes, organized by season to suit every occasion.
Each recipe comes with detailed, foolproof instructions, essential baking tips, and troubleshooting advice to ensure your cheesecakes turn out rich, creamy, and delicious every time. Whether you’re a seasoned baker or a novice, this e-book will help you create perfect, indulgent desserts all year round.

Ingredients Needed
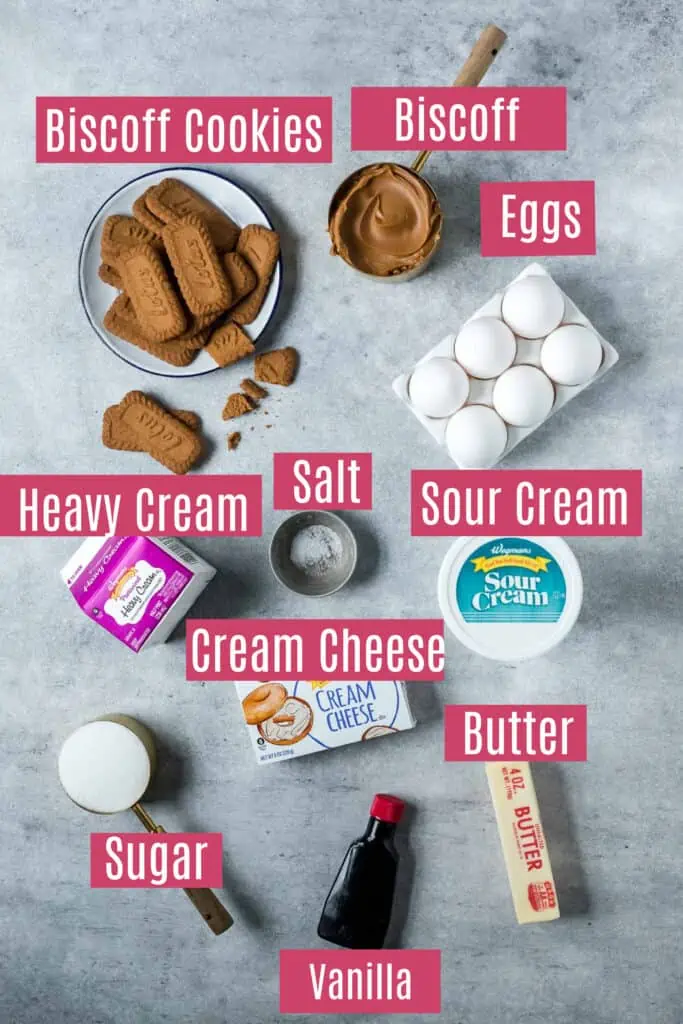
Here are the ingredients needed for this Biscoff cheesecake recipe:
For Biscoff Cookie Crust:
- Lotus Biscoff Cookies – You can use a rolling pin or food processor for crushing your Lotus Biscoff Cookies. If you can’t find Lotus Biscoff cookies in your grocery stores, you can use any speculoos cookies, gingersnaps, or cinnamon graham crackers.
- Unsalted Butter – Melted butter helps your Biscoff cookie crust stick together and hold its shape. You can use salted butter.
- Salt
For Biscoff Cheesecake Filling:
- Cream Cheese – I always use full-fat cream cheese in my cheesecake filling for better texture. It gives a smoother and silkier texture. Also, skip the tub type of cream cheese. Always go for cream cheese blocks.
- Biscoff Cookie Butter – It is also called Lotus Biscoff spread which is made from crushed Biscoff cookies (that have a caramel, ginger, cinnamon flavors). Biscoff spread has a smooth peanut butter consistency. Can be found in most grocery stores.
- Sour Cream – I use full-fat sour cream for this recipe. It adds richness, flavor, and creaminess to the Lotus Biscoff cheesecake mixture.
- Heavy Cream – Use heavy cream, and not half-n-half or whole milk. You want that fat and richness to make a thick, creamy cheesecake.
- Granulated Sugar
- Salt
- Vanilla Extract
- Eggs – Don’t use cold eggs. Let your eggs sit at room temperature before adding them to your cheesecake mixture.
For Biscoff Cookie Butter Toppings:
- Biscoff Cookie Butter
- Whipped Cream (Optional)
- Biscoff Crumbs (Optional)
How To Make Biscoff Cheesecake
To make a delicious Biscoff cheesecake, it needs to be set and chill for at least 8 hours or overnight. Don’t serve it immediately. Let the flavors set and top with whipped cream for the best results.
The Crust
1. Preheat Oven
Preheat your oven to 350°F/180°C.
Grease the springform pan with nonstick baking spray for easy removal.
2. Combine Ingredients
With your food processor, pulse Lotus Biscoff cookies until you reach a fine crumbs consistency. Add melted butter and sugar. Pulse until thoroughly combined.
If you don’t own a food processor, then you can place the cookies in a plastic bag and smash them in to crumbs with a rolling pin.

3. Bake Crust
Transfer the crust mixture to the prepared springform pan. Press the cookie crumbs at the bottom. I used my measuring cup to do this. I like to start by pressing the crumbs into the sides first, then along the bottom. I find it’s much easier to shape this way.
You then want to pre-bake the Biscoff crust for 10 minutes. This helps to prevent a soggy crust. Remove from the oven and let it cool.

Cheesecake Batter
1. Mix Ingredients
Before using your cream cheese, make sure it is softened and at room temperature. All of the ingredients I used for this recipe are at room temperature. We want room temperature cream cheese so we get a smooth filling.
Combine the at room temperature cream cheese and sugar and mix well using a stand mixer with a paddle attachment. Mix well for about two minutes or until the cheesecake batter is smooth and has no lumps. Scrape down all the softened cream cheese mixture at the sides of the bowl.
You don’t want to keep mixing though because it will incorporate too much air which could result in cracks later down the road!

Then go ahead and add the vanilla and salt. Then add in the eggs (also room temperature!) one at a time. Make sure the egg is properly incorporated before adding another one.
Then add in the sour cream and to the cream cheese mixture. Mix well. Again, scrape the sides to ensure all the ingredients are incorporated properly.
Use the medium speed of your stand mixer for this.

Add the Biscoff cookie butter and beat until smooth and combined. When all ingredients are properly mixed together, stop your stand mixer.
Don’t over-mix your cream cheese and cookie butter mixture. Again the more you mix = more cracks!

Transfer the mixture to the prepared springform pan with the crust.

Preparing Your Pan For The Water Bath
A water bath is key to getting a smooth, creamy filling. We want to cover our pan so no water leaks in. You will cover your pan (more on that in a minute) and place the pan into a larger pan. I use a large roasting pan but basically any pan that is larger will work. You will then fill the larger pan about halfway with hot, boiling water.
But don’t skip the water bath! It’s the key to the best texture and no cracks. Don’t believe me? Just take a look…

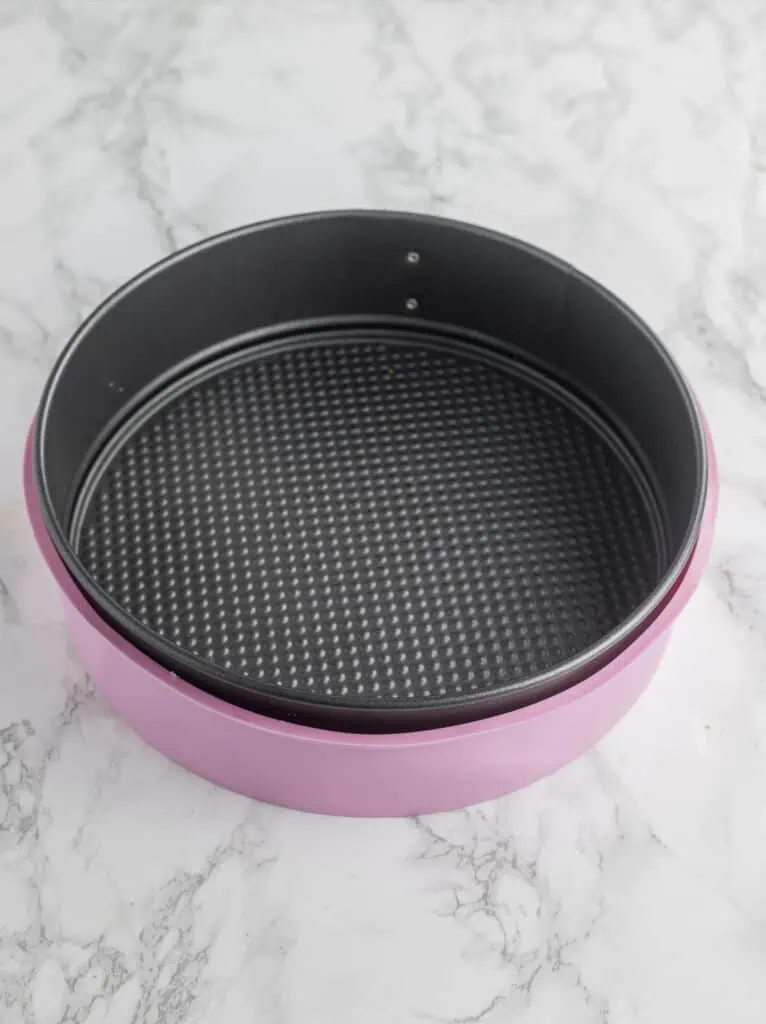
To prepare your springform pan for the water bath you have a few options.
- Wrap your 9-inch springform pan with aluminum foil. And don’t be stingy with your foil. You will want to use 3-4 layers. This helps make sure water doesn’t seep into your Biscoff cheesecake mixture while baking. Leave about 2 inches more foil at the top to ensure your cheesecake is protected from splashed water. This is NOT my favorite option as I don’t always get a good wrap and sometimes water still gets in.
- Slow cooker liner: Another great option that I love is wrapping the outside of the springform pan with a slow cooker liner. The plastic liner ensures that no water will seep into your cheesecake when baking. I like to use both foil and the liner if I can.
- The Best Method!!! Use a larger cake pan!! Just place the cheesecake pan into a larger cake pan (I use a 10-inch silicone cake pan but any larger cake pan works. Then place both into the 3rd larger pan (the roasting pan in this case). No leaks. No worries.
Baking The Cheesecake
Place the springform pan into the large roasting pan. Fill the large roasting pan with boiling water carefully for a water bath. The water should reach about 1 1/2 inches of your springform pan. Make sure you don’t splash water onto the filling.
I like to place my pan in the oven first then fill with water so I’m not carrying a pan full of hot boiling water across my kitchen!
Bake the cheesecake at lower heat 325°F/160°C for 80-90 minutes. Your cheesecake should be set at the edges but still have a bit of a wobble to it in the center. This ensures you have not overbaked it.
3. Cool And Chill
Now that’s it baked it’s time to cool it. First you will cool the cheesecake in the oven. Turn off your oven and open the door. Use a wooden spoon to stop your oven from closing. Leave the cheesecake inside the oven with a crack open door for another hour. This allows for a slow cooling which will help prevent cracks from forming.
After cooling in the oven, remove the cheesecake and place it on the counter to cool completely. With a butter knife, loosen the sides and go around the edges of your springform pan. I find this also helps with cracks from forming so it doesn’t cool and pull away from the sides of the pan.
When the cheesecake is completely cool, place it in the fridge to chill for at least 8 hours. I left mine in the fridge overnight. I like to place a paper towel over the top (to catch any condensation) and cover then with foil.
After cooling, remove the chilled cheesecake from the springform pan and transfer it to your serving plate.

Toppings And Decorations
1. Melt Lotus Biscoff Cookie Butter
To melt Lotus Biscoff spread, you can use your microwave. Transfer Biscoff spread into a microwave-safe bowl and heat it for 10 to 15 seconds or until your cookie butter is smooth and melted. Stir well after heating.
2. Pour And Decorate
Pour your melted cookie butter on your chilled cheesecake. Use an offset spatula to spread and smooth the cookie butter out. Place in the fridge to let the cookie butter set and harden. It will take at least 20 minutes.
When your Biscoff butter is set, remove it from your fridge and start decorating. You can add Biscoff crumbs and more Biscoff cookies. If you have any whipped cream or leftover homemade whipped cream, you can use them to decorate them as well.
Serve and enjoy!

More Recipes To Try
Are you craving more biscoff in your life? Then be sure to try my biscoff cookies made with white chocolate chips!
Or try these decadent biscoff blondies from fellow food blogger, Anna Banana.
Get My Cheesecake Book!
Don’t forget to grab a copy of my cookbook, Cheesecake For All Seasons! It’s an easy to download digital e-book with over 50 delicious cheesecake recipes, toppings, tips and tutorials for you to master making cheesecake at home!
Biscoff Cheesecake
Ingredients
For the crust:
- 32 biscoff cookies
- ⅛ teaspoon salt
- 6 Tablespoons (85 g) unsalted butter melted
For the cheesecake filling:
- 2 pounds (four 8-ounce blocks) cream cheese softened to room temperature
- ¾ cup (150 g) granulated white sugar
- pinch salt
- 2 teaspoons vanilla extract
- 4 large eggs room temperature
- ⅔ cup (151 g) sour cream
- ⅔ cup (160 ml) heavy cream
- 1 ¾ cup biscoff spread divided
Instructions
Make the crust
- Prep oven. Preheat oven to 350°F (1780°C), with rack in middle of oven.
- Make cookie crust. Pulse the cookies in a food processor or blender until finely ground. Add the salt and butter and pulse to combine. 32 biscoff cookies ⅛ teaspoon salt 6 Tablespoons (85 g) unsalted butter
- Assemble the crust. Press the cookie crumbs firmly into the bottom and slightly up the sides of a 9 inch springform pan, using the bottom of a measuring cup (or you can use your fingers).
- Bake the crust. Place the pan on a baking sheet and bake at 350°F (180°C) for 10 minutes. Remove from the oven and let cool.
Make cheesecake filling
- Combine cream cheese and sugar. In the bowl of a stand mixer, fitted with a paddle attachment beat cream cheese and sugar on medium speed for 4 minutes. 2 pounds (four 8-ounce blocks) cream cheese ¾ cup (150 g) granulated white sugar
- Add remaining ingredients. Add the salt and vanilla, beating after each addition. Add the eggs, one at a time, beating for one minute after each addition. Add the sour cream, beat until incorporated. Add heavy cream and beat until incorporated. Beat in 1 cup of the biscoff spread until evenly mixed. Scrape down the sides of the bowl and along the bottom to make sure all of the cream cheese has been incorporated. pinch salt 2 teaspoons vanilla extract 4 large eggs ⅔ cup (151 g) sour cream ⅔ cup (160 ml) heavy cream 1 ¾ cup biscoff spread
Bake the cheesecake
- Lower the heat on the oven to 325°F (160°C).
- Wrap springform pan. Wrap the outside of the springform pan in three layers of aluminum foil, ensuring none of the pan is exposed. You can also use a slow cooker liner. I like to ensure no leaks place my pan into a larger 10-inch cake pan instead of the foil/liner method.
- Bake the cheesecake. Prepare pan and boiling water: Place the foil-wrapped springform pan in a large, high-sided roasting pan. Prepare 2 quarts of boiling water.
- Pour filling into pan. Pour the cheesecake filling into the springform pan, over the cookie crust. Smooth the top with a rubber spatula.
- Place in oven. Place the roasting pan with the springform pan in it, in the oven.
- Add hot water. Carefully pour the hot water into the roasting pan, pouring until the water reaches halfway up the side of the springform pan.
- Bake the cheesecake. Bake at 325°F (160°C) for 80-90 minutes until the edges of the cheesecake are set and slightly golden brown, and the middle of the cheesecake is set but still slightly wobbly.
- Allow cheesecake to cool in oven. Turn off the heat of the oven. Crack open the oven door and let the cake cool in the oven, as the oven cools, for another hour, which will help prevent the cheesecake from cracking.
- Chill the cheesecake. Cover the top of the cheesecake with a paper towel (to help with condensation forming) and then cover in foil. Chill in the refrigerator for a minimum of 4 hours, or overnight.
- Top with Biscoff spread. When ready to serve, remove the foil. Run a knife around the edges and remove the outer ring of the pan. Warm the remaining 3/4 cup Biscoff cookie spread in the microwave until softened and spreadable, about 20-30 seconds. Using a spatula, spread over the top of the cheesecake. Return to the fridge until firm, about 15 minutes before cutting into slices and serving.
Notes
- Storage: You can transfer Lotus Biscoff cheesecake to an airtight container or, if you are storing the whole cheesecake, you can use a cake barrier. It can last up to 5 days in the fridge.
- Freezing: To freeze the whole Biscoff cheesecake, wrap it with plastic wrap then transfer to an airtight container or wrap it twice with aluminum foil. And to freeze slices, wrap the individual slice of Biscoff cheesecake with plastic wrap and place it inside freezer bags. Squeeze out as much air as possible and seal. It can last up to 1 month in your freezer. To thaw frozen cheesecake, leave it in your fridge overnight.
- Biscoff cookies: If you can’t find Lotus Biscoff cookies in your grocery stores, you can use any speculoos cookies, gingersnaps, or cinnamon graham crackers.