
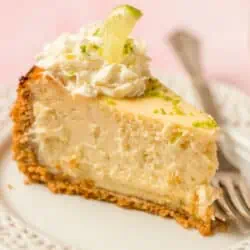
Key Lime Pie Cheesecake
This Post May Contain Affiliate Links. Please Read Our Disclosure Policy.
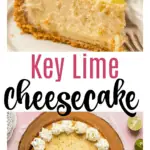
This key lime pie cheesecake recipe has a tangy, sweet, and creamy- with a perfect graham cracker bottom. Top with a bit of sweetened whipped cream for the perfect special occasion cheesecake.

I still remember the first time I had cheesecake. We had a big family dinner out at some restaurant, and the finale to the dinner. Cheesecake. And. I hated it.
I would spent the rest of my childhood and well into my early adulthood avoiding the stuff. The next time I had a cheesecake was working at some high end restaurant. And guess what. I loved it. I mean absolutely loved it. What the heck? I mean all these years I had harbored this absolute hatred towards it.
And then it hit me. That cheesecake I had as a kid. Cherry cheesecake. Those big red cherries drizzled over the cheesecake. I hated those fake cherries. Not the actual cheesecake! All those years wasted. Cheesecake-less. So since then I’ve been making it up for it.
And this key lime cheesecake recipe combines two of my favorite desserts – cheesecake and key lime pie. It’s creamy but also tangy – absolute cheesecake perfection. If you’re a fan of key lime desserts as much as I am, then I know you’re going to love this cheesecake made with key lime juice!
Grab My Cheesecake Book Now!
Discover the joy of baking with my digital cookbook, ‘Cheesecake for All Seasons‘! This comprehensive eBook features over 50 delectable cheesecake recipes, organized by season to suit every occasion.
Each recipe comes with detailed, foolproof instructions, essential baking tips, and troubleshooting advice to ensure your cheesecakes turn out rich, creamy, and delicious every time. Whether you’re a seasoned baker or a novice, this e-book will help you create perfect, indulgent desserts all year round.

Substitutions for Fresh Key Limes
This is a key lime cheesecake, which means it uses key limes. Key limes and regular limes are not the same thing.
If you can’t get a hold of key limes for this key lime cheesecake, you can use regular lime juice instead. I’ve made this key lime cheesecake with regular limes and it still works beautifully! I find the regular limes to be a bit more tart and pronounced in the final cheesecake batter but I don’t mind this!
You could also buy bottled key lime juice if you can’t find any at your grocery store. I’ve used this many times to make a key lime pie in a pinch.

Let’s make key lime pie cheesecake!
For the graham cracker crust you will need:
- Graham cracker crumbs – If you can’t find graham crackers, then you can swap these out for another type of cookie or digestive biscuit, like Nilla wafers.
- Melted Butter – I prefer to use unsalted butter, but salted butter will also work. You can simply omit the added salt in the crust.
- Salt – Just a pinch of salt in the graham cracker crust to balance out the sweetness.
- Sugar – For the crust, I used granulated sugar but you could swap and use brown sugar.

For the cheesecake filling:
- Cream cheese – For the best texture, I recommend using full-fat cream cheese. And be sure to blocks of cream cheese and not the tub variety which has a different texture.
- Granulated sugar– I use granulated sugar in the filling.
- Eggs – You want to use large, room temperature eggs. To bring eggs to room temperature quickly place in a bowl of warm water for 10 minutes.
- Vanilla extract – To help flavor the cheesecake filling. Pure vanilla extract is always best, but imitation will also work.
- Salt – I add just a little salt to balance out the sweetness.
- Sour cream – I use and recommend full-fat sour cream. This will give flavor and richness to that cheesecake filling.
- Heavy whipping cream – Make sure to use heavy cream and not milk or half-n-half.
- Key limes – If you can’t find key limes, use bottled key lime juice or swap and use regular limes. You will use both the key lime juice and the key lime zest.

How to Make Key Lime Cheesecake
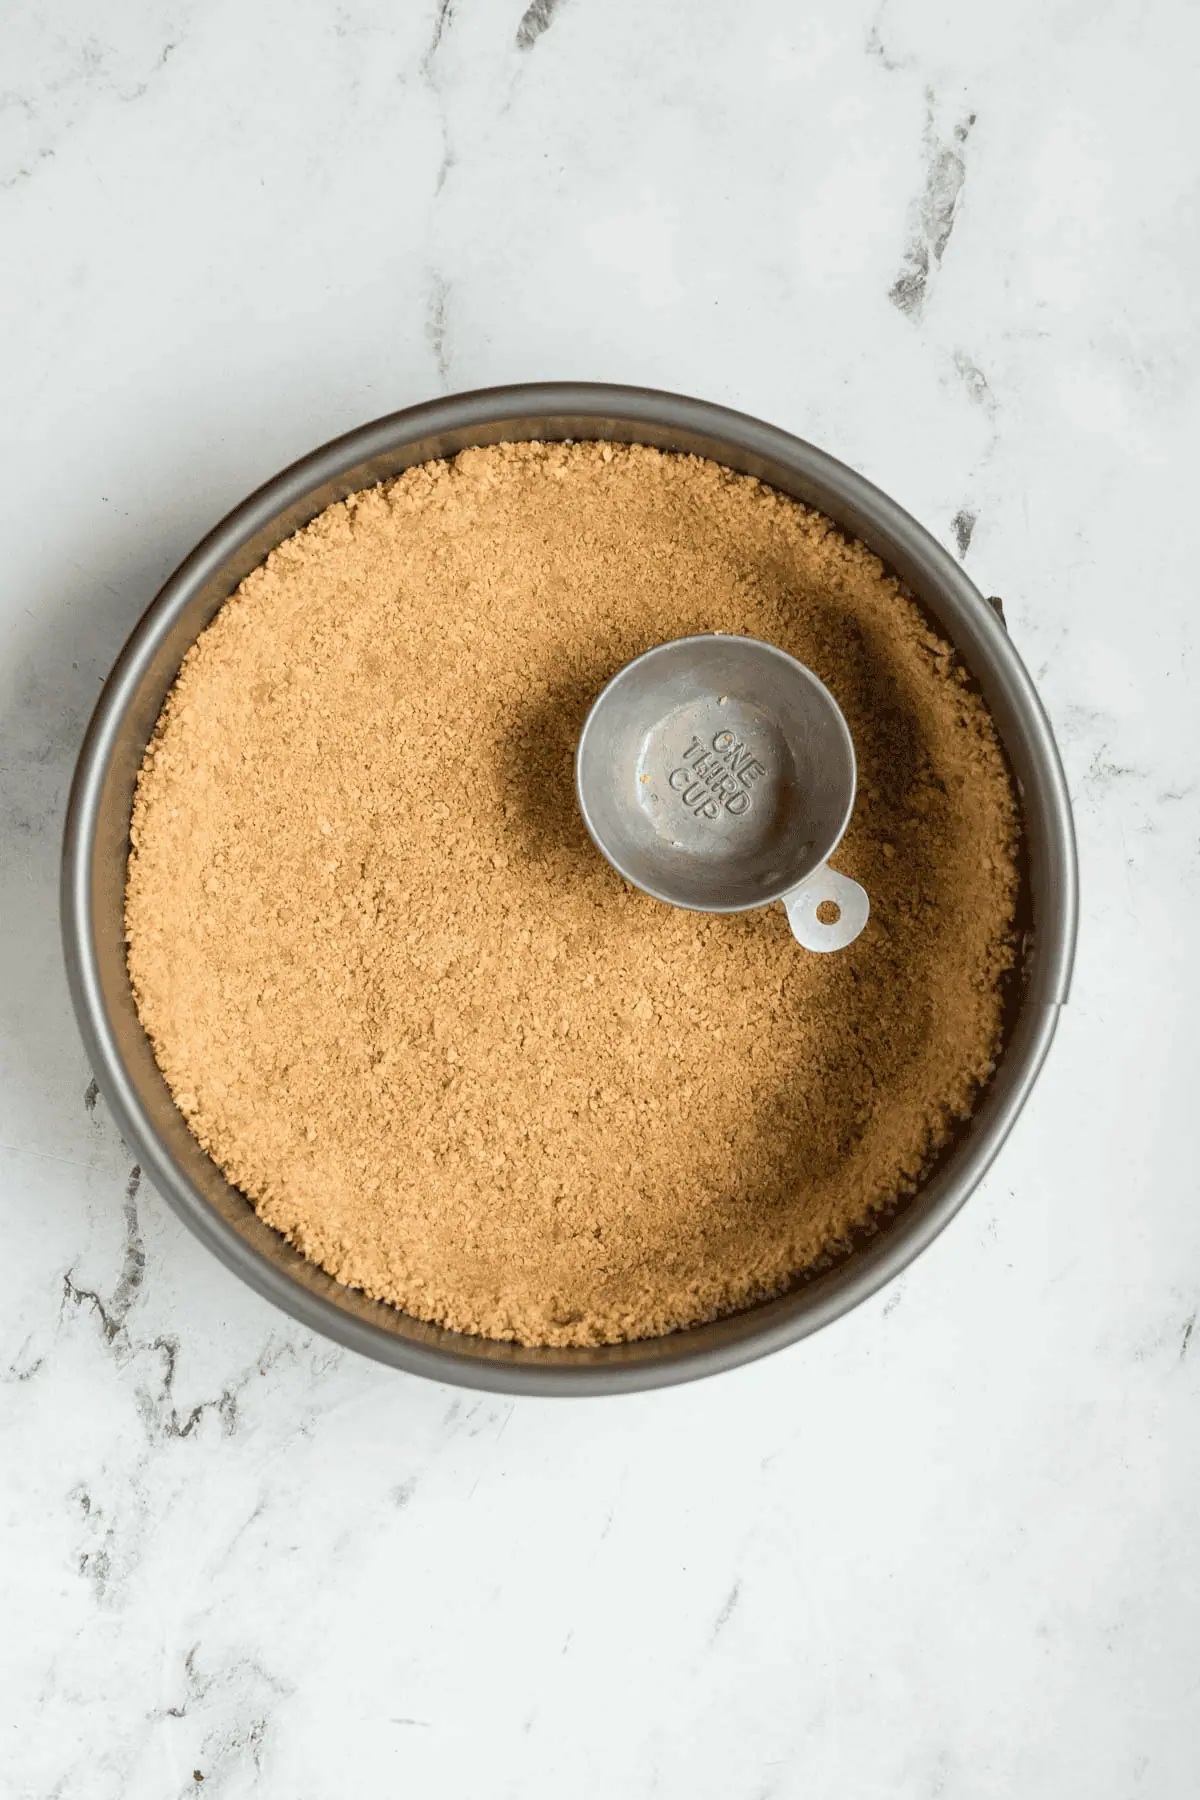
Step 1. Make the graham cracker crust
This key lime cheesecake starts with making a perfect buttery graham cracker crust that gets pressed into a springform pan. You can use store-bought graham crackers or try making Homemade Graham Crackers.
You can crush the graham crackers by placing them in a zip-loc bag and using a rolling pin to smash them to smithereens. Had a bad day? Then this is totally your method. In a bit of a rush? Well, then the food processor is your going to be your go to. I like to use my food processor to make graham cracker crumbs easily and ensure there are no big pieces.

Place the crumbs into a medium bowl. To those graham cracker crumbs, add in the melted butter, a pinch of salt and a bit of sugar to help sweeten.

Then press into your springform pan.
I like to use the bottom of a measuring cup to press down the crumbs and a bit up the sides of the pan. You want to then bake the crust for 10 minutes in the lower third of your oven.
Step 2. Make the filling
I make my key lime filling in my stand mixer for quick easy work. Simply beat cream cheese and sugar for about 4 minutes on medium speed until smooth with an electric mixer.
I use my stand mixer with my paddle attachment or you can use a hand mixer to beat cream cheese until smooth.

Be sure to not continue to mix beyond that point because otherwise you will be just adding in unwanted air that will cause your cheesecake later to crack in the oven. Then mix in your salt, vanilla extract, eggs and sour cream.

After that is all incorporated then add in your heavy cream. Give your bowl a scrape down as needed.

Then stir in the key lime juice and key lime zest. Not at all limes are equal in juice, so I like to include the exact amount of juice and zest used to ensure your cheesecake batter is perfectly lime-y!

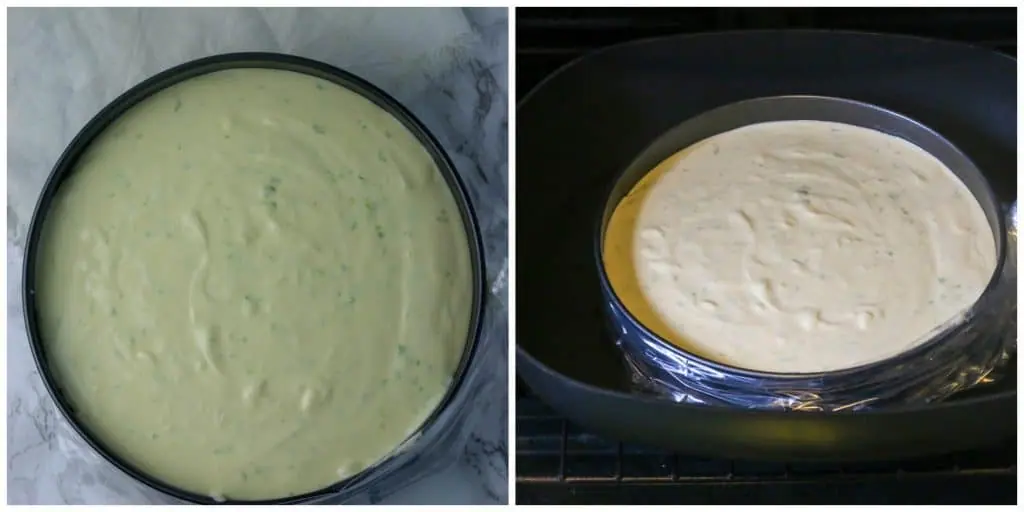
And that’s it! Then it’s ready to be added to the graham cracker crust. I told you this key lime cheesecake was easy!

Step 3. Prep the water bath
Once you have pre-baked your crust, you will need to wrap the outside of the pan in 3-4 layers of heavy duty aluminum foil. This is going to protect your cheesecake while it bakes in a water bath. You want to make sure your pan is completely covered so no water gets inside your cheesecake.
Another great alternative that is my new favorite method is to wrapping in tin-foil is to use a slow cooker liner. It’s much easier to use and ensure there is no chance of water getting into the cheesecake.
After wrapping the springform pan, then place the pan inside a large roasting pan. Place the roasting pan inside your oven, and fill the pan about 1/2 full of water. And then it’s time to bake.
Baking and cooling this cheesecake
You will bake this key lime cheesecake, low and slow, in the water bath at 325oF for about 1 1/2 hours. To tell if your cheesecake is done baking, gently shake the pan. The edges should be set and lightly browned, but the middle should still have a slightly wobble to it. The cheesecake will continue to set and firm up as it cools.
Then you will turn the oven off and allow to cool slowly with the oven door slightly open. This will ensure the cheesecake cools slowly and helps with the cheesecake from cracking.
Once cooled, then continue to let the chilled cheesecake firm up in the fridge for about 4 hours to cool completely.
And then it’s time to enjoy! I like to make homemade whipped cream to serve this key lime cheesecake with.

Tips For Making This Key Lime Cheesecake Recipe
- Use room temperature cream cheese. Cold cream cheese will not incorporate into the rest of the ingredients, so be sure that you leave at room temperature for at least 30 minutes or try one of these easy ways to soften cream cheese quickly. This may take longer depending on the temperature of your kitchen. And softened cream cheese will ensure a smooth cheesecake batter.
- Do not overmix your ingredients. Over-mixing your cheesecake will result in TOO much air incorporated into the batter which results in a cracked cheesecake.
- Use a waterbath or bain marie as the French call it. Wrap your cheesecake pan several times in tinfoil on the outside of the pan and set the pan inside a larger pan (like a roasting pan) that has been filled with hot water. The key here is make sure your pan is completely covered by tinfoil so no water seeps into the cheesecake, which would result in a soggy crust! I wrap my cheesecake in 3 layers of foil and use a good quality springform pan. Or use a slow cooker liner for an easy prep.
- A great alternative to the water bath is placing a pan of boiling water on the rack below where your cheesecake is baking. The steam from the hot water will gently cook your cheesecake and you do not have to worry about a soggy bottom.
- Allow your cheesecake to cool in the oven with the heat off for an hour. It will appear that it is not done, and be a bit wiggly in the middle. Just allow the cheesecake to sit in the oven for an hour. Then be sure to refrigerate the cheesecake for at least 4 hours (up to overnight) at which point your cheesecake will completely set up.

How to Freeze Key Lime Cheesecake
If you want to freeze your baked cheesecake , be sure it’s cooled completely. You can freeze a whole cheesecake or cheesecake slices.
I like to freeze the cheesecake in plastic wrap, and then in tinfoil. You can freeze cheesecake for up to 3 months. When ready to enjoy, thaw overnight in the fridge or on the counter at room temperature for a quicker thaw before serving.
Storing cheesecake
I recommend that you refrigerate cheesecake for up to 4 days. I like to place a paper towel over the top to collect any condensation that may form, and then cover with tin foil or plastic wrap.
Any longer than 4 days, and I recommend freezing the cheesecake.
Recipe FAQs
A water bath helps achieve that so you get a smooth cheesecake that doesn’t crack and helps so the top doesn’t brown too quickly. A great alternative to the water bath is placing a pan of boiling water on the rack below where your cheesecake is baking. The steam from the hot water will gently cook your cheesecake and you do not have to worry about a soggy bottom!
Your cheesecake cracked because it was either overcooked over overmixed. Be sure to use room temperature cream cheese so you do not have to mix the batter that much. Also avoid opening the door while baking. Big temperature changes like this can cause your cheesecake to crack. And don’t skip that water bath. If your cheesecake does crack, simply make some extra whipped cream and cover it up!
I do recommend a springform pan. You could try a deep dish pie plate but it may be too much filling still. And a different pan can also affect your baking time. You could also try baking in a muffin tin and turn them into mini key lime cheesecakes instead. The baking time will be reduced significantly.

More Recipes to Check Out
If you’re craving more key lime desserts try my key lime cookies with a key lime glaze.
And for more cheesecake, try my creme brulee cheesecake with a vanilla bean filling and bruleed topping. Or try this no bake pistachio cheesecake and no bake peanut butter cheesecake for an easy no bake dessert.
Get My Cheesecake Book!
Don’t forget to grab a copy of my cookbook, Cheesecake For All Seasons! It’s an easy to download digital e-book with over 50 delicious cheesecake recipes, toppings, tips and tutorials for you to master making cheesecake at home!
Key Lime Cheesecake
Ingredients
For the crust:
- 1 3/4 cup (227 g) graham crackers (from about 15 crackers)
- 3 Tablespoons granulated white sugar
- 1/8 teaspoon salt
- 6 Tablespoons (85) unsalted butter melted
For the cheesecake filling:
- 2 pounds (four 8-ounce blocks) cream cheese softened to room temperature
- 1 1/3 cups (264 g) granulated white sugar
- pinch salt
- 2 teaspoons vanilla extract
- 4 large eggs room temperature
- 2/3 cup (151 g) sour cream
- 2/3 cup (151 g) heavy cream
- 1/2 cup (120 ml) key lime juice about 10-12 key limes
- 1 tablespoon lime zest
- whipped cream homemade or store-bought, for serving
Instructions
Make graham cracker crust
- Prep oven. Preheat oven to 350°F (177°C), with rack in middle of oven.
- Make graham cracker crust. Pulse the graham crackers in a food processor or blender until finely ground. Put in a large bowl, and stir in the sugar and salt. Stir in the melted butter.
- Assemble graham cracker crust. Press the graham cracker crumbs firmly into the bottom and slightly up the sides of a 9 inch springform pan, using the bottom of a measuring cup (or you can use your fingers).
- Bake the crust. Place the pan on a baking sheet and bake at 350°F (177°C) for 10 minutes. Remove from the oven and let cool.
Make cheesecake filling
- Combine cream cheese and sugar. In the bowl of a stand mixer, fitted with a paddle attachment beat cream cheese and sugar on medium speed for 4 minutes
- Add salt, vanilla, eggs, and sour cream. Add the salt and vanilla, beating after each addition. Add the eggs, one at a time, beating for one minute after each addition. Add the sour cream, beat until incorporated. Scrape down the sides of the bowl and along the bottom to make sure all of the cream cheese has been incorporated.
- Add heavy cream, juice and zest. Add the heavy cream, beat until incorporated. Stir in your lime juice and zest.
Bake the cheesecake
- Lower the heat on the oven to 325°F (160°C).
- Wrap springform pan. Wrap the outside of the springform pan in three layers of aluminum foil, ensuring none of the pan is exposed. You can also use a slow cooker liner.
- Bake the cheesecake. Prepare pan and boiling water: Place the foil-wrapped springform pan in a large, high-sided roasting pan. Prepare 2 quarts of boiling water.
- Pour filling into pan. Pour the cheesecake filling into the springform pan, over the graham cracker crust. Smooth the top with a rubber spatula.
- Place in oven. Place the roasting pan with the springform pan in it, in the oven.
- Add hot water. Carefully pour the hot water into the roasting pan, pouring until the water reaches halfway up the side of the springform pan.
- Bake the cheesecake. Bake at 325°F (160°C) for 1 1/2 hours until the edges of the cheesecake are set and slightly golden brown, and the middle of the cheesecake is set but still slightly wobbly.
- Allow cheesecake to cool in oven. Turn off the heat of the oven. Crack open the oven door and let the cake cool in the oven, as the oven cools, for another hour, which will help prevent the cheesecake from cracking.
- Chill the cheesecake. Cover the top of the cheesecake with a paper towel (to help with condensation forming) and then cover in foil. Chill in the refrigerator for a minimum of 4 hours, or overnight.
- Serving the cheesecake. When ready to serve, remove the foil. Run a knife around the edges and remove the outer ring of the pan. Cut into slices and serve with whipped cream.
Notes
- Storing: I recommend that you refrigerate cheesecake for up to 4 days. I like to place a paper towel over the top to collect any condensation that may form, and then cover with tin foil or plastic wrap. Any longer than 4 days, and I recommend freezing the cheesecake.
- Freezing: If you want to freeze your baked cheesecake , be sure it’s cooled completely. You can freeze a whole cheesecake or cheesecake slices. I like to freeze the cheesecake in plastic wrap, and then in tinfoil. You can freeze cheesecake for up to 3 months. When ready to enjoy, thaw overnight in the fridge or on the counter at room temperature for a quicker thaw before serving.
- Cream cheese – For the best texture, I recommend using full-fat cream cheese. And be sure to blocks of cream cheese and not the tub variety which has a different texture.
- Key limes – If you can’t find key limes, you can substitute with regular limes. Or use bottled key lime juice.
- Graham cracker crumbs – If you can’t find graham crackers, then you can swap these out for another type of cookie or digestive biscuit, like Nilla wafers.
- Alternative to water bath: A great alternative to the water bath is placing a pan of boiling water on the rack below where your cheesecake is baking. The steam from the hot water will gently cook your cheesecake and you do not have to worry about a soggy bottom.


It cracked in the oven when cooling 🙁
Hi Hilda, that can happen if you don’t bake in a water bath, or if you overmixed when making the batter. It’s happened to me as well – but nothing that a good dollop of whipped cream can’t cover up and fix 😉
Cheesecake is the best! Your recipe looks delicious and easy! I cannot wait to try this!
thank you! Let me know what you think!
Tried this recipe. Did not like at all. Followed instructions, but cheesecake was terrible.
Hi sorry to hear that. We’ve made this recipe many times and with rave reviews. Perhaps I can help troubleshoot what happened for you.