
Homemade Whipped Cream
This Post May Contain Affiliate Links. Please Read Our Disclosure Policy.
Never buy store-bought whipped cream ever again after you learn just how easy it is to make your own at home! All you need is three simple ingredients, and a few tricks and tips for making this homemade whipped cream recipe to top all of your baked goods.

Did I grow up on tubs of whipped topping and bottles of spray whipped cream? You betcha. But then somewhere along the way I learned just how stinking easy it is to make your own whipped cream, or chantilly cream as it’s also known, and I never looked back.
Yes whipped cream is easy. However, it can go wrong! So I wanted to show you today how easy it is to make your own so you skip past the store-bought stuff. Because homemade is always 1000% better. And seriously what’s in some of those store-bought versions anyway? No idea.
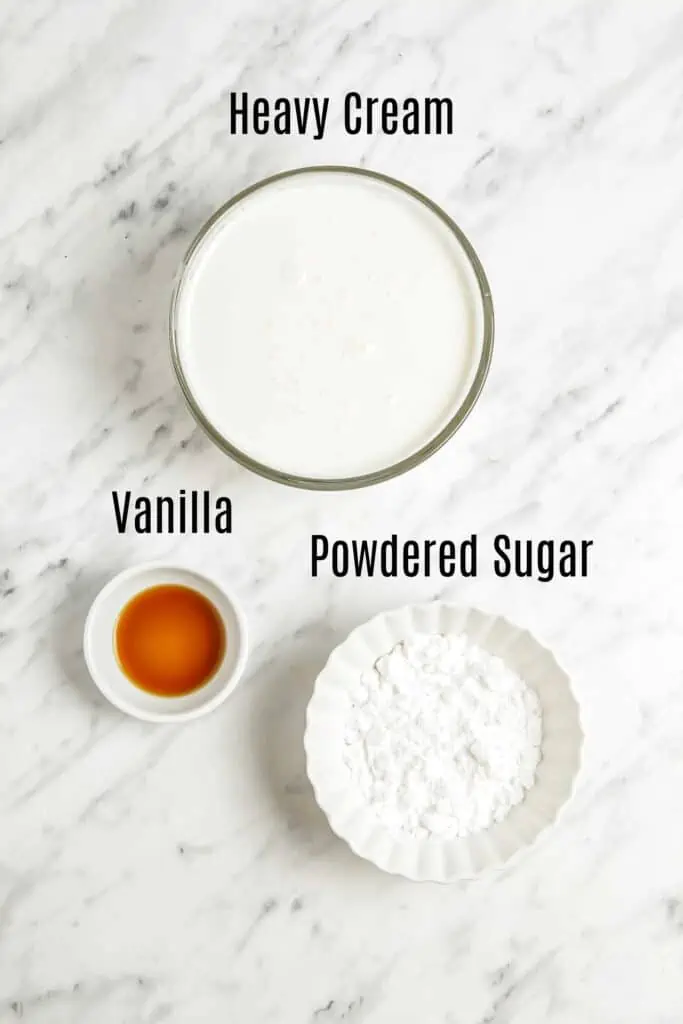
However, I can tell you what’s in mine. Just 3 simple ingredients: heavy cream, confectioners sugar, and vanilla extract. That’s it friend. Of course I think homemade whipped cream comes down to knowing a few techniques and that’s what I really want to share with you today.
Bake Pies With Confidence!
If you’ve ever struggled with shrinking crusts, runny fillings, or pies that just didn’t wow—you’re not alone. But here’s the good news: you can bake pies that look beautiful, slice cleanly, and taste bakery-worthy… without the stress. Inside my Pie Perfection eBook, you’ll learn how to:
- Master buttery, flaky crusts (no soggy bottoms here!)
- Choose the right thickeners for fruit fillings that hold
- Avoid common pie mistakes with my step-by-step guides
- Bake seasonal favorites all year long—from classic apple to no-bake summer pies
Better Than Store-Bought!
- Three ingredients! Heavy cream, confectioner sugar, and vanilla. That’s it! That store-bought stuff has got a funky long list of stuff that I’d rather avoid.
- Quick to make. It really does only take a few minutes to whip up a homemade batch of this stuff!
- Make ahead. Yes you really can make this ahead of time. I’ll show you the trick to doing so!
- BEST flavor. Ok besides being easy, and requiring a few ingredients, homemade whipped cream is just hands down way better tasting than any stuff from the store.
Ingredients Needed
- Heavy cream – I do recommend using heavy cream as opposed to whipping cream. Yes, whipping cream works but heavy cream holds it shape better. Whipping cream has a higher milk fat content, and is meant for whipped cream technically and will give you more of a “cool whip texture” but I prefer heavy cream so it can hold it shape better and lasts a bit longer.
- Confectioner sugar – You want confectioner sugar, or powdered sugar, NOT granulated sugar. Granulated sugar won’t dissolve or mix in the same and will have a gritty texture.
- Vanilla extract – Because this isn’t cooked, you really do want to use pure vanilla extract since the flavor will stand out. Artificial can work but I find you can really taste the difference. This is one of those times to invest in the good stuff. You could also mix things up with a different extract, like almond extract or peppermint extract.
How To Make Homemade Whipped Cream
Chill your bowl and beaters. Besides using cold ingredients you also want to chill your bowl (this is why I recommend a metal bowl because it chills faster than glass) and your beaters for 10 minutes before starting. This will help your whipped cream to whip up easily and quickly.
Combine ingredients. In your chilled bowl, combine the heavy cream, confectioner sugar and vanilla.

Beat ingredients until stiff peaks form. With your electric mixer, begin beating the ingredients on LOW to start until it reaches soft peaks, then gradually increase the speed to medium-high speed to high speed. I like to use my whisk attachment with my stand mixer, but you can also use a hand mixer.
Continue beating, until stiff peaks form, about 5 minutes (this can vary). The whipped cream will billowy, light, and soft in texture.

Recipe Tips
- Use an electric mixer. You absolutely can make whipped cream by hand, but it’s going to take longer and require some serious arm muscle. Using an electric hand mixer or in the bowl of stand mixer fitted with a whisk attachment, will just make this whole process much easier on you.
- COLD is KEY. You want to make sure your heavy cream is cold! It will up much easier and to higher volume.
- Heavy cream is best. Again heavy cream is best for a whipped cream that holds it shape, but whipping cream will still work.
- Use a metal bowl. For best results, use a metal bowl. This is so you can pop it into your freezer and it’s get very cold very fast! Glass bowls also work, but will take a bit longer than a stainless steel bowl..
- Use a cold mixing bowl and beaters! Besides cold cream, you also want cold tools. I recommend putting your bowl and beaters into the freezer for 10 minutes before making your whipped cream to help it whip up to its best volume.
- Start on LOW speed. This is just so you don’t end up with splatters of heavy cream all over yourself and the counter! Then gradually increase the speed to high once it’s starting to thicken.
- STIFF peaks. You want peaks that when you pull the beater out of the bowl the peaks stand up on their own. I find stiff peaks means the whipped cream lasts longer and you can pipe it if need be.
- Do NOT overmix. We want stiff peaks, but you also don’t want to go past that so you end up overmixing it and turning it into sweet butter instead! You can always err on the side of less mixed if you are making this for the first time.

Storage Instructions
I prefer to make my whipped cream the same day it’s going to be served. You can, however, make this a day ahead of time. I will make the whipped cream and then store in an airtight container in my refrigerator.
Different environments, weather, humidity can all affect how long your whipped cream lasts. So if it’s a particularly hot day I would make it right before serving so it doesn’t weep and turn to liquid on you.
Recipe Variations
- Add cinnamon – Try my cinnamon whipped cream recipe that adds a little cinnamon into the mix!
- Try adding a different extract – Try adding 1/4-1/2 teaspoon peppermint extract or almond extract.
- Sweeten with maple syrup instead. You could use maple syrup or even honey for a natural way to sweeten the whip cream.
- Add cocoa powder. Add 3-4 Tablespoons cocoa powder to make a chocolate whipped cream.
- Add some lemon zest. You can fold in some fresh lemon zest. Use a teaspoon of lemon zest, or a bit more to your liking!
- Add a little bit of cream cheese. This can help stabilize the whipped cream.

Serving Suggestions
Oh my, what can’t you serve it with? All the things that deserve a dollop of goodness on top.You could simply serve on the side of fresh fruit for an easy dessert. Or here of my favorite desserts I love serving this perfect whipped cream with!
- On top of a slice of homemade pie! Try my Easy To Make Eggless Pumpkin Pie or Deep Dish Apple Pie
- With cheesecake! I like to use a piping bag and pipe onto a cheesecake like my Pumpkin Cheesecake or Key Lime Cheesecake Recipe
- Alongside a Chocolate cake like this Chocolate Molten Lava Cake Recipe or this Sourdough Chocolate Cake
- Any apple dessert! Like this Irish Apple Cake or this Apple Dapple Cake!
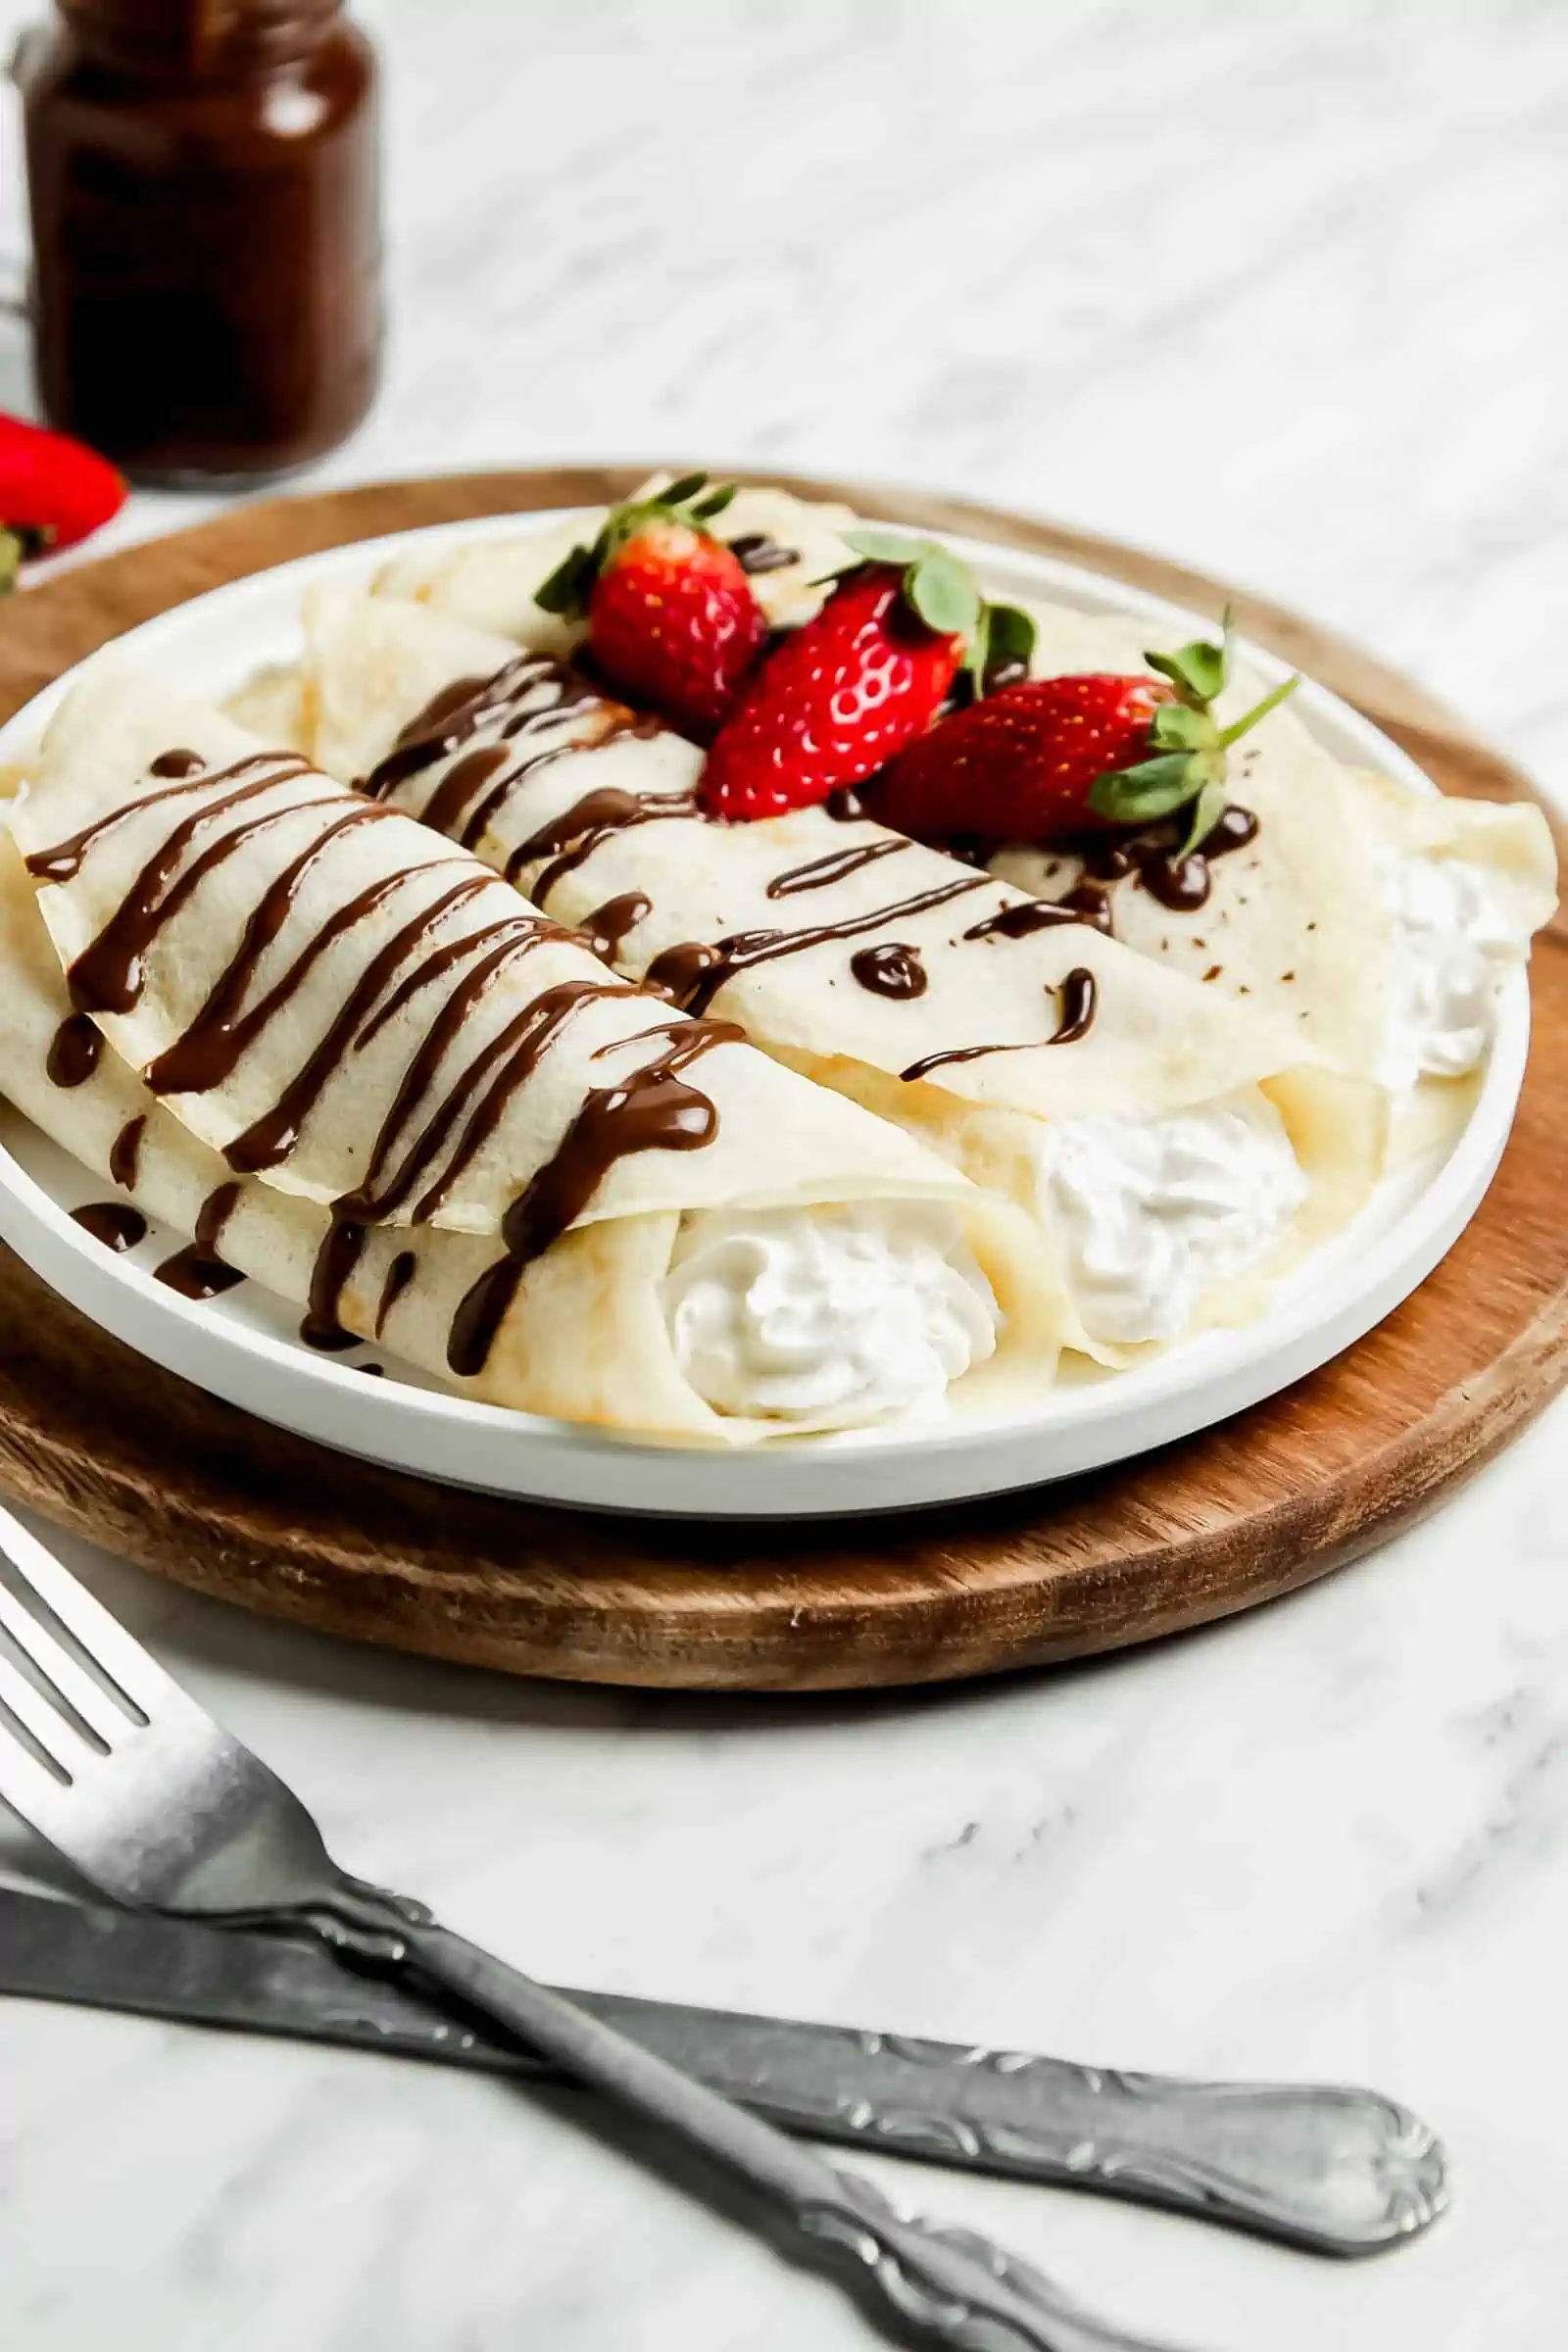
- Rolled up inside French Crepes
- Strawberry shortcake – I love serving this with my strawberry shortcake biscuits. I slice open a biscuit and fill with whipped cream and strawberries!
- Dollop on hot chocolate – I love serving a cup of homemade hot chocolate with a dollop of homemade whipped cream in the winter!
- Filling for French pastries– Try filling cream puffs or homemade eclairs with this whipped cream recipe!
Recipe FAQ’s
This can vary. I put u00225 minutesu0022 but it can vary based on the speed, the temperature of the cream (and tools),and equipment you are using. You want to aim for a smooth consistency with peaks that hold their shape. Stop periodically and check the consistency so as to ensure you do not over-whip it.
Yes you absolutely can! If your whipped cream is now looking dense and curdled like, then you may have mixed it for too long. But you can still save it. With your mixer running on low, add a bit of cold heavy cream to the mixture and continue to beat until the mixture smooths itself out of again. How much you will need to add will depend on how overbeaten it is. It could be 1-2 Tbs. or up to 50% more than the recipe calls for!
For best results I recommend using full-fat cream so it whips up to full volume. A light cream will not work.
You can always make my stabilized whipped cream made with gelatin that is a bit stiffer and can be better for piping and hold up longer.
More Recipes To Try
If you love a homemade recipe like this one then be sure to try my chocolate ganache recipe. It’s perfect for drizzling on fruit or topping a cake with.
For more easy dessert recipes be sure to try my chocolate covered Oreos and my chocolate covered strawberries.
Ready To Bake Pies With Confidence?
Imagine making a homemade pie from scratch that everyone raves about! Grab my Pie Perfection eBook and learn how to master flaky crusts, flavorful fillings, and picture-perfect pies—no stress, just sweet success.
👉 Get The Ebook Here!

Whipped Cream
Ingredients
- 1 cup (240 mL) heavy cream cold
- 2 Tablespoons confectioners sugar (powdered)
- 1 teaspoon pure vanilla extract
Instructions
- Chill beaters and bowl for 10 minutes before starting the recipe. If using a stand mixer, you want to use the whisk attachment.
- With an electric mixer, whip cream, sugar and vanilla on low then increase to medium-high until stiff peaks form, about 5 minutes. The peaks should stand up on their own when you pull the beaters out of the bowl. Make sure not to over-beat, cream will then become lumpy and curdled looking. 1 cup (240 mL) heavy cream 2 Tablespoons confectioners sugar (powdered) 1 teaspoon pure vanilla extract
- Can be made up to 1 day ahead, just cover and refrigerate for 24 hours.
Notes
- Tools – Electric mixer (hand mixer or Kitchen-aid Stand mixer) | Metal mixing bowl
- Make Ahead: I prefer to make it the day I plan to serve it. But you can make this and keep it refrigerated in an air-tight container, up to 1 day in advance for best results. If it’s a hot, humid day I prefer to make and serve this right away!
- Overbeaten: With your mixer running on low, add a bit of cold heavy cream to the mixture and continue to beat until the mixture smooths itself out of again. How much you will need to add will depend on how overbeaten it is. It could be 1-2 Tbs. or up to 50% more than the recipe calls for.
- Timing: Recipe states up to 5 minutes but it can vary based on the speed, the temperature of the cream (and tools),and equipment you are using. You want to aim for a smooth consistency with peaks that hold their shape. Stop periodically and check the consistency so as to ensure you do not over-whip it.
- Use an electric mixer. You absolutely can make whipped cream by hand, but it’s going to take longer and require some serious arm muscle. Using a mixer, either hand-held or a stand mixer, will just make this whole process much easier on you.
- COLD is KEY. You want to make sure your heavy cream is cold! It will up much easier and to higher volume.
- Heavy cream is best. Again heavy cream is best for a whipped cream that holds it shape, but whipping cream will still work.
- Use a metal bowl. This is so you can pop it into your freezer and it’s get very cold very fast! Glass bowls also work, but will take a bit longer.
- Chill your bowl and beaters! Besides cold cream, you also want cold tools. I recommend putting your bowl and beaters into the freezer for 10 minutes before making your whipped cream to help it whip up to its best volume.
- Start on LOW speed. This is just so you don’t end up with splatters of heavy cream all over yourself and the counter! Then gradually increase the speed to high once it’s starting to thicken.
- STIFF peaks. You want peaks that when you pull the beater out of the bowl the peaks stand up on their own. I find stiff peaks means the whipped cream lasts longer and you can pipe it if need be.
- Do NOT overmix. We want stiff peaks, but you also don’t want to go past that so you end up overmixing it and turning it into sweet butter instead! You can always err on the side of less mixed if you are making this for the first time.


I can’t believe how easy this was to make. I will be making whipped cream from scratch from now on. Thanks for sharing the recipe.
I loveee this homemade whipped cream! So easy and delicious!
Will be making this homemade whipped cream often as its super easy to put together.
Yes, homemade whipped cream is so much better. There’re no surprise ingredients and it’s so easy to make it.
Super easy!
I Just tried this recipe and my family loved it.