This Post May Contain Affiliate Links. Please Read Our Disclosure Policy.
Calling all chocolate lovers! You know what makes a cinnamon roll better? Chocolate! These fluffy chocolate chip cinnamon rolls topped with a chocolate cream cheese frosting are the perfect holiday treat to serve for breakfast and brunch. These chocolate sweet rolls are a perfect Christmas morning treat.

Ok believe it or not I actually crave salty foods for breakfast. I want scrambled eggs, salty bacon, all on top of a buttery, flaky biscuit.
I skip over the pancakes and dive into the plate of bacon instead. Or maybe have it all with a breakfast charcuterie board.
However, there’s one sweet treat that will make me put down the bacon. Homemade cinnamon rolls. Ooey, gooey cinnamon rolls. The fluffy kind that you pull apart with your fingers to get to the center. You know what I’m talking about. Like my small batch cinnamon rolls (yes it makes just 4!) with cream cheese icing. Or maybe some decadent red velvet cinnamon rolls. Is there anything better?
Oh wait there might be. Cinnamon rolls with chocolate!!
Yes this time I took cinnamon rolls one step further and added some chocolate to the party. And they are like WHOA, FRIEND. Whoa cinnamon roll heaven.
I start with a yeasted dough, then that gets a brown sugar cinnamon filling with mini chocolate chips rolled up inside. And then after baking a big slather of a a sweet but slightly tangy chocolate cream cheese frosting on top. Behold homemade chocolate cinnamon rolls.
Drooling yet? Me too. I’ll show you step by step how to make this cinnamon chocolate rolls recipe!
See Also:
- Move over pumpkin! This butternut squash bread recipe is an easy loaf bread to make in the Fall.
- For more whole grain goodness, try my whole wheat blueberry muffins. These are the best breakfast treat!
- Sugar donuts are a fun breakfast treat to make with yeast! Dipped in sugar these donuts are light and fluffy.
- For a traditional Swedish breakfast treat during the holidays try making these St Lucia buns flavored with saffron!

 Buy Now →
  Buy Now →
  Buy Now →
 Ingredients Needed
For the dough:
- Milk – I used whole milk for the best flavor, and texture. You need this warmed to about 115F in order to activate the yeast. I used Red Star platinum yeast and follow the guidelines on the package, so if you are using a different yeast brand it’s always best to check the package to see what temperature they call for with the liquids. Make sure the milk isn’t too hot or it will kill the yeast. And if the milk is cold, it won’t properly proof the yeast and get it activated to work!
- Instant Yeast – I used Red Star Platinum yeast, I think it’s just superior in quality and highly recommend. I used 2 1/4 teaspoons which is the amount in one package of yeast. Yeast can expire so you want to make sure your yeast is bubbling and foamy before proceeding with the step. And make sure your milk isn’t too cold or it won’t proof. And too hot it will the yeast so be sure to check the temperature! You can use active dry yeast as well, but your rising times will be longer.
- Butter – I used unsalted butter so I can control the amount of salt. Salted butter can vary by brand as to how much salt they use so I like to use unsalted so I can control the amount of salt.
- Eggs – You need two room temperature eggs. Eggs will help to make for a rich dough! I bring my eggs to room temperature quickly by placing them uncracked into a bowl of warm water for 10 minutes before using.
- Flour – I used all purpose flour for this recipe. The best thing you can do is to invest in a kitchen scale and weigh your flour! Over measuring your flour is the biggest blunder bakers make. And too much flour will result in a very tough, dry cinnamon roll. I start by adding 4 cups of flour and then if the dough is way too sticky I will add in a little at a time up to an extra 1/2 cup more. But if you are measuring by volume, then be sure to read this post on How To Measure Flour.
- Salt – You always need a little salt to help strengthen the dough! Salt is very important in baking.
- Sugar – Of course we need some to sweeten things, but it also helps to tenderize our dough as well!
For the cinnamon sugar filling:
- Unsalted butter – We will use more butter to spread onto the dough to help the filling stick. Make sure your butter is VERY SOFT so you can spread it easily. If you are using salted butter, then reduce the salt. You can also use melted butter and brush on the dough.
- Brown sugar – I love brown sugar rolled up into my cinnamon rolls! Make sure to pack it down in your cup while measuring to get an exact measurement.
- Cinnamon – Of course cinnamon rolls need cinnamon! I like to use mix the cinnamon with the brown sugar to get it evenly combined before spreading over the softened butter.
- Miniature chocolate chips – This is what makes these cinnamon rolls extra decadent. Chocolate chips! I used miniature chocolate chips so they would “fit” better, and there would be more chocolate in every bite. But you could also chop up some chocolate and use that.
- Heavy cream – Ok this is a new cinnamon roll secret to baking up perfectly, fluffy cinnamon rolls. Heavy cream gets poured over the risen rolls right before baking. It sort of soaks in and creates the fluffiest rolls you will have ever eaten.
For the icing:
- Cream cheese – I used softened full-fat cream cheese in this glaze. I love the tang that the cream cheese brings to these rolls and balances out all the sweetness.
- Powdered sugar – This is key to sweetness but also for texture in creating a smooth glaze.
- Butter – Yes more butter. Forgive me. But just a little bit for richness.
- Vanilla – A little vanilla extract for flavor is needed, and pure is always best. I think the artificial stuff has, well, an artificial taste! So use pure for the best flavor.
- Unsweetened cocoa powder – This is what makes this a chocolate cream cheese frosting. You could use a dutch cocoa powder but would be more of a richer, dark chocolate icing.
- Heavy cream – Without this rich ingredient, the icing is well not icing! It’s way too thick! So thin out the frosting with a little heavy cream for the perfect consistency.

How To Make These Chocolate Cinnamon Rolls
Making the dough:
- Pour the warm milk in the bowl of a stand mixer and sprinkle the yeast overtop. Let the mixture sit for 5-10 minutes until foamy.
- Add the eggs, butter, salt and sugar.

- Add in 4 cups of flour and mix using the beater blade just until the ingredients are barely combined. Allow the mixture to rest for 5 minutes so the flour has time to soak up the liquids.
- Scrape the dough off the beater blade and remove it. Attach the dough hook.
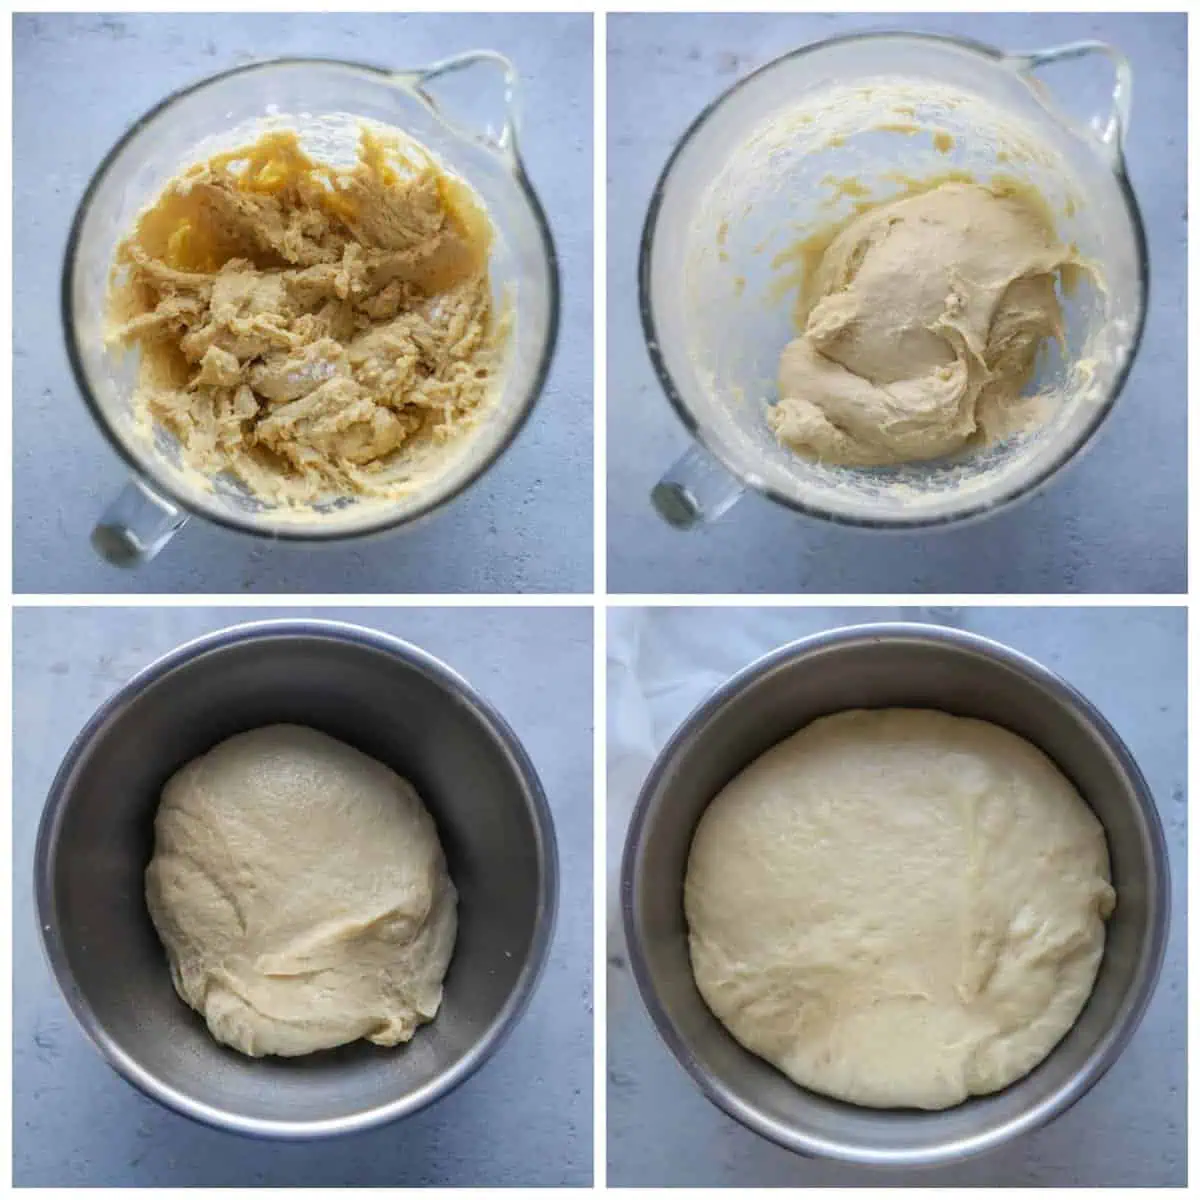
- Beat the dough on medium speed, adding in up to 1/2 cup more flour if needed to form a dough. Knead for 5-7 minutes or until the dough is elastic and smooth. **The dough should be tacky and will still be sticking to the sides of the bowl.
- Spray a large bowl with cooking spray.
- Use a rubber spatula to remove the dough from the mixer bowl and place it in the greased large bowl.
- Cover the bowl with a towel or wax paper.
- Set the bowl in a warm place and allow the dough to rise until double. (about 1 – 1 ½ hours, this will vary depending on how warm your kitchen is. The colder the kitchen the longer the rise. You can speed this up by putting your bowl in an oven. To proof in your oven: Preheat your oven at it’s lowest temperature for 1-2 minutes, then turn it off. Place your bowl of covered dough in after it’s off.
Heather’s Baking Tip
This is an enriched dough, because of the addition of butter, milk and eggs so the dough will take longer to rise. So the first rise could take 1 1/2 – 2 hours to rise. It will vary depending on how warm your kitchen is. A colder kitchen (like mine is in the winter!) means it will take longer for the dough to rise
If you want to speed up the rising process then pop them into an oven that is OFF but that had just been preheated for a couple minutes at its lowest heat setting. For me by proofing in my oven my dough only took about 30-45 minutes to rise.
Heather’s Baking Tip
The dough should have doubled in size for the first rise. And for the second rise the rolls should be doubled in size and puffier looking. You can check your dough for the first rise, by indenting two fingers into the dough up to your first knuckle. If the dough stays indented, then it’s risen enough and you’re all set!
10. While the dough is rising, prepare the cinnamon filling. In a medium bowl, combine the soft butter, brown sugar and cinnamon, mixing until well combined. Set aside.

Shaping The rolls:
- Sprinkle a pastry mat generously with flour. Turn out the dough onto the pastry mat and sprinkle the top of the dough with additional flour. Or you can roll the dough out onto a lightly floured surface.
- Flour a rolling pin and roll the dough to about a 24 by 15 inches rectangle. (the size of the rectangle can vary…it does not have to be exact!)
- Spread the filling over the whole dough rectangle. It can be very tough to spread out, so I find it best to use my hands!
- Cut the dough into 12 equal strips (about 2 inches wide). Roll up each strip into a spiral and place spiral side up into a lightly greased 9×13 baking pan. You can also roll up the dough into a tight log and cut into 12 equal pieces using a clean piece of dental floss.

Baking The Rolls:
- Cover the pan and allow the rolls to rise for 20 minutes or until nearly double.
- Preheat the oven to 375 degrees.
- Warm the heavy cream until the chill is off. It should NOT be hot, but warm to the touch.
- Once the rolls have risen, pour the heavy cream over the top of the rolls, allowing it to soak down in and around the rolls.
- Bake at 375 degrees for 25 minutes, until the rolls are lightly golden brown and the center rolls are cooked through. Baking time can vary based on how you rolled and cut the rolls, so start checking at 20 minutes but it may take an additional 5-7 minutes beyond that. If they are getting too browned, cover loosely with foil for the remaining baking time.

Make The Cream Cheese Frosting:
- While the rolls are cooling, prepare the cream cheese frosting.
- Cream the cream cheese and butter together.
- Add in the remaining ingredients. You may need to adjust the consistency with more cream.
- Frost the cooled rolls. You can use all of the icing for a thick layer of frosting! Or use as little as you want and drizzle it on!

Recipe Tips
- Check your milk temperature. You want to use a thermometer to test the temperature of your milk before adding the yeast. I used Red Star platinum yeast, and the package says to warm the milk to 130F. But if you are using a different yeast then check what the package says. Typically the liquid needs to be between 105-110F. Yeast is a living thing, which means if the milk is too hot, it will kill the yeast. If the milk is too cold the yeast will not proof properly. You can read more here from Bob’s Red Mills about what temperature kills yeast.
- Look for foam! After combining the milk and yeast, wait 5-10 minutes to double check that your yeast gets all foamy. This means it’s coming alive and starting to produce carbon dioxide, which is what helps makes the dough rise. If you don’t see any foam, then that means your milk might have not been hot enough to “wake it up” or too hot and you killed the yeast. Or your yeast is old and it’s expired. Yeast packets have expiration dates on them, so if you’re not sure check the package! If you don’t see any foam then it’s best to start over.
- Measure your flour accurately. Either measure using this method described in this post, or use a kitchen scale for best accuracy.
- Don’t be tempted to add more flour! I start with 4 cups, and then see if I need to add more. The dough will still be sticky and stick to the sides of bowl so start with 4 cups and add up to a 1/2 cup more. You might be tempted to add more, but don’t! You will end up adding too much flour resulting in tough, dry rolls.
- Proof in your oven for a quicker rise. You can leave on your counter to rise, but it will take longer and if you have a colder kitchen it will take even longer! So preheat in your oven. I turn my oven to its lowest setting (for me that’s 170F) and let it heat for a few minutes and then shut it off. I then place my bowl of dough, covered, in the oven. It’s basically a homemade proofing box.
- Use very soft butter for the filling. You need the butter to be very soft, almost melted! This is so it’s easily spread onto your dough and not tear it. I find using my hands in the end to spread it on to the dough.
- Cut the dough into strips. I used to try rolling up my dough into a log then cutting it into the rolls, but I always found I would squish the spiral. So then I resorted to using sewing thread to “cut” the dough, which is a technique you may have seen or tried. Then I found this much easier method! Cut first! Then roll. So easy and no more dough being squished!

Recipe Variations
- Add oreo cookies – For a fun twist, sprinkle on some crushed cookie crumbs.
- Add peanut butter – Instead of a chocolate icing try my peanut butter cream cheese icing!
- Use different chocolate chips – Try using white chocolate chips or chopped dark chocolate for these cinnamon chocolate rolls.

Frequently Asked Questions
Yes you can! Just cut them into 15 rolls instead of 12 rolls, and use a slightly larger pan like a 10×15 pan.
Yes you can! I like to make the dough and let it go through the first rise. Then I fill and shape the rolls and place them into the pan. At this point I cover them with plastic wrap and pop them in the fridge to rise overnight. The next morning, I let them sit at room temperate for 30 minutes before baking. If you find your rolls didn’t rise overnight in the fridge you may need to let them sit for up to an hour before baking to allow them to double in size.
First make sure you are baking on the center rack. Every oven is different, so if your rolls are browning too much just cover them loosely with tinfoil.
This is probably because you added too much flour. Stick to the 4 – 4 1/2 cups of flour when making the dough. Yes the dough will be slightly sticky, that’s what you want! And when rolling them out be careful to no add too much flour when dusting the surface. You want just enough flour so the dough doesn’t stick. If you add too much then your rolls will turn out tough and dry.
Yes you definitely can and I highly recommend it! You can freeze the cinnamon rolls after they have been shaped and placed into the pan BEFORE the second rise. Make sure they aren’t touching and line the pan with parchment paper so they can be easily released from the pan after they are frozen. Freeze them in the pan for about 1 hour, then place into a sealable plastic bag to be frozen for up to 3 months.
When ready to bake them, you need to place the rolls in your pan and then in the fridge overnight to thaw. The next morning, pull the pan out of the fridge and let the rolls rise until puffy and about doubled in size, about 1 hour. Then once risen, bake as normal!

More Recipes To Try
- Self Rising Flour Biscuits
- Lemon Cookies
- Brown Sugar Chocolate Chip Cookies
- 20 Self Rising Flour Recipes
- Milk Bar Cake

Chocolate cinnamon rolls
Ingredients
For the dough
- 1 cup (240 ml) milk very warm
- 2 ¼ teaspoons instant yeast
- ½ cup (1 stick, 113 g) unsalted butter
- 1 teaspoon kosher salt
- 2 large egg room temperature
- 4-4 1/2 cups (480-540 g) all purpose flour
- ½ cup (99 g) granulated sugar
For the filling
- ½ cup (113 g unsalted butter) very soft
- ¾ cup (160 g) packed light brown sugar
- 1 tablespoon ground cinnamon
- 1 cup (170 g) miniature chocolate chips
- 1/2 Cup (120 ml) heavy cream for pouring over the rolls
For the cream cheese icing
- 4 ounces cream cheese softened
- 2 ½ tablespoons unsalted butter softened
- 1 teaspoon vanilla extract
- 1 ¼ cups (150 g) confectioners sugar
- ¼ cup unsweetened cocoa powder
Instructions
For the dough
- Pour the warm milk in the bowl of a stand mixer and sprinkle the yeast overtop. Let the mixture sit for 5-10 minutes until foamy.
- Add the eggs, butter, salt and sugar.
- Add in 4 cups of flour and mix using the beater blade just until the ingredients are barely combined. Allow the mixture to rest for 5 minutes so the flour has time to soak up the liquids.
- Scrape the dough off the beater blade and remove it. Attach the dough hook.
- Beat the dough on medium speed, adding in up to 1/2 cup more flour if needed to form a dough. Knead for 5-7 minutes or until the dough is elastic and smooth. **The dough should be tacky and will still be sticking to the sides of the bowl.
- Spray a large bowl with cooking spray.
- Use a rubber spatula to remove the dough from the mixer bowl and place it in the greased large bowl.
- Cover the bowl with a towel or wax paper.
- Set the bowl in a warm place and allow the dough to rise until double. (about 1 – 1 ½ hours, this will vary depending on how warm your kitchen is. The colder the kitchen the longer the rise. You can speed this up by putting your bowl in an oven. To proof in your oven: Preheat your oven at it’s lowest temperature for 1-2 minutes, then turn it off. Place your bowl of covered dough in after it’s off.
- While the dough is rising, prepare the cinnamon filling. In a medium bowl, combine the soft butter, brown sugar and cinnamon, mixing until well combined. Set aside.
Shaping The rolls
- Sprinkle a pastry mat generously with flour. Turn out the dough onto the pastry mat and sprinkle the top of the dough with additional flour.
- Flour a rolling pin and roll the dough to about a 24 by 15 inch rectangle. (the size of the rectangle can vary…it does not have to be exact!)
- Spread the cinnamon filling over the whole dough rectangle. Mixture can be difficult to spread. I recommend using your hands!
- Cut the dough (I used a pizza cutter) into 12 equal strips. Roll up each strip into a spiral and place sprial side up into a lightly greased 9×13 baking pan. If any chocolate chips fall out, just sprinkle on top of the rolls.
Baking The Rolls
- Cover the pan and allow the rolls to rise for 20 minutes or until nearly double.
- Preheat the oven to 375 degrees.
- Warm the heavy cream until the chill is off. It should NOT be hot, but warm to the touch.
- Once the rolls have risen, pour the heavy cream over the top of the rolls, allowing it to soak down in and around the rolls.
- Bake at 375 degrees for 20-22 minutes, until the rolls are lightly golden brown and the center rolls are cooked through. Baking tie can vary based on how you rolled and cut the rolls, so start checking at 20 minutes but it may take an additional 5-7 minutes beyond that. If they are getting too browned, cover loosely with foil for the remaining baking time. I recommend checking the internal temperature of the rolls with a digital thermometer inserted into a center roll. Temperature should read 190F.
- While the rolls are cooling, prepare the cream cheese frosting.
Make The Icing
- Cream the cream cheese and butter together.
- Add in remaining ingredients. Mix until smooth. You may need to adjust the consistency with additional cream.
- Frost cooled rolls.
Notes
- Tools Needed: Stand Mixer |Red Star Yeast | Pastry Mat|Pizza Cutter | 9×13 Baking Pan | Rolling Pin
- Make Ahead: Make the dough and let it go through the first rise. Then I fill and shape the rolls and place them into the pan. At this point I cover them with plastic wrap and pop them in the fridge to rise overnight. The next morning, I let them sit at room temperate for 30 minutes before baking. If you find your rolls didn’t rise overnight in the fridge you may need to let them sit for up to an hour before baking to allow them to double in size.
- Instant yeast: If using active dry yeast your rising times will be a bit longer.
- Freezing: You can freeze the cinnamon rolls after they have been shaped and placed into the pan BEFORE the second rise. Make sure they aren’t touching and line the pan with parchment paper so they can be easily released from the pan after they are frozen. Freeze them in the pan for about 1 hour, then place into a sealable plastic bag to be frozen for up to 3 months. When ready to bake them, you need to place the rolls in your pan and then in the fridge overnight to thaw. The next morning, pull the pan out of the fridge and let the rolls rise until puffy and about doubled in size, about 1 hour. Then once risen, bake as normal!
- For Smaller Rolls: Cut them into 15 rolls instead of 12 and then use a slightly larger pan like a 10×15 pan.
- Note About The Yeast You Use. You want to use a thermometer to test the temperature of your milk before adding the yeast. I used Red Star platinum yeast, and the package says to warm the milk to 120 – 130F. But if you are using a different yeast then check what the package says. Typically the liquid needs to be between 105-110F. Yeast is a living thing, which means if the milk is too hot, it will kill the yeast. If the milk is too cold the yeast will not proof properly. You can read more here from Bob’s Red Mills about what temperature kills yeast.
- Look for foam! After combining the milk and yeast, wait 5-10 minutes to double check that your yeast gets all foamy. This means it’s coming alive and starting to produce carbon dioxide, which is what helps makes the dough rise. If you don’t see any foam, then that means your milk might have not been hot enough to “wake it up” or too hot and you killed the yeast. Or your yeast is old and it’s expired. Yeast packets have expiration dates on them, so if you’re not sure check the package! If you don’t see any foam then it’s best to start over.
- Don’t be tempted to add more flour! I start with 4 cups, and then see if I need to add more. The dough will still be sticky and stick to the sides of bowl so start with 4 cups and add up to a 1/2 cup more. You might be tempted to add more, but don’t! You will end up adding too much flour resulting in tough, dry rolls.
- Proof in your oven for a quicker rise. You can leave on your counter to rise, but it will take longer and if you have a colder kitchen it will take even longer! So preheat in your oven. I turn my oven to its lowest setting (for me that’s 170F) and let it heat for a few minutes and then shut it off. I then place my bowl of dough, covered, in the oven. It’s basically a homemade proofing box.


Dan says
Nice recipe, however, how much heavy cream? I didn’t see it in the recipe (perhaps I missed it). Otherwise it was very good.
Heather says
Oh my apologies! It’s a 1/2 cup. I’ll make sure to update the recipe. Thank you for letting me know and glad you loved them!
Veronika Sykorova says
So good! I hadn’t actually come across any chocolate cinnamon rolls before I found your recipe. It’s such a smart idea!
Heather says
Thank you so much Veronika! Glad you liked the recipe!
Heidy says
Whew!!!! Did you say Chocolate cinnamon rolls? OMG, these sound super fab! The pictures look so inviting that I am actually tempted to head to Walmart and pick up a few things to make this tonight! I’m not kidding!!!!
[email protected] says
I sure did Heidy 🙂 You won’t regret if you do!
Elaine says
I was looking for a new cinnamon rolls recipe to try, and this one ticks all the boxes. Fantastic results, and I can’t wait to have them on my table!
[email protected] says
Aw thank you Elaine!
Alex says
Why are chocolate cinnamon rolls not more popular?! I’ve never seen them before. I’m so trying these! Love that frosting.
[email protected] says
Aw thank you Alex!
Jacqueline Debono says
I’m with you when it comes to preferring savoury breakfast foods, especially bacon! But these chocolate cinnamon rolls just look too good not to try! On my to make list!
[email protected] says
Yes these go perfect with bacon 😉 Thanks Jacqueline!
Sandhya Ramakrishnan says
This is a chocolate lover treat!! Love the chocolates inside and out. And cutting the dough into strips before rolling is brilliant. This makes them stay intact and not become squishy when slicing. Thanks for sharing!
Heather says
Thanks Sandhya! Yes cutting then rolling is so much easier 🙂
Tammy says
Your cinnamon rolls look sooo soft and fluffy and the chocolate topping is wonderful! I’ve actually never had chocolate cinnamon bun so this is definitely on my list of things to try 😀
Heather says
Hi Tammy! Thank you and yes let me know what you think of them when you try them!
Marta says
I have no idea why I’ve never topped my cinnamon rolls with chocolate, but that’s all about to change! Thanks for this recipe!
[email protected] says
Hi Marta! Oh yes it’s heavenly – chocolate lovers dream!
Bernice Hill says
Whoa…what?! You pour cream over the buns before baking? I have never heard of this before. Definitely going to have to try this next time. And the chocolate too!
Shelley says
Oh you’re so right … how can cinnamon rolls possibly get any better? Chocolate! (I mean … doesn’t that make everything better???) And these are EXTRA-better (is that a thing LOL?) since they have chocolate in both the filling and the frosting! My oh my!
Heather says
Yes picked this tip from another baker and it makes for the BEST cinnamon rolls! And yes if you love chocolate these are definitely EXTRA better 🙂