
Vanilla Sponge Cake
This Post May Contain Affiliate Links. Please Read Our Disclosure Policy.
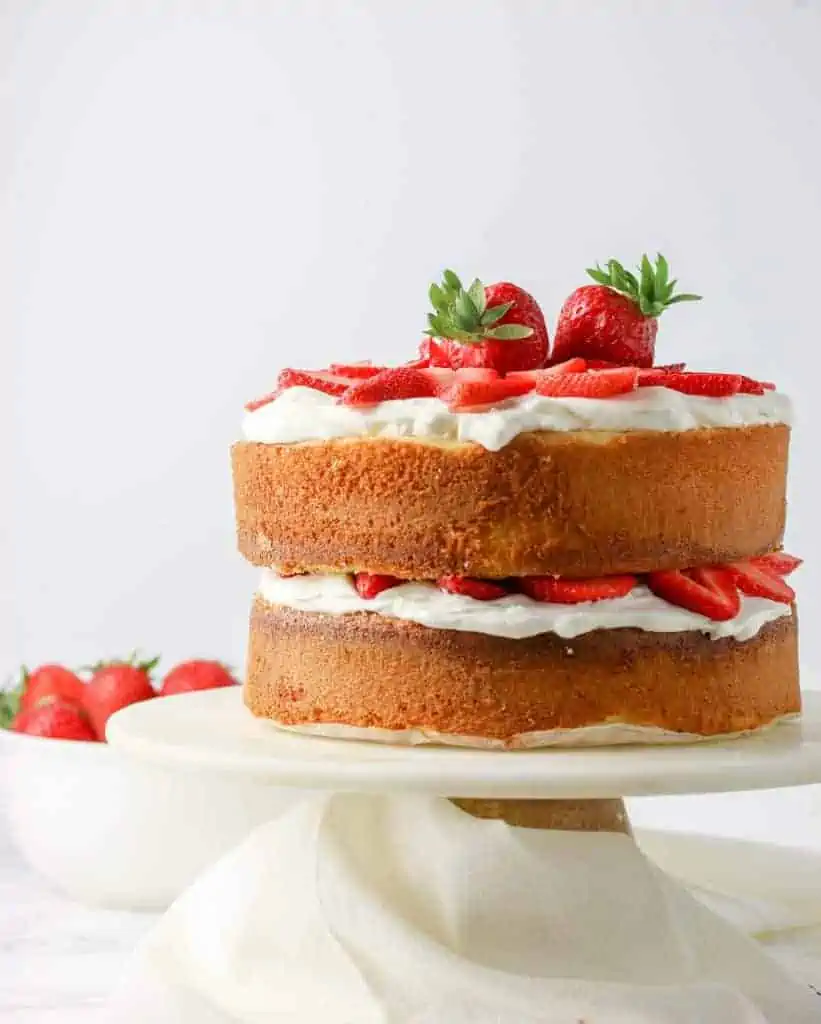
This is the perfect vanilla sponge cake recipe that is easier to make than you think. Top the layers with whipped cream and fresh strawberries for a perfect summer dessert!
Listen whenever someone tells me I have the Perfect _________________. I have to be a bit skeptical. I mean, come on…perfect?
So if you are like me and a bit skeptical when I say I have the most perfect vanilla sponge cake recipe for you that is the thing you need to make this summer. I get it. But trust me. It really, truly is.
Perfect Sponge Cake. Layer with whipped cream and call me done. I found it.
Ready To Take Your Baking To The Next Level?
Join the Ultimate Baking Bootcamp and master essential techniques like mixing methods and the why behind every recipe! Whether you’re a beginner or looking to refine your skills, this step-by-step class will help you bake with confidence and create flawless desserts every time. Start your baking journey today!
What is vanilla sponge cake?
First of, what is a sponge cake? I mean all cakes are the same right? Definitely not. There’s sponge, genoise, flourless, pound cake. The list goes on. According to Craftsy, there are 10 different types of cake in all. Ten! But let’s just focus on sponge shall we?
The two major types of cake are shortened or butter cakes and foam or sponge cakes. Sponge or foam cakes rely on air being whipped into the eggs to help the cake rise once its in the oven.
In this cake, the whole egg is whisked with sugar over a double boiler and then whipped on high speed in your mixer to incorporate the air.
The key to making a perfect sponge cake is achieve full volume when beating the eggs and then trying to deflate them as little as possible when you add in the dry ingredients.
In the end, the air that was incorporated during the mixing process expands causing the cake to rise. So in the end you have a light fluffy sponge cake that is perfect for a dollop of whipped cream and fresh strawberries piled on top.
Cake Flour 101
Cake flour is KEY in helping make this a tender sponge cake. Cake flour is milled from a soft winter wheat, and has a lower protein content than regular AP flour. Lower protein = less gluten formed. Less gluten results in less structure (aka a more tender cake).
This cake uses cake flour, which is lower in protein content than regular all purpose flour so it helps to create a nice tender cake.
For the complete Flour 101, you can nerd out on this post. And for more ways to use up that box of cake flour, check out my 41 cake flour recipes.

How To Make This Vanilla Sponge Cake
Step 1: Grease your cake pans properly with shortening and line the bottom of the pans with parchment paper.
For a full tutorial on how to line your cake pans, read this post.
Step 2: Sift your dry ingredients together. Sifting is crucial to help ensure that your dry ingredients are incorporated evenly and to aerate the mixture.

Step 3: Combine your wet ingredients in a second mixing bowl. Just simply whisk together your oil, milk and pure vanilla extract.

Step 4: In a heatproof bowl, you want to whisk your eggs and sugar together and set it over a double boiler. Just be sure the water underneath doesn’t touch the bottom of the bowl. You want to then whisk constantly. You need the mixture to get up 105°F.
HEATHER’S BAKING TIP: Use a digital thermometer to get the job done. Trust me, this handy dandy tool will be used all the time if you get to baking as much as I do.

Step 5: Once the egg/sugar mixture is up to temperature then you can add it to your stand mixer and whip the mixture on high speed until pale and thick (about 5 to 6 minutes) and then on medium for 2 to 3 more minutes to help stabilize the foam. Basically its going to look like pale yellowy ribbons of goodness.

Step 6: Sprinkle the dry ingredients.

Step 7: Then go ahead and drizzle the milk mixture in.

Step 8: Divide the mixture between your pans and that’s it! Time to bake! See I told you that you could do this. Just divide the batter and bake!
Frosting Options
Once the cakes are cooled, it’s time to frost.
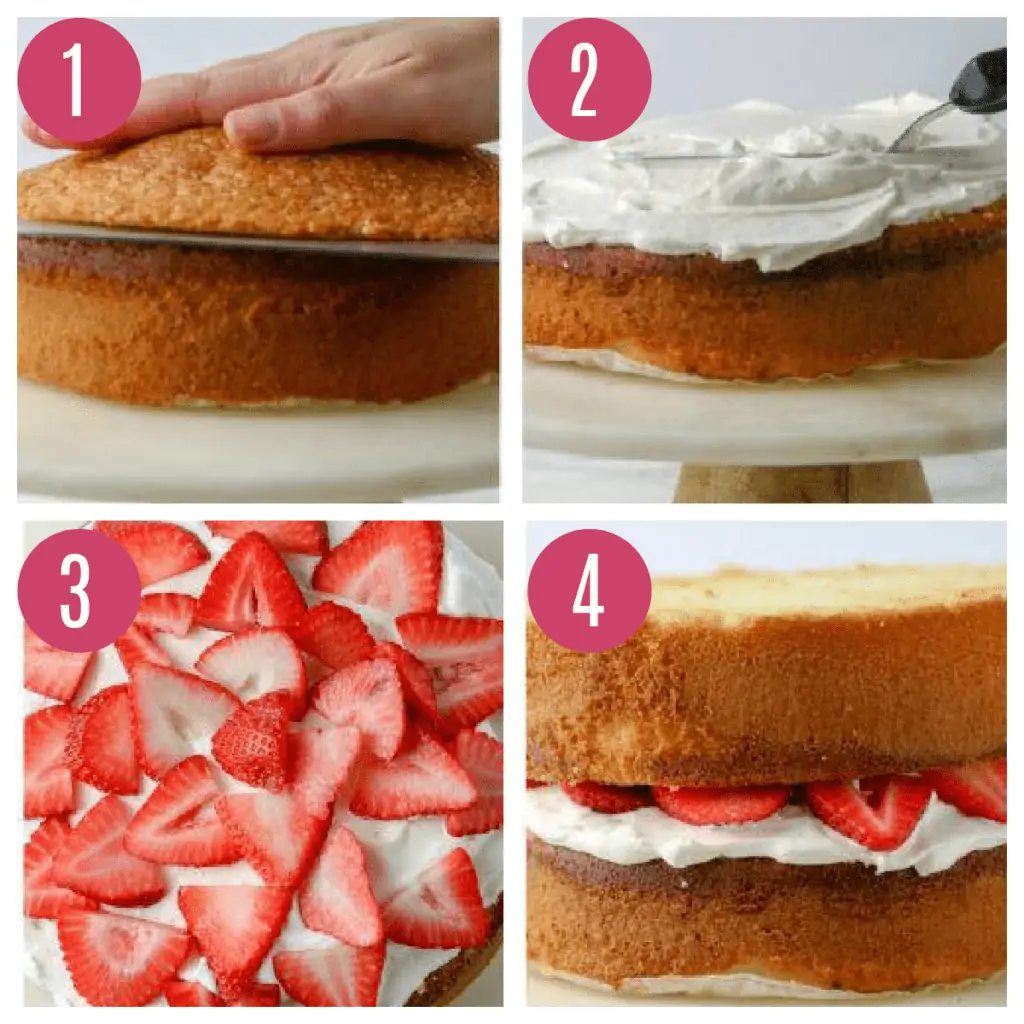
- First start by leveling the cake top if you need to if it’s not flat.
- Then frost with whipped cream.
- Layer your strawberries on.
- Top with another cake layer and repeat!
I topped each layer with stabilized whipped cream or my Whipped Cream and fresh strawberries. But really you could use whatever type of frosting you want. Maybe a chocolate italian meringue buttercream? Nothing wrong about that.
Check out my Ultimate Guide To Making The Best Buttercream Icing if you are new to making buttercream.
Recipe FAQ’s
Absolutely. You can make this cake 4 days ahead of time. Just allow the cake too cool, then wrap each layer in plastic wrap and store at room temperature.
You can also freeze this cake. Simply wrap in plastic wrap and one more layer of tinfoil or place inside a zip-loc bag. It can be frozen up to 3 months. You can allow it to thaw in the refrigerator, still wrapped, overnight. Then frost as normal. I find frosting a frozen cake much easier and would simply unwrap the cake directly from the freezer and frost frozen. Then serve once it has come to room temperature.
A Note About Cake Pans
Unfortunately this cake hasn’t worked out for every reader. And one possible reason (besides incorrect measuring – I always recommend measuring by weight!) is incorrect pans.
My 8-inch cake pans have 3-inch nice, tall sides to it. If your cake pans are on the shorter side, it could result in the cake overflowing. If you only have 2-inch tall cake pans you could try dividing this cake batter into 3 pans, or try using 9-inch cake pans, but will need to adjust the time it takes to bake.
Recipe Tips
- Grease the pans properly. There is nothing worse than having a cake that sticks! I find that greasing the sides with shortening works the best. And the addition of parchment paper on the bottom of the pans can ensure the bottoms don’t stick.
- Sift Your Flour. Be sure to sift and measure your cake flour accurately. If you don’t have any cake flour on hand, you can make your own cake flour.
- Add dry ingredients gradually. When adding the dry ingredients to the egg foam mixture, be sure to do so gradually so as not to deflate the mixture. One of the reasons that a sponge cake rises and results in a light and fluffy cake is because of the air that is incorporated.

Flavor variations
- Spices – You could try stirring in some spices, like cinnamon, ginger, or nutmeg to the dry ingredients for a whole new level of flavor!
- Extracts – You could also try stirring in a different extract like almond, or in combination with the vanilla.
- Zests– Try stirring in some citrus zest, like lemon or orange for a little extra flavor.
- Chocolate – I love vanilla, but this chocolate sponge cake is calling my name!
More Cake Recipes
So you might not believe me when I say this vanilla sponge cake is perfect. Like that alusive perfect date, it seems like a unicorn. But trust me on this. This is the perfect vanilla sponge cake.
Master The Art Of Baking!
Don’t miss out on the chance to elevate your baking skills! Join the Ultimate Baking Bootcamp today and unlock the secrets to creating perfect desserts every time. With expert guidance, step-by-step lessons, and insider tips, you’ll be baking like a pro in no time. Sign up now and start mastering your baking!
Vanilla Sponge Cake
Ingredients
For the vanilla sponge cake:
- 2 2/3 cups cake flour (322 grams)
- 2 teaspoons baking powder
- 1/2 teaspoons fine sea salt
- 1 cup (240 mL) vegetable oil
- 3/4 cup (180 mL) whole milk, at room temperature
- 1 Tablespoon pure vanilla extract
- 8 large eggs, at room temperature
- 2 1/3 cups granulated sugar (463 grams)
For the whipped cream:
- 1 teaspoon unflavored gelatin
- 4 teaspoons cold water
- 1 cup heavy cream
- 1/2 cup powdered sugar
- 1/2 teaspoon vanilla extract
- strawberries sliced
Instructions
To make the vanilla sponge cake:
- Prep oven and pans. Preheat the oven to 350F/175C, with a rack in the middle. Grease and flour two 8-inch round cake pans. *see note about cake pans below
- Make the cakes: Sift the cake flour, baking powder, and salt together in a medium bowl. In a container with a spout (I used my 2-cup liquid measuring cup) whisk together the oil, milk, and vanilla.
- Heat sugar and eggs. In the bowl of a stand mixer fitted with the whisk attachment (or in a large heatproof bowl, using a hand mixer) beat the eggs and sugar to combine. Set the bowl over a medium saucepan of barely simmering water (with the bowl not touching the water) and heat, whisking constantly, until the mixture registers 105F/41 C on an instant read thermometer.
- Beat sugar and eggs. Remove the bowl from the saucepan and whip the mixture on high speed until pale and thick, 5 to 6 minutes. Reduce the speed to medium and beat for 2 to 3 minutes more (this will help stabilize the foam).
- Add flour. Sprinkle about one quarter of the flour mixture over the egg mixture and mix on low speed just until incorporated. Add the remaining flour mixture in to 2 to 3 additions, mixing just until incorporated into the batter. Gradually drizzle the milk mixture into the batter, mixing just until incorporated.
- Bake cakes. Divide the batter between the prepared pans (about 730 grams per pan). Bake the cakes until the centers spring back when touched, 45 to 55 minutes. Cool in the pans for 15 minutes, then invert onto a wire rack to cool completely. I split the layers into two and frosted with whipped cream and fresh strawberries. But you can really use any type of buttercream you want. If you use both pans, it makes a tall cake, You could also cut each cake into two layers, and make two smaller cakes (or freeze one for later!)
To Make The Whipped Cream:
- Place cold water in small bowl and sprinkle gelatin over it. Let sit for 5 minutes. While it’s sitting, place heavy cream, powdered sugar, and vanilla in the bowl of a stand mixer with the whisk attachment or in a mixing bowl if using an electric beater. Once gelatin is set, place bowl in microwave and heat until gelatin turns to liquid, about 10 seconds.
- Turn mixer on to start beating cream. Let it run for about 1 minute and then with the mixer on high, very slowly pour the melted gelatin in, in a small steady stream.
- Continue beating cream until you reach medium-stiff peaks. Spread or pipe whipped cream as desired. Top with fresh sliced strawberries
Notes
- Cake Pan Size: Some readers have trouble with their cake overflowing. You need two 8-inch cake pans. I use pans that have 3-inch tall sides as this cake rises quite a bit. If yours are shorter it may overflow in the oven. You can always try dividing the batter between 3 cake pans, or try two 9-inch pans but will need to adjust the baking time.
- Grease the pans properly. There is nothing worse than having a cake that sticks! I find that greasing the sides with shortening works the best. And the addition of parchment paper on the bottom of the pans can ensure the bottoms don’t stick.
- Be sure to sift and measure your cake flour accurately. If you don’t have any cake flour on hand, you can make your own cake flour.
- Add dry ingredients gradually. When adding the dry ingredients to the egg foam mixture, be sure to do so gradually so as not to deflate the mixture. One of the reasons that a sponge cake rises and results in a light and fluffy cake is because of the air that is incorporated.
- Make in advance. You can make this cake 4 days ahead of time. Just allow the cake too cool, then wrap each layer in plastic wrap and store at room temperature.
- Freeze this cake. You can also freeze this cake. Simply wrap in plastic wrap and one more layer of tinfoil or place inside a zip-loc bag. It can be frozen up to 3 months. You can allow it to thaw in the refrigerator, still wrapped, overnight. Then frost as normal. I find frosting a frozen cake much easier and would simply unwrap the cake directly from the freezer and frost frozen. Then serve once it has come to room temperature.


CAN IS USE VANILLA PASTE INSTEAD?
Great question! Yes, you can substitute vanilla paste for vanilla extract in a 1:1 ratio. It will give the cake a lovely, rich vanilla flavor with visible specks. Enjoy baking!
How long would it have to cook in a 9 by 13 inch pan
Hi! Thanks for asking. In a 9×13-inch pan at 350°F, I’d estimate around 35–45 minutes, but ovens can vary, so keep an eye on it and test with a toothpick for doneness. I’m also including a link to my Oven Baking Temperature Guide to help you out! Thanks for baking with us.
I would love to try this.Can I use a nine by thirteen is square cake pan
That should work! I’ve never baked it in a 9×13 before, so just be sure not to overfill the pan and keep an eye on the baking time, as it may need to be adjusted. Happy baking, and enjoy the cake! Thanks for stopping by!
Can I make the whipped cream frosting a day ahead of time?
Thank you!
Yes a day ahead of time should be fine. Just keep refrigerated. Enjoy!