
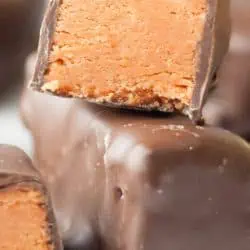
Homemade Butterfingers

This Post May Contain Affiliate Links. Please Read Our Disclosure Policy.
Only 3 ingredients needed to make your own homemade butterfingers at home!

You ever find that you can totally say no to a candy bar any day of the week. But then those fun size candy bars appear in like oh August it seems to get ready for Halloween. And then you find yourself eating like 3 or 4 a day? Or 5. Or 6. Who’s counting?
What is about the fun size that makes me think they don’t count calorie wise? And eating 3 or 4 in a sitting is so not the same as having an entire candy bar right? You do the same right?
Ready To Take Your Baking To The Next Level?
Join the Ultimate Baking Bootcamp and master essential techniques like mixing methods and the why behind every recipe! Whether you’re a beginner or looking to refine your skills, this step-by-step class will help you bake with confidence and create flawless desserts every time. Start your baking journey today!
Ingredients Needed
Now I know buying a bag of candy is so easier than making it yourself, but these homemade butterfingers are so easy, and so darn good. I can’t even tell you how many of these little guys I ate.
Only 3 ingredients. Yea, three. That’s it. And oh they are made in the microwave too. Ok you ready for these little treats? Here is what you need: Candy Corn, Peanut Butter, and Chocolate wafers (or chips) to coat them in once they are done. Yup all you need is:
- Candy Corn
- Peanut Butter – I recommend peanut butter that isn’t the all natural kind because it might make it too oily.
- Chocolate – You are going to need to use 2 bags for this recipe. You could also use chocolate chips, or even white chocolate chips! Sky’s the limit.

How To Make These Homemade Butterfingers
- Melt the candy corn in the microwave. Start by simply melting your candy corn in the microwave until they are melted. Do this in 30 second intervals, so as not to burn them. You always want to make sure to stir them in between as well.
- Add the peanut butter. Once they are all melted, stir in your peanut butter. If your candy corn begins to seize, just pop it back in the microwave again, to get them melt again.
- Freeze. When you have it all combined, time to press them into your pan and pop in the freezer for 15-20 minutes. Just enough to let them set up. After that, you can cut them into bars. Here is where you can have some fun. You want full size bars, fun size, butterfinger bites? Up to you! I went with fun size.
- Dip In Chocolate. Next of course you have to cover them in chocolate. After you have cut them into bars, get a cookie sheet ready with parchment paper so they don’t stick after you let them swim around in a big bowl of melted chocolate. I mean what is a butterfingers with the chocolate coating? I love using Ghiradelli Chocolate Melting Wafers.
The Ghirardelli wafers though are amazing chocolate and melt perfectly in the microwave. Want a whole tutorial on dipping chocolate, then this is a must read for you.

How To Dip Your Butterfingers
- Use A Fork: Use a fork to roll the butterfingers around in the chocolate. Why? Well it makes easier then to let the excess chocolate drip off. Just simply scrape the extra chocolate on the side of your bowl.
- Use A Toothpick. My next little handy tool? A toothpick. Yea, super fancy. But seriously a toothpick is all you need to help you set the candy on your parchment paper lined baking sheet. It just helps ease the candy off the fork without messing up all your beautiful work.
- Then let them sit until the chocolate hardens. And that’s it. Seriously. Homemade butterfingers with only 3 ingredients and made in the microwave.

Recipe Tips
- Microwave slowly. Do this in 30 second intervals and then stir in between so things don’t burn on you. Same thing for the chocolate dipping.
- Use smooth, non-natural peanut butter. Natural peanut butter might be too oily for these candies.
- Line your pan with parchment paper. Parchment paper will make it so you can easily release the candy after freezing to cut into bars.
Pan Size
I used an 8×8 pan which made rather thick candy bars. You could use a 9×9 pan or try a 9×13 pan (although this might be too large). You could also halve this recipe. If you do then use a loaf pan for thicker bars, or stick with the 8×8 if you do want the thinner candy bars.

Recipe FAQ’s
Around this house? Not long! But if you have some self control, they should keep covered at room temperature for up to 5 days, or in the refrigerator for up to 2 weeks.
Yes you can! Use a candy mold and paint, or fill the mold with chocolate leaving a shell. Let it freeze solid (about 10-15 minutes). and then make the butterfinger filling, and let it cool softly but not harden and then press into the mold. Top with more melted chocolate and allow to firm up.
Yes, use a peanut free butter like cashew butter or SunButter.
More Recipes To Try
Master The Art Of Baking!
Don’t miss out on the chance to elevate your baking skills! Join the Ultimate Baking Bootcamp today and unlock the secrets to creating perfect desserts every time. With expert guidance, step-by-step lessons, and insider tips, you’ll be baking like a pro in no time. Sign up now and start mastering your baking!
Homemade Butterfingers
Ingredients
- 16 ounces candy corn
- 16 ounces smooth peanut butter
- 24 ounces (4 cups) semi-sweet chocolate melted
Instructions
- Pour candy corn into a microwave safe bowl. Microwave for 1 minute and stir. Microwave again for another 30 seconds and stir again. Continue to microwave and then stir at 30 second intervals until candy corn is completely melted.
- Add in peanut butter and mix until thoroughly combined. If candy corn hardens, microwave for another 30 seconds and then stir to mix. Pour mixture into a 8×8 pan (or larger pan if you prefer thinner candies) lined with parchment paper and press to evenly distribute. Place in freezer for about 10-15 minutes until it hardens.
- Meanwhile, melt chocolate in another microwave safe bowl for 30 seconds and then stir. Microwave again and stir, continuing at 30 second intervals until chocolate is completely melted. . Careful not to overcook the chocolate.
- Remove candy corn mixture from freezer. Using a sharp knife, cut into butterfinger bar sizes (or whatever size you prefer). Dip buttefinger in melted chocolate. Make sure to coat both sides. Then place on a cookie sheet (or cooling rack) that has parchment paper underneath. Repeat with remaining bars. Once finished, place bars in freezer to set.
Notes
- Store covered at room temperature for 5 days, or in the fridge for up to 2 weeks. I also like to freeze mine, but just let them thaw before enjoying!
- Microwave slowly. Do this in 30 second intervals and then stir in between so things don’t burn on you. Same thing for the chocolate dipping.
- Use smooth, non-natural peanut butter. Natural peanut butter might be too oily for these candies.
- Line your pan with parchment paper so you can easily release the candy after freezing to cut into bars.
- Quick note on pan size: I used an 8×8 pan which made rather thick candy bars. You could use a 9×9 pan or try a 9×13 pan (although this might be too large). You could also halve this recipe. If you do then use a loaf pan.for thicker bars, or stick with tthe 8×8 if you do want the thinner candy bars.


I have made these before but have never used this much peanut butter. I think I have used 2 cups of candy corn and 2 cups peanut butter. I thought 16 ounces of peanut butter would be 2 cups. Just wondering how you came up with 3 3/4 cups of peanut butter.
My apologies – that is a mistake. Thank you for bringing it to my attention. The 16 ounces is correct.
Are these crunchy like butterfingers???
Hi Linda, yes they do have a slight crunchy texture and taste just like a butterfinger!
Oh wow! Cannot wait to try these – I would devour the whole batch!
let me know how they turn out for you
Well you know a good way of using candy corns with this recipe! Never knew you could do such a thing of making butterfingers!
perfect for halloween
These were delicious and super simple to make too! Thank you!!
Thank you for your great feedback!
This candy looks delicious! Perfect for Halloween.
Oh Biana I couldn’t agree more!!
Just 3 ingredients? Sign me up! I definitely wouldn’t stop at just 3 candies a day:)
especially when they’re such a fun size!