
Black Forest Cheesecake
This Post May Contain Affiliate Links. Please Read Our Disclosure Policy.
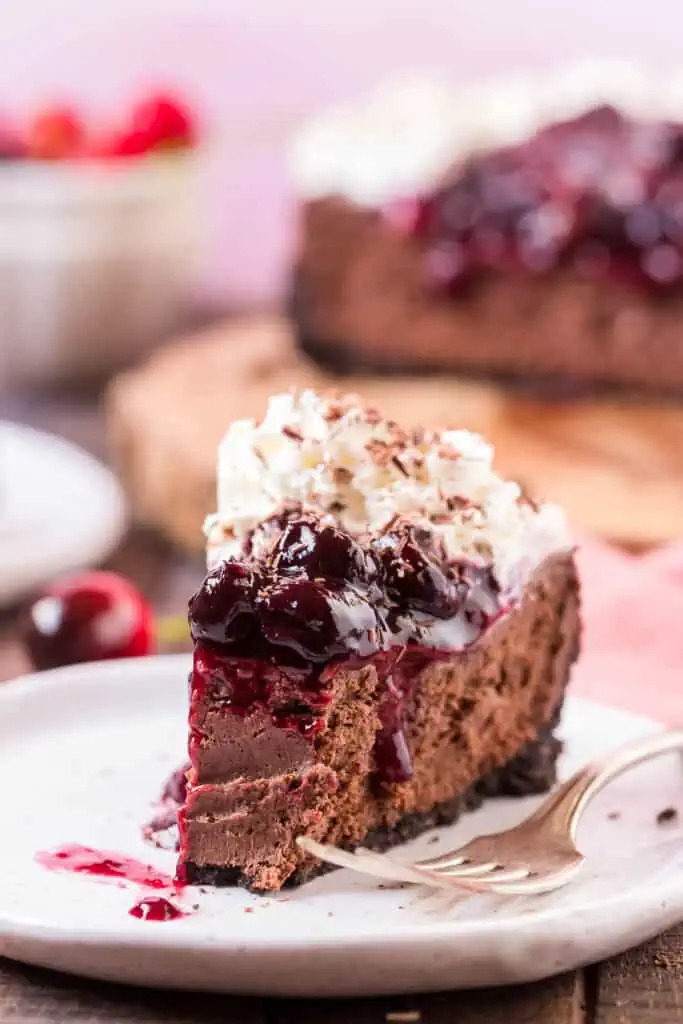
This black forest cheesecake is a decadent, delicious, and delectable dessert you can proudly serve on special occasions and celebrations. The silky, smooth cheesecake is sitting on an Oreo crust and topped with sweet and tangy cherry topping. You can add whipped cream and more chocolate shavings if you want!

After skipping cheesecakes when growing up, I realized what I’d been missing after tasting a delicious and well-made slice of cheesecake. Since then, I’ve been trying to make it up.
I made a few cheesecake recipes like key lime pie cheesecake, pumpkin cheesecake, and triple chocolate cheesecake. I also made a no-bake cheesecake recipe.
But, I feel like that is still enough. I need a crowd-pleaser and showstopper cheesecake that I can serve at celebrations or special occasions like Christmas and Thanksgiving. That’s why I came up with the idea of making black forest cheesecake!
Black forest cake is a staple in special celebrations in our household. So, I turned it into a decadent and delicious black forest cheesecake!
Grab My Cheesecake Book Now!
Discover the joy of baking with my digital cookbook, ‘Cheesecake for All Seasons‘! This comprehensive eBook features over 50 delectable cheesecake recipes, organized by season to suit every occasion.
Each recipe comes with detailed, foolproof instructions, essential baking tips, and troubleshooting advice to ensure your cheesecakes turn out rich, creamy, and delicious every time. Whether you’re a seasoned baker or a novice, this e-book will help you create perfect, indulgent desserts all year round.
See Also:
- Calling all chocolate lovers with this triple chocolate cheesecake recipe! No water bath is needed.
- San Sebastian cheesecake is a wonder to make! And couldn’t be simpler. No crust is needed.
- Make this classic cherry cheesecake dessert with fresh cherry topping and graham cracker crust!
- Not a fan of cherries? Try my strawberry topping for cheesecake instead!

Why You’ll Love This Black Forest Cheesecake
- Easy To Make – This black forest cheesecake recipe is easy to follow. Even first-timers can make it!
- Prepare Ahead – You can make this black forest cheesecake on the weekends and chill overnight. Then, serve or consume through the weekend.
- No Water Bath – For this recipe, no water bath is needed. You can put your cheesecake batter in the oven straight!

Ingredients Needed
For this black forest cheesecake recipe, you will need the following cheesecake ingredients.
For chocolate cookie crust:
- Chocolate cookie crumbs – I used oreo chocolate sandwich cookies for this black forest cheesecake recipe. You can make crumbs by crushing oreo sandwich cookies using a rolling pin, kitchen mallet, or food processor.
- Melted butter – I use unsalted butter for this black forest cheesecake recipe.
For the cheesecake filling:
- Cream cheese – For this recipe, I use full-fat cream cheese. Based on experience, full-fat cream cheese gives a better texture after cheesecake bakes. Also, don’t use the tub cream cheese variety. Always go for packages cream cheese blocks, this type of cream cheese will give a smoother and silkier texture to your black forest cheesecake.
- Dark chocolate- I used bittersweet or semi-sweet for this black forest cheesecake recipe. I prefer using chocolate bars, like Ghiradelli, that I can chop as opposed to chocolate chips which have stabilizers and don’t always melt well. I recommend using semi-sweet or dark chocolates. Anything sweeter than that will make your cheesecake filling and melted chocolate too sweet.
- Eggs – Your eggs should be at room temperature. Place in a bowl of warm water for 10 minutes before using.
- Cocoa powder – You can use unsweetened cocoa powder or Dutch processed cocoa powder . I prefer to use Dutch for a richer, more chocolate-y taste.
- Heavy cream – For silkier texture. You can also use sour cream. Sour cream is commonly used to have a softer cheesecake. If you use sour cream, choose full-fat sour cream.
- Sugar – I used granulated sugar.
- Vanilla extract – I prefer using pure vanilla extract because the flavor is richer. But you can also use imitation vanilla extract.
- Salt
For the cherry topping:
- Pitted cherries – Fresh or frozen cherries will do. Just make sure the seeds are removed. If you don’t have fresh or frozen sweet or sour cherries, you can use can cherry pie filling. However, be mindful of the sweet cherries in a cherry pie filling. The cherries are soaked in sweet cherry juice in the cherry pie filling. Adjust the sugar if you use can cherry pie filling.
- Sugar – I used granulated sugar. You can also use powdered sugar, white sugar, or brown sugar.
- Lemon juice – This is to add acidity, balance the sweetness, and adjust the consistency of the cherry topping.
- Cornstarch – For thickening the cherry topping.
- Cherry liqueur (Optional) – For a boozy kick, and more cherry flavor you can stir in 1-2 tablespoons to your liking of cherry liqueur.

How To Make Black Forest Cheesecake
This black forest cheesecake needs time to set and chill. Before adding the cherry toppings, leave your cheesecake in the fridge for at least 6 hours or overnight.
Cherry Topping
1. Combine Ingredients
Dissolve cornstarch in water to make a slurry.
In a saucepan, combine sugar, lemon juice, pitted cherries, and slurry. Bring to a boil over medium heat. Stir frequently to avoid burning.
2. Thicken The Sauce
When the cherry toppings start to thicken, lower the heat. Taste your sauce and adjust the flavors to your liking.
Remember, your cherry toppings will thicken as it cools down. If you think it is too thick, you can add water or lemon juice.

The Crust
1. Preheat Oven
Preheat your oven to 350°F/180°C.
Grease your springform pan with non-stick cooking spray. You can also line the bottom part of your 9-inch springform pan with parchment paper to prevent your chocolate oreo crust from sticking.
2. Combine Ingredients
Mix crushed oreo sandwich cookies with melted butter until they can hold their shape. It should have a wet sand texture.

3. Bake
Transfer mixture into springform pan. Press the mixture using a measuring cup into the bottom and sides of the prepared springform pan.
Bake for 8 to 10 minutes at 350°F/180°C. Set aside to cool.

Cheesecake Batter
1. Melt Chocolate
In a small saucepan or microwave-safe bowl, combine chocolate chips and heavy cream. Heat the saucepan until the chocolate chips melt. Stir frequently to prevent burning.
For the microwave method, heat the small bowl for 30 seconds intervals at around 50% power. Stir in between internals.

2. Mix Ingredients
In a large bowl, combine sugar and cream cheese. Cream cheese should be at room temperature and softened.
I use my stand mixer with a paddle attachment for this step. Beat together at low speed using a stand electric mixer. Scrape the sides and bottom using a spatula and continue beating until you reach a smooth consistency.

Continue beating and add eggs, one at a time.

Add the rest of your ingredients, cocoa powder, vanilla extract, and salt.

Stir in melted chocolate chip mixture. Don’t forget to scrape the sides and bottoms to ensure all the ingredients are incorporated well.

Beat chocolate cheesecake batter until smooth.
3. Bake
Transfer the chocolate cheesecake batter to the prepared pan with the oreo crust.

Bake the cheesecake at 350°F/180°C for 45 to 50 minutes or until the cake is cooked. The edges should be set, but the middle should be still a little jiggly in the center.
Don’t remove the springform pan from the oven. Turn off the oven and slightly leave the oven’s door ajar to cool your creamy chocolate cheesecake. You can use a wooden spoon as a stopper. Leave your cheesecake in the oven for 1 hour.

4. Chill
Remove your cheesecake from the oven. Let it cool completely in your cooling rack or chill in the fridge. If you are moving your chocolate cheesecake into the fridge, it is important to cover it with a paper towel and then wrap it with plastic wrap or heavy-duty aluminum foil.
Assemble And Serve
You can do this step once your cheesecake was able to set and chill.
Pour your cherry topping mixture over the cheesecake. If you have whipped topping or shaved chocolate you can garnish your black forest cheesecake with them.
Assemble the cherry topping mixture at the center. Then, surround it with whipped topping. Lastly, garnish with chocolate shavings and you have a showstopper black forest cheesecake!
You can garnish your chocolate cheesecake however you like. Add chocolate curls, whipped cream, cherries, melted chocolate, or any topping you have in your pantry.

Recipe FAQs
Yes, you can freeze the whole black forest cheesecake or per individual slice. You can freeze this cheesecake for up to two months. But I highly recommend consuming frozen cheesecake within a month. This is to avoid changes in texture and taste. To freeze, wrap them with layers of plastic wrap. Transfer into an airtight container or freezer bag. Remove excess air and freeze. Move frozen cheesecake to the fridge and leave overnight to thaw.
It is either overcooked or your cheesecake filling is overmixed. That’s why it is important to ensure your cream cheese is at room temperature before adding it to your mixture. If your cream cheese is cold, it will be harder to incorporate with other ingredients and needs more mixing.
Also, avoid opening your oven door while baking a cheesecake. The sudden changes in temperature will cause your finished cheesecake to crack.
If your black forest cheesecake cracked, no worries! You can cover it up with cherry topping, chocolate curls, and whipped cream!
Serve a delicious, standout, and decadent dessert at your next family gathering or celebration. This black forest cheesecake is not only beautiful in the eyes but tasty on the inside!
This cheesecake will keep covered in the fridge for up to 4 days.
More Recipes To Try
Get My Cheesecake Book!
Don’t forget to grab a copy of my cookbook, Cheesecake For All Seasons! It’s an easy to download digital e-book with over 50 delicious cheesecake recipes, toppings, tips and tutorials for you to master making cheesecake at home!

Black Forest chocolate cheesecake
Ingredients
Cherry topping:
- 1 tablespoon cornstarch
- ¼ cup (60 ml) water
- 4 cups cherries fresh or frozen
- 1/3 cup (67 g) granulated sugar
- 1 tablespoon lemon juice
- 1-2 tablespoons kirsch liqueur optional
Crust:
- 24 Oreo cookies
- 5 Tablespoons (71 g) unsalted butter melted
Filling
- ½ cup (120 ml) heavy cream
- 2 cups (340 g) bittersweet or semi-sweet chocolate, chopped
- 24 ounces (3 packages) full-fat cream cheese softened to room temperature
- 1 cup (200 g) granulated sugar
- 4 large eggs room temperature
- 1 ½ teaspoons vanilla extract
- 2 Tablespoons unsweetened or Dutch cocoa powder
- Whipped cream for topping
Instructions
Make the cherry topping:
- In a small bowl, stir together the water and cornstarch.
- In a medium saucepan, stir together the cherries, lemon juice, sugar, and cornstarch/water mixture. Cook over medium heat until boiling, stirring continuously and allow to thicken, about 10 minutes.
- Remove from the heat and stir in kirsch liquor if using, allow to cool. Refrigerate until ready to use.
Make the graham cracker crust:
- Prepare oven and pan. Position a rack in the center of the oven. Preheat the oven to 350℉ (177℃).
- Make the crust. In your food processor pulse the cookies together until they are fine crumbs. You can also do this in your stand mixer, or place cookies in a plastic bag and crush with a rolling pin. If doing this by hand with a rolling pin, transfer the crumbs to a mixing bowl.
- Add butter and bake. Add butter and mix until combined. Press the crust mixture into the bottom and about halfway up the sides of a 9-inch springform pan. Place the pan on a baking sheet and bake for 8-0 minutes. Remove from the oven and set aside.
Make the chocolate cheesecake:
- Make the filling. Combine the heavy cream and chocolate in a small saucepan or in a microwave-safe bowl. Heat, stirring frequently, until the chips melt and the mixture is smooth. If doing this in the microwave, heat for 30 seconds at 50% power, stirring in between.
- Beat cream cheese and sugar. In a large mixing bowl (I like to use my stand mixer with my paddle attachment) beat together the cream cheese and sugar at low speed, until thoroughly combined. Scrape the bottom and sides of the bowl with a spatula and beat until smooth. You don’t want to continue to mix the cream cheese at this point or it will incorporate too much air and cause your cheesecake to crack so mix briefly.
- Add eggs. Add the eggs one at a time, beating to combine. Scrape down the bowl as needed.
- Add vanilla and cocoa. Stir in the vanilla, then the cocoa powder and beat to combine.
- Add melted chocolate mixture. Add the chocolate/cream mixture, beating on low speed until thoroughly combined. Scrape the bottom and sides of the bow with a spatula; and beat to combine briefly, just until smooth.
- Pour the batter into the crust. Place the pan on a baking sheet. Bake the cake (at 350oF) for 45 to 50 minutes. The center may not look set quite yet but will continue to bake up as it cools.
- Cool the cheesecake. Turn off the oven, crack the oven door open several inches, and allow the cheesecake to cool in the oven for 1 hour. Remove the cheesecake from the oven, and set it on a rack to finish cooling. You can refrigerate it to cool as well, just cover with a paper towel to prevent condensation then cover with another layer of plastic wrap or tinfoil. When ready to serve, top with cherry topping and serve with fresh whipped cream.
Notes
- Storage: Keep covered in the fridge for up to 4 days. I like to place a paper towel over the surface, then cover with plastic wrap or tinfoil. The paper towel helps to keep condensation from forming on top of the cheesecake.
- Freezing: You can freeze a whole or slice of cheesecake for up to 2 months. Wrap well with several layers of plastic wrap (I also like to then place in a plastic bag or wrap a final time in tinfoil). Thaw overnight in the fridge before serving.
- Cream cheese: Full-fat cream cheese is best for texture. Do not use whipped or tub style cream cheese. Make sure the cream cheese is softened to room temperature. If the cream cheese is cold it will not mix in well and not make for a smooth filling.
- Cocoa powder: You can use either unsweetened or Dutch process cocoa powder. I prefer Dutch process as it gives it a richer, more chocolatey flavor.


I adapted the recipe to Lactose free. I was a bit worried, that it wouldn’t set, but it turned out really well. So smooth and creamy.
Everyone enjoyed it.
Thank you for sharing! I’m so happy to hear that the lactose-free adaptation worked out perfectly and that everyone enjoyed it. Your feedback means a lot!
I made this for New Years Day pudding. Absolutely gorgeous.
I adapted it to be lactose free and you couldn’t tell the difference, wonderful.
Thank you so much! I’m thrilled you loved the cheesecake, and it’s great to hear it worked so well as lactose-free. Happy New Year! 🎉