
Butter Cookies
This Post May Contain Affiliate Links. Please Read Our Disclosure Policy.
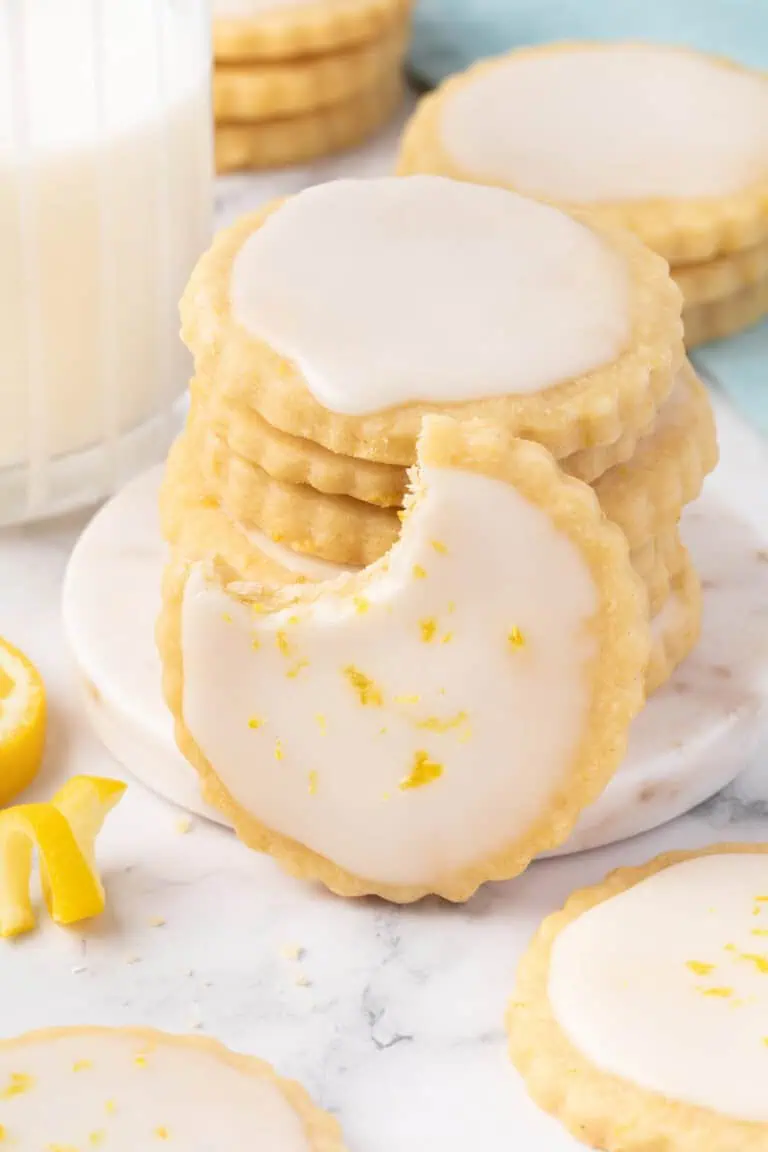
These homemade Danish butter cookies, just like you remember from the blue tin, are sweet, buttery, crispy, and soft, perfect for a quick snack and treat. This recipe only needs 7 simple ingredients and can be made ahead of time. Decorate them however you want!

There are times when I or my family crave sweet, buttery, and quick snacks. I can’t always dive into baking cakes or bread because they take a long time to make. And I or my family’s stomach will not like that! Hangry people are not very fond to be with, you know?
That’s why it is important to always have a quick dessert in your back pocket to make. Like these butter cookies. It is not only good for everyday snacks but also but the holidays!
I wasn’t sure if I was ever going to get this Danish butter cookie recipe right. I tested batch after batch of these butter cookies but found they either spread too much losing their beautiful shape or would take Herculean strength to pipe out! After I think about 10 test batches, I found the perfect ratio of flour to egg and milk. Don’t worry even all those “failed cookies” got frozen, shared, and eaten.
Get My Christmas Cookie Book!
Grab a copy of The Christmas Cookbook to guide you with the best and most delicious cookie recipes to serve these holidays! In this e-book I am sharing with you fun, and easy cookie recipes perfect for Christmastime!
Over 25 cookie recipes, plus easy no-bake cookies + easy icing recipes to decorate your cookies with. In addition, I’ll be sharing with you:
- My favorite cookie baking tools
- Cookie Ingredients 101
- How To Store and Freeze cookies guide
- +Ultimate Cookie Troubleshooting Guide
Make this Christmas the most memorable! Get my Christmas Cookie Book now!
See Also:
- Need softened butter now for your cookies? Check out my 4 easy ways to soften butter!
- Confused on what the difference is between salted butter and unsalted butter– give this post a read!
- Learn how to temper chocolate in the microwave, perfect for dipping these cookies!

Why You’ll Love These Butter Cookies
- Melt In Your Mouth – These delicious cookies melt in your mouth, just like butter! The exterior is crispy, but when you bite into one, it is soft, tender, and crumbly. The perfect combination!
- Simple And Easy To Make – This recipe is made in one bowl and for this butter cookie recipe, I made used a piping bag and piped the cookie dough into their classic spiral shape But you can also use cookie cutters, cookie press, or a cookie scoop.
- Small, Light, And Fluffy – I know the buttery flavor of these Holiday cookies are to die for but it is easy to eat. But because of its small size, you won’t be feeling too guilty about consuming too much!
- Make Ahead Snack – You can make the dough ahead and store it in your freezer when you are craving butter cookies. Just add a few minutes to its baking time if it’s frozen.

Ingredients Needed
For this homemade butter cookies recipe, you will need the following ingredients:
- Flour – I used all-purpose flour for this butter cookie dough recipe. For best results be sure to measure your flour correctly by spooning the flour into the cup and leveling it off. Do not pack it down or you will end up with too much flour and it will be impossible to pipe!
- Vanilla Extract – For added richness and slight sweetness. I used pure vanilla but you can also make homemade vanilla extract.
- Unsalted Butter – I used unsalted butter for this butter cookie recipe. But you can also use salted butter just remove or reduce the salt you add. Check the Unsalted vs Salted Butter In Baking Guide.
- Granulated Sugar – Granulated sugar is to help sweeten the cookie but also creates tenderness and aids in spreading.
- Egg – To bind the butter cookie dough. It should be at room temperature before use. Follow this How To Get Room Temperature Eggs Fast. I tried testing these cookies with egg yolk instead of a whole egg, but the dough made with egg yolks was way too stiff and difficult to pipe.
- Salt – I used sea salt but you can also use regular table salt or kosher salt.
- Milk – To help thin out the dough so it’s easier to pipe. I used full-fat milk, but you can use low-fat milk or a dairy-free milk like almond or soy milk.

How To Make Butter Cookies
Making baked cookies is easy and simple. It doesn’t need a lot of complicated ingredients and processes. So, you can enjoy making homemade butter cookies, even kids can participate!
1. Make a Butter Mixture
In a large bowl, combine softened butter and sugar. Beat using a stand mixer or hand mixer with a paddle attachment for 2 minutes or until you get a smooth consistency. This is also called a creaming method.

Add the room temperature egg and vanilla extract. Scrape the sides and bottom of the bowl. Mix well.

2. Add The Flour
In the same bowl, add dry ingredients – the flour and salt. Beat at low speed until fully incorporated.

3.Add Milk
You need to add 2 to 3 tablespoons of milk. The milk will help thin out the dough so it’s easier to pipe. The more milk you add the more the cookies will spread.

4. Refrigerate Piped Cookies
Scoop the cookie dough into a large piping bag fitted with a large star tip. You want to pipe the cookies onto a baking sheet lined with parchment paper. This recipe makes about 36 cookies so you will need to pipe the cookies onto 3 baking sheets and then refrigerate for 30 minutes until firm. If you don’t have enough space in the refrigerator, you could always pipe the cookies close together onto one baking sheet, and then after chilling move them over to another baking sheet.
Refrigerating the cookies before baking will help the cookies from spreading when in the oven and will lose their beautiful spiral shape. But you want to pipe the cookies before you refrigerate or the dough will be too difficult to pipe if you refrigerate the dough.
If you want to add sprinkles, add them now after you pipe the cookies.

5. Bake cookies and enjoy!
When you are ready to make butter cookies, preheat the oven to 350°F/177°C.
Bake butter cookies for 13 to 15 minutes or until they turn golden brown. Remove from the oven and let it cool on its sheet for 5 minutes. Transfer the Danish butter cookies to a wire rack to cool completely and enjoy!
Recipe Variations
- Melted Chocolate – Dip Danish butter cookies in melted white, milk, or dark chocolate and add salt, sprinkles, or coarse sugar for a more festive holiday season. You can melt chocolate in the microwave.
- Maraschino Cherry – This is a good option if you are using a piping bag with a large star tip. Place maraschino cherry at the center of each cookie before baking.
- Sprinkles or Sugar – Sprinkle on coarse sugar or sprinkles before slicing. You can also sprinkle more coarse sugar and sprinkles before baking if you like.
- Scoop, press, or slice – If you don’t want to pipe the cookies, then you use a cookie scoop, cookie press, or shape the dough into a log and then slice into rounds after chilling.

Recipe Tips:
- Measure your flour! Too much or too light flour will affect the texture of your butter cookies. Follow this How To Measure Flour Guide.
- Use pure and good-quality vanilla for this recipe. The quality of your vanilla will affect the taste of your butter cookies. Pure vanilla extract has a richer and sweeter flavor compared to its artificial counterparts.
- Leave in the oven longer for crispier cookies. If you want crispier butter cookies, after baking, turn the oven off, leave your baking sheet inside, crack open the oven door, and leave it there for 3 minutes instead of your counter. Transfer to a wire rack to cool completely. This will dehydrate your butter cookies more and turn them crispier.

Recipe FAQs
To store butter cookies, transfer them to an airtight container or resealable bag. It can last up to 7 days at room temperature.
Absolutely, you can freeze unbaked cookie dough and leftover butter cookies. Transfer the unbaked or baked butter cookies into an airtight container or freezer-safe bag. For unbaked cookies, let freeze solid on a baking sheet first then transfer to a freezer bag. Then place it in your freezer. You can freeze them for up to 3 months.
There’s no need to thaw the frozen dough, just add a few minutes to your baking time and you are good to go. And for frozen butter cookies, transfer them to the fridge overnight or place them on the counter for at least an hour to thaw.
Letting the piped cookies chill in the fridge lets all the flavors mingle and intensify while dehydrating it. It helps the butter cookies hold their shape better while baking.
Doughs with high-fat content like these butter cookies tend to spread and melt quicker inside the oven. That is because the fat melts due to the introduction of heat. However, when you chill your dough the fat hardens which takes longer to melt resulting in less spreading. This is why refrigerating your dough before baking is crucial for this type of cookie.

More Recipes To Try
Get My Christmas Cookie Book!
Grab a copy of The Christmas Cookbook to guide you with the best and most delicious cookie recipes to serve these holidays!

Butter cookies
Ingredients
- ¾ cup (150 g) granulated white sugar
- 1 cup (2 sticks, 227 g) unsalted butter softened to room temperature
- 1 large egg room temperature
- 2 teaspoons vanilla extract
- 2 ¼ cups (270 g) all-purpose flour spooned and leveled
- ½ teaspoon salt
- 2-3 tablespoons milk
- Sprinkles optional
Instructions
- In large mixing bowl with an electric mixer (I like to use my stand mixer with paddle attachment) cream together sugar and butter, on medium speed until light and fluffy, about 2 to 3 minutes.
- Beat in egg until combined. Scrape down bowl as needed. Beat in vanilla extract until evenly mixed.
- With mixer on low speed, add flour and salt and beat to combine. The dough will be very thick. Add in milk and beat to combine. The milk helps thin out the dough so it’s easier to pipe. The more milk you add the more it spreads.
- Scoop dough into a large piping bag fitted with a large star tip. This dough can be difficult to pipe so it’s best to not overfill the bag. You can also use two piping bags by placing the dough into one bag without a tip then place inside a second bag fitted with the tip. Pipe 1 inch cookies into a spiral shape onto baking sheet lined with parchment paper spaced about 2 inches apart. If using sprinkles, sprinkle on top of the cookies now. Chill for 30 minutes (this helps the cookies keep their shape. If piping is too difficult alternatively you can scoop the cookies, use a cookie press, or roll the dough into a log, chill, then slice into rounds.
- Position a rack in the center of the oven. Preheat oven to 350 degrees F (180 degrees C).
- Bake for 13-15 minutes until lightly golden browned in color. I prefer 15 minutes so cookies come out nice and crisp in the end. Remove from the oven and let cool on the cookie sheet for 5 minutes then transfer to a wire cooling rack to continue cooking. Cookies will become crispier as they cool.


These cookies are delicious! I definitely will make them again.
So happy to hear you enjoyed them! Thank you for baking them and for your kind feedback.
These cookies are amazing! They are really easy to make and they are delicious. Everyone loved them
Thank you, that makes me so happy! I’m thrilled they were easy and that everyone loved them — that’s the best kind of feedback. Happy baking!!