
How To Make A Sourdough Starter

This Post May Contain Affiliate Links. Please Read Our Disclosure Policy.
Learning how to make a sourdough starter from scratch can seem intimidating at first. But, trust me, it’s easy trust me. It will take one week to get it started and I have step by step photos for you and all the essential questions answered for you. Making your own sourdough starter is easy…let me show you how!

The first time I attempted a sourdough starter was years ago. Let’s just say it didn’t end well. I shoved it to the back of the fridge and completely forget about that, shall we? Like a first pancake I had to throw it out.
Fast forward. Year 2020. I decided one of my baking goals this year was to start a sourdough starter (and ahem, keep it alive this time). It’s now been 3 months, and we are thriving folks. My starter is alive, bubbling away, happy as can be.
I did a lot of reading in January about starting the sourdough starter this time so I didn’t kill it. I went down a huge rabbithole. The more I read, the more I got confused. And then I just decided to jump in.
And I’m glad I did. Listen, if you have done all the research like I did and think it’s complicated I beg you to just DO IT. These starters are versatile. I left mine in the fridge and went on vacation and was able to revive it. Was the first bread 100% success? Maybe not. Was it still 1000% delicious. Let’s just say no crumbs were left behind.
If you have been thinking about starting a sourdough starter yourself, then this is the post for you. I’m going to break it down for you. Step by step. Answer all the questions. I got yo’ sourdough back friend. Grab that bag of flour and let’s go.
Ready To Take Your Baking To The Next Level?
Join the Ultimate Baking Bootcamp and master essential techniques like mixing methods and the why behind every recipe! Whether you’re a beginner or looking to refine your skills, this step-by-step class will help you bake with confidence and create flawless desserts every time. Start your baking journey today!
Table of contents
- What Is Sourdough?
- Is Sourdough Bread Better For You?
- What Makes Sourdough Bread Sour?
- Flour Choice
- Can You Buy A Sourdough Starter?
- Sourdough Starter Jars
- Water Choice
- Ingredients And Equipment Needed
- Feeding And Maintaining Your Starter
- Feeding Ratios
- Keeping A Smaller Starter
- Sourdough Starter Tips
- FAQ’s
- Recipes To Try
What Is Sourdough?
Sourdough is basically an ancient way of making bread. Sourdough doesn’t rely on commercial yeast, but on wild yeast. By simply combining flour and water, you create a live fermented culture from the wild yeast found on the grains of the wheat that the flour is made from. The more it is “fed”, meaning fresh flour and water, allows the wild yeast to multiply.
Because sourdough relies on wild yeast, the process can take much longer than commercial yeast bread recipes. But the complex flavor and texture is far superior of any other bread you will ever eat.
You can read more here about “What Is Sourdough?“.
Is Sourdough Bread Better For You?
Yes. 1000% yes. Sure at first glance, the nutrition label might look the same to conventional bread. But the long fermentation process is what has sourdough sailing past the conventional bread loaves by a mile for its health benefits.
- You Know What’s In It! It’s made with just a few simple ingredients compared to store-bought bread that has added chemicals and preservatives.
- Nutrients Are Better Absorbed – Whole grains, in general, that bread is made with can contain lots of great minerals. But the body can have a hard time absorbing those minerals due to phytic acid that is present in grains. But the lactic acid created from the fermentation process helps to break down the phytic acid allow your body to be able to absorb more of those minerals than you would be able to with bread made from commercial yeast.
- More Easily Digested – Also, sourdough bread can be much more easily digested and enjoyed, especially those with a gluten sensitivity. The long fermentation process helps to already start the process of breaking down the gluten in the bread making it much easier to digest.
So more vitamins, minerals, and it’s easier to digest. Basically, sourdough is awesome.
What Makes Sourdough Bread Sour?
So the thing that makes sourdough bread, well, sourdough, is its “sour” flavor. And although the bread relies on the wild yeast, the sourness doesn’t actually come from it. The sourness is a result of your sourdough starter, contains wild yeast and healthy bacteria that make this happy little culture.
According to the Kitchn, The sour flavor is due from two kinds of good for you bacteria — Lactobacillus and acetobacillus . These bacteria grow alongside the wild yeast in the sourdough culture creating lactic and acetic acid, creating that sour flavor.
The amount of sour your bread will have in the end can depend many factors from how you take care of your starter to how you make your bread. It can depend on how you develop the culture, the age of the starter, the flours used. It can also depend on how long you let the dough rise. The longer the fermentation process = the more “sourer” the bread will be. Ideally it will have a touch of sourness that plays well with the earthy, sweet, yeasty flavors of the rest of the bread.
Flour Choice
The BEST flour to start your starter is a whole grain – such as rye flour or whole wheat. There is more wild yeast found in whole grain flours, giving your sourdough starter a boost in the beginning.
But as the week progresses of making your sourdough starter, I start incorporating some unbleached bread or all-purpose flour. You can stick with just using 100% whole grain flours, but I find as a beginner it’s easier to use an all-purpose or bread flour.
I like to use a combination of whole wheat and unbleached all-purpose flour (I do a 1/3 Whole wheat and 2/3 AP flour when I feed.) But I have done 100% unbleached AP flour feedings as well if I need to.
You can use all-purpose flour the whole time if that’s all you have.
HEATHER’S BAKING TIP: You want to avoid using bleached all purpose flour. Stick to unbleached. Bleached flour is not recommended since it’s treated with chemicals, and will cause problems with your sourdough starter becoming active.
The Clever Carrot doesn’t recommend using organic flours, which she says has different enzymes and can cause a hinderance in rising times.
Can You Buy A Sourdough Starter?
You absolutely can. You can buy a sourdough starter from King Arthur Flour, and get a jumpstart on making sourdough bread. But honestly, making your own is so easy. And cheap. And there is the added thrill of “I made this”.
Or do you have a friend or family member that makes sourdough bread? Ask them for some of their starter! They can give you some of their “discard” at their next feeding and you will have your own starter that is ready to be fed and used!
I’m all for homemade. But if you need to take a shortcut, then by all means do so. Don’t let it be the reason you don’t get started on your sourdough bread adventure.
Sourdough Starter Jars
You have some options here. I used to use this 3/4-L glass jar. I know have switched to use a 1/2-L weck jar as I find it’s easier to stir and it has this great rubber seal. This size is perfect for keeping a small amount of starter going. I use a 1-L weck jar for my discard as I always find I have quite a bit more discard to store!
I prefer to use glass so I can see what’s going on in my jar. The size you choose depends on how much you are feeding it. You need to make sure you accommodate how much feeding it and that it can double in size or more. I used to feed mine 60 grams equal parts flour and water, but have begun reducing the amount of starter I keep.
I keep a smaller amount of starter now and it’s perfect (about 10 g starter). I know some bakers that keep even less (around 5 g) or much more! Less starter = less to feed = less discard.
But you can also use a plastic container or a stoneware crock. Or hey just use a mason jar! That will work perfectly!
Related: My Favorite Sourdough Bread Tools and Resources.
Water Choice
Filtered/bottled water is best: It’s recommended that you use filtered or bottled water. Chlorine present in water can kill your starter. I just switched over to using my tap water to using filtered water. I got this Zero Water filter system for my fridge to use for my starter (and it just makes great tasty water!)
Tap water: I have used my regular tap water with no problem, but not everyone’s tap water is the same. And hard water can also affect your loaves later. So if you know you have heavily treated water, then it might be best to use bottled, filtered water to get your starter going.
Distilled Water: Do NOT use distilled water as all the minerals to make a happy healthy starter removed!
Ingredients And Equipment Needed
Ok now that we have some basics under our belt, let’s get started! Here is what you will need:
- Flour – Whole wheat, rye, or unbleached. Again whole grain is best for the first couple days. Then I switch over to using a combination of whole wheat and AP flour. Do not use bleached flour.
- Water – Non-Chlorine, bottled or filtered is best. Some tap water can have chlorine present, and depending on your tap water if it’s too soft or hard can also affect your starter and future bread loaves.
- Container – I use a glass jar, but a large bowl would also work for the first week. Plastic or stoneware will also work. Stainless steel is said to be OK, but otherwise metal should be avoided.
- Kitchen Scale – I do recommend using a digital scale to weigh out your flour and water if you can.
Note: I used to use more flour and water with my original starter as shown below, but have started using 60 g flour and 60 g water. This results in less discard as well.

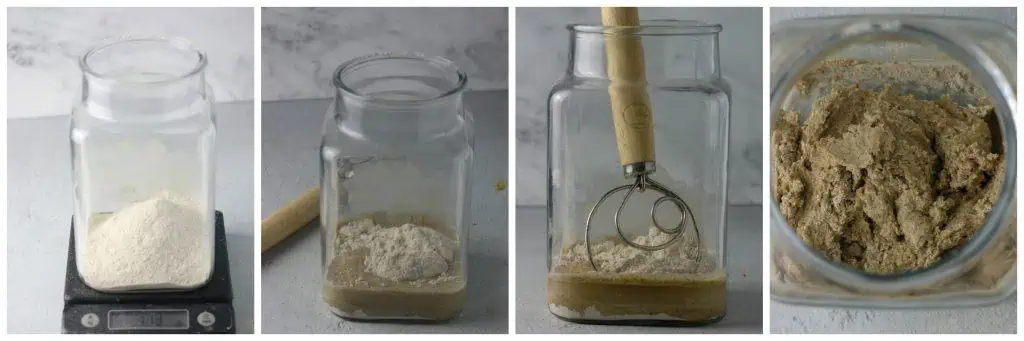
Day 1
Update: I use to use the ratios given by King Arthur Flour. I know have reduced the amount and use 60 g flour (1/2 cup) and 60 g water (1/4 cup). Basically you are going to use equal parts flour and water (by weight).
Your day 1 mixture, is going to be very thick at this point. Stir it together and loosely cover the container. And you will let the starter rest for 24 hours. You want to try to feed your starter at the same time each day.
Congrats! You are officially on your Sourdough way.
- Set your jar on a kitchen scale and hit tare.
- Add 60 g flour and 60 g water.
- Stir together.
- Loosely cover and place in a warm place (on top of your fridge is a good spot, or in your oven with it OFF AND LIGHT ON only. <– I don’t prefer the oven, because I’m too afraid I may turn it on and forget about it!
Day 2
At this point, you probably won’t see any activity. Or you may see a little bit of bubbling. Either is fine!
- Remove about 1/2 of your starter (you can measure this or just eyeball it.) – should have about 1/2 cup left in the jar.
- Throw away the “discard” <– the starter you took out. Do NOT put it down the sink!
- Add 60 g flour and 60 g water.
- Stir together.
- Loosely cover and place in a warm place (on top of your fridge is a good spot, or in your oven with it OFF AND LIGHT ON only. <– I don’t prefer the oven, because I’m too afraid I may turn it on and forget about it!
Again, loosely cover your container and let the starter rest for 24 hours. Now that wasn’t so hard was it?

Day 3
Ok Day 3. At this point you may see some bubbling and the starter may have a bit of an aroma. And your excitement level is growing. Because…You. Are. Doing. This.
At this point, I switch over to a combination of whole wheat and unbleached all-purpose flour (or bread flour). I will do a 1:1 ratio of 1:2 (1/3 whole wheat and 2/3 regular). And we are also doing TWO feedings a day. Yes. Two. (Note: I have seen some books still only recommend one feeding all week. But I’m sticking with two.)

- You are going to repeat the same feedings as you did on Day 1 and Day 2. You want to save about half (this should be around 1/2 cup, and discard the rest.
- Feed the starter with 60 g of flour and water.
- Stir together.
- Cover and store in a warm place.
- Repeat about 12 hours later with a second feeding like above.

Day 4
- You are going to repeat the same double feedings as you did on day 3. You want to save about half (this should be around 1/2 cup, and discard the rest.
- Feed the starter with 60 g of flour and water.
- Stir together.
- Cover and store in a warm place.
- Repeat about 12 hours later with a second feeding like above.

Day 5
Repeat again with two feedings as you did on Day 3 and Day 4. At this point you should see lots of activity, bubbling, a nice aroma, and it may have doubled in size.
- You are going to repeat the same double feedings as you did on day 3 and day 4. You want to save about half (this should be around 1/2 cup, and discard the rest.
- Feed the starter with 60 g of flour and water.
- Stir together.
- Cover and store in a warm place.
- Repeat about 12 hours later with a second feeding like above.
At this point it may be ready by the second feeding. If it hasn’t doubled in size within 6-8 hours, and you don’t see lots of activity then repeat with two feedings on Day 6.
HEATHER’S BAKING TIP: You can mark your jar with a sharpie or put a rubberband around the top of where the starter is.
Once your starter is ready, give it one last feeding and then let it sit at room temperature for 6 to 8 hours. At this point, you can use it to make bread, removing what you need for the recipe or store it in the fridge for up to a week.
Day 6 and 7
If you don’t see much activity then repeat the twice a day feedings. At this point you can go ahead and store your starter.

Feeding And Maintaining Your Starter
I recommend transferring your starter to its permanent home, as shown below – a nice clean jar. I store mine in the fridge, and once a week, (if I am not making bread) I take it out and feed it a few days before I start a recipe.
Once your starter is bubbly and active you can choose to store your starter two ways:
- Room Temperature – daily feedings required.
- Fridge – feed once about every 7-10 days. II take mine out, give it a feed, let it sit out for a few hours to get active and then place back in my fridge (unless I plan to use it for bread in the next couple days).
And if you want to make bread you will need to take it out a couple days before you want to bake bread with it, and give it a couple feedings to get it bubbly and active.
You can read the full tutorial on how to feed and maintain your sourdough starter.
Feeding Ratios
So far you have been feeding your starter a 1:1:1 ratio (equal amounts of starter to fresh flour and fresh water). But with a 1:1:1 ratio your starter will peak much faster.
If you want to feed your starter less frequently you can feed it at a higher ratio such as 1:2:2, 1:3:3, or higher ratio than that.
Basically you are giving the same amount of starter more food and more water so it doesn’t peak or run out quickly and need more food again.
Let’s say you keep 10 g starter, instead of feeding 10 g water and 10 g flour (1:1:1) you can feed it 1:3:3 – so feed the 10 g starter feed it 30 g flour and 30 g water.
Keeping A Smaller Starter
I lowered the amount I was feeding from 1/2 cup flour and a 1/4 cup water to a microfeeding (where I keep about 10 g) because of the size of the jar I was using.
If you are baking also many times a week, you can keep a smaller amount such as the 5 g or 10 g previously mentioned , and feed it a small amount until you know you are going to use it.
Sourdough Starter Tips
- Don’t Use Metal. Metal can react with your starter so it’s best to avoid. Although KAF says stainless steel is OK to use. I like to use a glass jar, and a wooden spoon to stir with or my dough whisk.
- Loosely cover your jar while making the starter.
- Use A Whole Grain Flour To Start Your Starter. This will help give your starter a boost in the first few days to get it active.
- Do Not Use Bleached Flour. The chemicals to bleach the flour can interfere with your starter.
- Use a large enough jar. I recommend starting in either a large glass jar, or a bowl. And then transfer to it’s permanent home. I store mine in a 1/2 L weck. But KAF has this awesome stoneware crock as well. I haven’t used it, but it comes with great reviews and is very popular but will take up much more room in your fridge.
- This takes time. Yes the starter will take about a week to get started. Sometimes more. Sometimes maybe only 5 days. Really depends on where you live, climate, flour you use, the type of water. But have faith. Your starter will start. Just keep feeding it.
- Choose Your Water Wisely. It’s best to use bottled or filtered water as some tap waters can have chlorine present and kill your starter. And do not use distilled water which has all minerals removed which are beneficial to the starter.
FAQ’s
Yes you can however, if when you are feeding you add a little too much (let’s say 64 g not 60 g) just make sure the water is the same amount then (64 g) .
If your starter has started growing mold, or has a pink/orange streak throw it out and start over. If your starter just has some gray liquid on top, it’s called hooch, and is harmless and can pour it off.
When your starter is doubled in size within 6-8 hours. It should be very bubbly. And you can test it out with the “float test” by placing some starter in a bowl of water and see if it floats.
No a sourdough starter is a culture of the wild yeast in the air and does not need additional commercial storebought yeast.
Recipes To Try
Master The Art Of Baking!
Don’t miss out on the chance to elevate your baking skills! Join the Ultimate Baking Bootcamp today and unlock the secrets to creating perfect desserts every time. With expert guidance, step-by-step lessons, and insider tips, you’ll be baking like a pro in no time. Sign up now and start mastering your baking!

Sourdough Starter
Ingredients
- 60 g (about 1/2 cup) flour , for each feeding
- 60 g (about 1/4 cup) water , for each feeding
Instructions
Day 1
- In a jar (or you can use a bowl at this point until you transfer the starter to its more permanent home once you have completed this process) stir together the 60 g flour and 60 g water.
- Your day 1 mixture, is going to be very thick at this point. Stir it together and loosely cover the container. And you will let the starter rest for 24 hours in a warm place (75oF/80of) (you can keep it on top of your fridge, in your oven with it OFF and light on are two great places. You want to try to feed your starter at the same time each day.
Day 2
- At this point, you probably won't see any activity. Or you may see a little bit of bubbling. You want to save about 1/2 cup (60 g) and then discard the rest. (The discard is a little too early to save it, so throw in the trash – not down your sink). Then feed it again with the same amount of flour and water as you did from day 1.
- Again, loosely cover your container and let the starter rest for 24 hours in a warm place.
Day 3
- At this point you may see some bubbling and the starter may have a bit of an aroma. At this point, you can switch over to all-purpose flour or bread flour (or a combination of whole grain and AP flour) . And we are also doing TWO feedings a day.
- You are going to repeat the same feedings as you did on Day 1 and Day 2. You want to save 1/2 cup, and discard the rest. And then feed the starter with 60 grams of flour and water.
- Make sure to space your feedings out 12 hours apart.
Day 4
- Repeat two feedings a day, like on day 3.
Day 5
- Repeat again with two feedings as you did on Day 3 and Day 4. At this point you should see lots of activity, bubbling, a nice aroma, and should double in size within 6 to 8 hours.
- If you don't see you don't see the starter doubling within 6 to 8 hours then continue with double feedings for day 6 and 7,if needed.
Day 6 and 7
- Repeat double feedings as you did with day 3-5.
- Once your starter is ready (doubled in size within 6-8 hours), give it one last feeding and then you can use begin to use in your recipes or store.
- I recommend transferring your starter to its permanent home – a nice clean jar after the first week (if you haven't done so already).
Maintaining Your Starter
- Store your starter in the fridge (and feed every 7- 10 days). I take mine out and feed it, let it sit for a few hours to become active and then store back in my fridge if I'm not baking with it.
- Storing at room temperature you will need to feed your starter once a day (but then is ready to bake bread when you want!)
- Always keep the new flour to new water ratio the same.
Notes
- Starter is ready when? Your starter is ready when it doubles in size within 6-8 hours of feeding. Mark the top of your starter’s height with a sharpie or place a rubber band around the jar.
- Water: I have used my tap water but if you’re concerned about your tap water quality use filtered or bottled water. Do not use distilled water. Water temperature will affect how quickly/slow it rises. Colder water = slower rise time.
- Warm place: Place your starter in a warm location between feedings.
- Mold: If your starter has mold, or a pink/orange streak you need to throw it out. If you see a gray liquid, that’s called hooch, and it’s harmless. Just pour it off.
- Loosely cover your jar while making the starter.
- Use A Whole Grain Flour To Start Your Starter. This will help give your starter a boost in the first few days to get it active.
- Do Not Use Bleached Flour. The chemicals to bleach the flour can interfere with your starter.
- This takes time. Yes the starter will take about a week to get started. Sometimes more. Sometimes maybe only 5 days. Really depends on where you live, climate, flour you use, the type of water. But have faith. Your starter will start. Just keep feeding it.


Hi Heather!
Super new (like on day 3)! Question, do I refrigerate my discard right away? Or keep it out with the starter?
Hi Carolyn! You can refrigerate the discard right away if you’re not using it right away. It keeps well in the fridge for about a week. 😊
Your post inspired me so I jumped in. Everything was going beautifully, bubbly, rising, etc. I started with whole wheat flour. On Day 4 the discard floated, so I thought I was on the right track. I started feeding with 1/3 whole wheat and 2/3 unbleached AP flour. Since then, nothing. No rise, no bubbles. Still feeding 2x, still nothing on Day 6. Should I start over and stick with WW flour or keep going with this?
Hi Kathy! It sounds like you’re on the right track, but sometimes the transition between flours can slow things down. I’d recommend sticking with the whole wheat flour for now to give it a little more time. Keep feeding and be patient—your starter may just need a bit more time to adjust.
Thank you so much for this great post. (I’ve read several but always seemed to be left with unanswered questions.) You answered all my questions and gave me the confidence to jump right in. Today is Day 2.
That’s wonderful to hear! I’m so glad the post answered your questions and gave you the confidence to get started. Happy sourdough baking! 😊
can i do this with unbleached flour to start with instead of whole wheat?
Yes, you can absolutely start with unbleached flour! Just make sure it’s a good quality flour for the best results. 😊
My starter has many bubbles on day 5 but it is super runny. What should I do to fix this? Thank you for sharing your recipe and notes!
You’re welcome! If your starter is runny, try adding a bit more flour to thicken it to a pancake batter consistency. Keep feeding it regularly, and those bubbles are a great sign it’s active! Let me know if you need more help.
Can I use whole wheat and bread flour together?
Great question! Yes, you can definitely use a mix of whole wheat and bread flour for your sourdough starter. The whole wheat helps feed the starter and adds depth, while bread flour gives it structure. Enjoy the process!
My starter is still very thick on day 5. Is this normal???
Yes, a thick starter can be normal! You can add a little extra water to thin it out if needed. Keep feeding it, and it should balance out.
Hello! What do I do if I missed my third day feeding?
No worries! Just pick up where you left off and feed your starter as usual. It might take a little longer to get active, but it should be fine. 😊
Thank you!!
Hi Chelsea, you’re so welcome! Happy baking!
Hello. Day 1, very excited. When I get to the point of keeping discard, is there anything special I do with it?
Thanks so much!
Hi! So exciting to start your sourdough journey! Once you start keeping the discard, you can use it in so many delicious recipes. Here’s a link on how to feed and maintain your starter to keep it happy and active. 😊 Thanks for following along!
https://www.bostongirlbakes.com/how-to-feed-and-maintain-a-sourdough-starter/
On day 4 but seems like nothing is happening. Days 2 and 3 I had it grow in size but nothing today 🙁
Hi, Jena! That’s completely normal. You might see a lot of activity on days 2 and 3, followed by a slower period. Keep going—it can take anywhere from 7 to 14 days for the starter to become fully active. Even then, your first loaf might not be perfect, but as you continue to feed and use the starter, it will improve over time. Patience and regular feeding are key!
When I start the double feedings, do I take out everything but 1/2 cup every feeding?
Hi Kristen, Yes I always save a 1/2 cup for each feeding (anything leftover goes to my discard jar).
Starter is a a thick mass starting at day 2
Limited bubbling after 4 days
Other sites suggest ‘pouring out 1/2 and feed
Impossible to pour
following 1/4 water and 1/2 flour
started with rye and now 1/3 rye and 2/3 white
Help
Hi Bob! Yes it will still be thick at day 2 – and limitied bubbling by day 4 is awesome! That means you’re on the right track. Yes it might not be pourable quite yet, just simply scoop out with a spoon. And Yes I remove about 1/2 and then replace with equal parts flour and water but you can play around with th ratios and flours just like you’re doing.
Hi Laurie, for feedings in the fridge- if using the 1:2:2 or 1:3:3 ratio is it still every 7 days or is it every 10 days at that point?
Thanks!
Shannon
You can do either feeding – the 1:3:3 will get you a longer time between feedings.
Does using all whole wheat take longer to see results than using organic bred flour?
Hi Heather,
Curious why you start with whole wheat flour then switch to half and half? I find my starter does best with 100% whole wheat…
Hi Laurie! Just my own personal preference and with experimenting I find a mixture of both yields a good consistency but nothing wrong with using 100% WW as well – I’ve done that too – especially after my starter has been sitting for too long in the fridge!