
Sourdough Rye Bread
This Post May Contain Affiliate Links. Please Read Our Disclosure Policy.
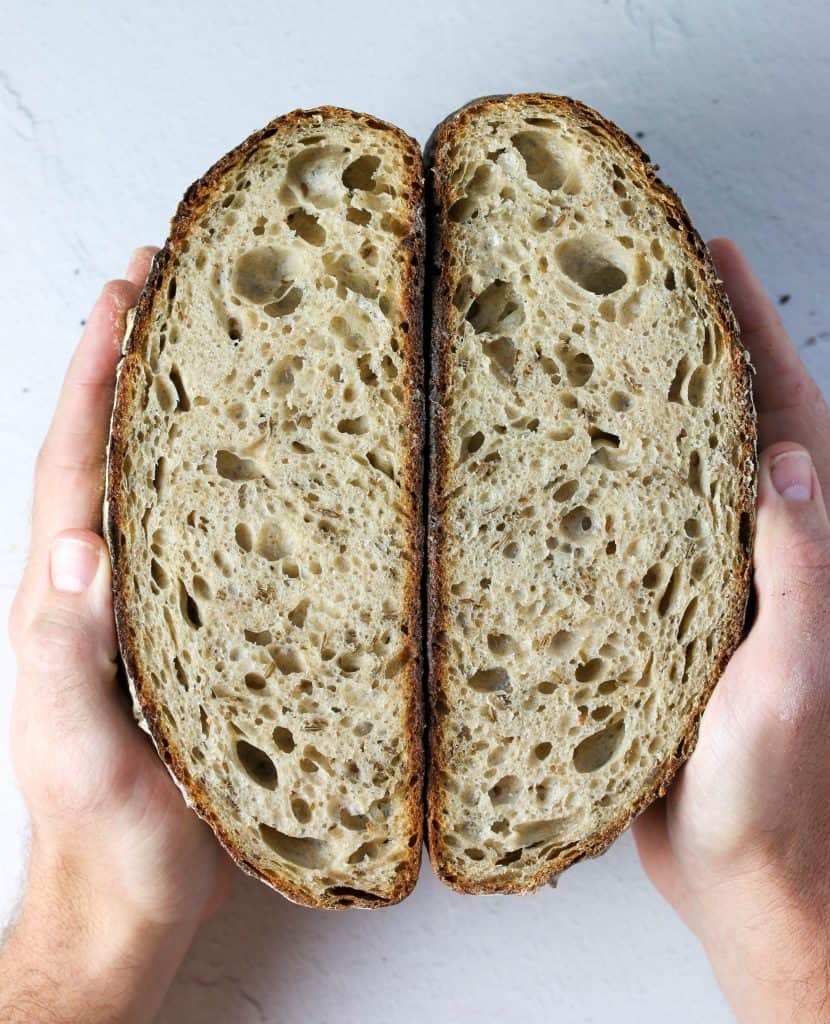
Sourdough Rye Bread is perfectly soft and chewy, with a deep golden crust and wonderfully complex flavors! It’s a great homemade bread for sandwiches, toast, or just snacking on. I’ve included all the tips and tricks you need to be successful in making your own at home.
I have fallen head over heels for sourdough bread in all it’s wonderful shapes, sizes, and forms. Something about the slightly sour flavor gives classic recipes a refreshing and exciting twist. I have used my Sourdough Starter to make Sourdough Focaccia for Italian nights, Whole Wheat Sourdough Sandwich Bread for healthier lunches, and even Sourdough Cinnamon Rolls for Sunday mornings.
Today I’m sharing my recipe for Sourdough Rye Bread. I adapted this recipe from this cookbook, Artisan Sourdough Made Simple. If you’re new to sourdough this is a great resource to get you started on the path to sourdough greatness!
This bread has extra depths of flavor thanks to the rye flour, plus it gets the most incredible brown crust. The sourdough and rye are perfect complements to each other, making for an addictive homemade bread!
Ready To Take Your Baking To The Next Level?
Join the Ultimate Baking Bootcamp and master essential techniques like mixing methods and the why behind every recipe! Whether you’re a beginner or looking to refine your skills, this step-by-step class will help you bake with confidence and create flawless desserts every time. Start your baking journey today!
Table of contents
- What is sourdough?
- Rye flour 101
- Is sourdough rye bread better for you?
- Make your sourdough starter…
- Ingredients Needed
- Start With An Active Starter
- Make the dough
- Add the caraway seeds
- Bulk Fermentation
- Shaping The Dough
- Second rise
- Score and bake
- Recipe Tips
- Why didn’t my dough rise?
- Recipe FAQ’s
- More sourdough recipes
What is sourdough?
Sourdough is basically an ancient way of making bread. Sourdough doesn’t rely on commercial yeast (aka those little packets you have bought at the store), but on wild yeast. Wild yeast is everywhere around us and even on us!
By simply combining flour and water, you create a live fermented culture from the wild yeast found on the grains of the wheat that the flour is made from. The more it is “fed”, meaning fresh flour and water, allows the wild yeast to multiply.
Because sourdough relies on wild yeast, the process can take much longer than commercial yeast bread recipes. But the complex flavor and texture is far superior of any other bread you will ever eat.
For more Sourdough 101: What Is Sourdough?<– click here.
Rye flour 101
Rye is similar to wheat, in that it has three layers – endosperm, germ, and bran. Rye flour can come in varying degrees of color – from light, medium to dark – based on how much of the rye kernel used.
This bread adds onto the flavors and texture of sourdough by adding rye flour. Rye flour is a grain that has less gluten than typical flour, which means that breads with 100% rye flour are usually tough and don’t rise well. But when you mix rye flour with bread flour, you get the wonderful flavor of rye with the soft, moist inside of traditional bread.
Is sourdough rye bread better for you?
Yes. 1000% yes. Sure at first glance, the nutrition label might look the same to conventional bread. But the long fermentation process is what has sourdough sailing past the conventional bread loaves by a mile for its health benefits. Plus it’s made with just a few simple ingredients compared to store-bought bread that has added chemicals and preservatives.
Whole grains, in general, that bread is made with can contain lots of great minerals. But the body can have a hard time absorbing those minerals due to phytic acid that is present in grains. But the lactic acid created from the fermentation process helps to break down the phytic acid allow your body to be able to absorb more of those minerals than you would be able to with bread made from commercial yeast.
Also, sourdough bread can be much more easily digested and enjoyed, especially those with a gluten sensitivity. The long fermentation process helps to already start the process of breaking down the gluten in the bread making it much easier to digest.
This bread also has the added benefits of rye flour, which is full of extra nutrients, vitamins, and soluble fiber. It is harder to refine than wheat, so it keeps many of the nutrients that wheat flour does not. So more vitamins, minerals, and it’s easier to digest. Basically, sourdough rye bread is awesome.
Make your sourdough starter…
If you haven’t gotten around yet to making your sourdough starter then let’s get going! What are you waiting for? It will take about 5 days to make your starter before you can attempt this bread. But it will be worth it. Here is the full guide on How To Make Sourdough Starter From Scratch.
Once you have your starter raring to go then you will need to feed and mantain your starter.
Want to jump in to sourdough but don’t want to make your own starter? Totally fine! Just buy a sourdough starter and it will be ready to use in a couple days.
Ingredients Needed
- Sourdough Starter – Make sure you start with an active, bubbly sourdough starter. I have two ways to tell when your starter is active below.
- Water – Make sure you use warm water. If you use cooler water it will take longer to rise.
- Honey – I like to use raw honey, this helps to feed the yeast in your starter so it can rise.
- Rye flour – I used a light rye flour, so it’s a great way to ease into baking with whole grains if you’re new to it but you can use any type of rye flour here, it will just affect the color of the bread and somewhat of the texture.
- Bread flour – Bread flour has a higher protein content than regular AP flour, which can help to develop the necessary gluten that gives the bread structure. The whole grains in the rye flour can inhibit gluten production so using bread flour with it helps to give the dough structure so it can rise properly.
- Kosher Salt – Salt is important not just for flavor but also inhibiting the yeast production. Without salt, your yeast can cause your bread to become overproofed. Kosher salt has larger granules than regular table salt, so if you use table salt use less. I like kosher salt because it has no additives and a purer taste and the granules are easily mixed in.
- Caraway seeds – These are optional but to me rye bread needs to that have that caraway taste!
Start With An Active Starter
In order to get a tall lofty loaf with a nice crumb, you need to make sure your starter is nice and bubbly. Now if you’re like me you like to keep in the fridge all week and bake on the weekends. But using a starter straight from the fridge isn’t active enough to produce a nice, big loaf in the end. So its important to get it active again and give it a few feedings before you use it.
So how do you know when your starter is ready to use for your dough? Well I have two ways for you tell.
The Rubberband Trick
I like to put a rubberband around where the starter begins, and then I can easily tell when the the starter is doubled.

The Float Test
I also like to give my starter the float test. This just means to take a small amount and place it gently into a small dish of water and see if it floats. If it doesn’t, then you may need to give your starter more time and more feedings. If it does, then it’s good to go. But I like to use the rubberband trick first and this is more reliable. But the float test is a nice backup!

Make the dough
Ok now that your starter is ready time to make that dough! You want to first stir together your active starter and water. Then stir in the flour and salt. Use your hands to squish everything together until all the flour is absorbed. Then cover with a damp towel and let the dough rest for 30 minutes.

Add the caraway seeds
After the 30 minute rest, add the caraway seeds and work in the seeds with your fingers. Then work into a smooth ball.

Bulk Fermentation
Now it’s time for the rise! Cover the bowl with a damp towel and let it rise at room temperature for 6-8 hours, preferably overnight. The dough should double in size and no longer look dense.
If you want a little more structure and height, stretch and fold the dough 30 minutes into the rise. Begin by pulling up on the edge of the dough as high as you can stretch it without tearing and fold it in the middle of the dough. Continue doing this around the outside of the dough until you have completed one complete circle. Repeat this technique 2 to 3 times, spaced about 45 minutes apart.

Shaping The Dough
After the dough has doubled in size, it’s time to shape the loaf. Start by scraping the dough onto a lightly floured surface. Use your hands to shape the dough into a round. Do this by starting at the top and folding the dough toward the center. Turn the dough slightly and fold over the next section of dough. Repeat this until you have come full circle and you have a nice round of dough.
Flip the dough over and let rest for 5 to 10 minutes. Meanwhile line an 8-inch bowl with a towel and dust with flour. With floured hands, gently cup the dough and pull it toward you in a circular motion to tighten its shape. Using a bench scraper, place the dough into the bowl, seam side up.

Second rise
Now it’s time for the second rise. Cover the bowl and let rest for 30 minutes to 45 minutes.. The dough is ready when it looks puffy, and has risen slightly but has not yet doubled in size. Nearing the end of the rise, preheat the oven to 400oF.
Score and bake
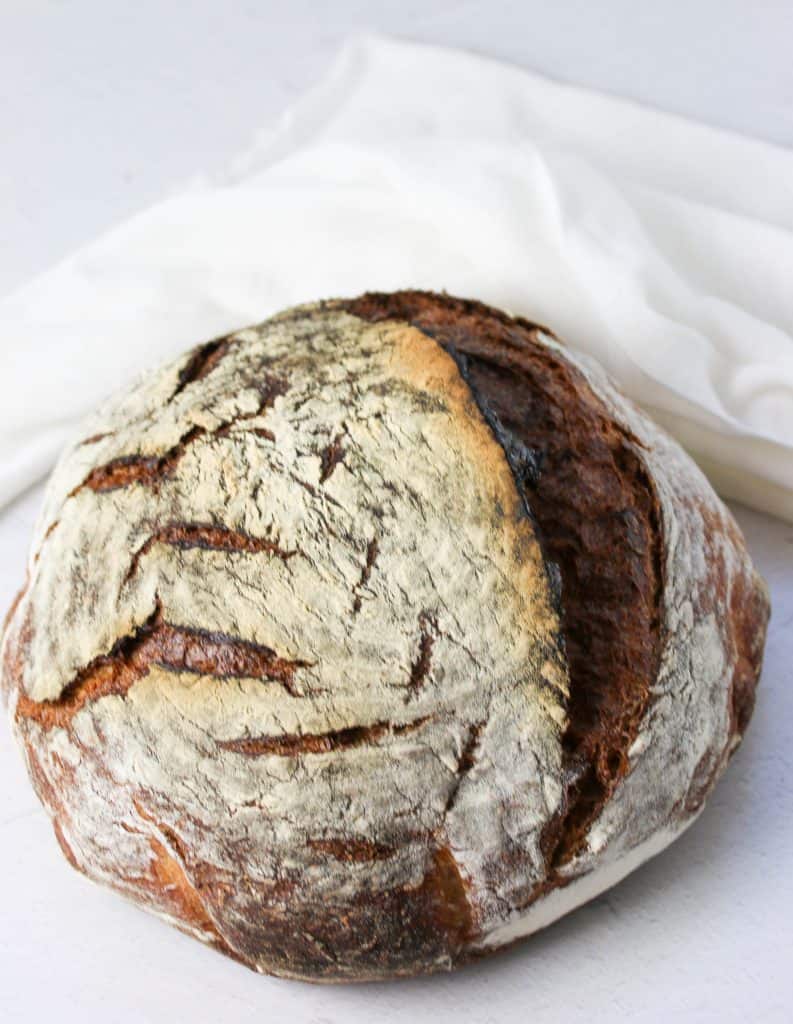
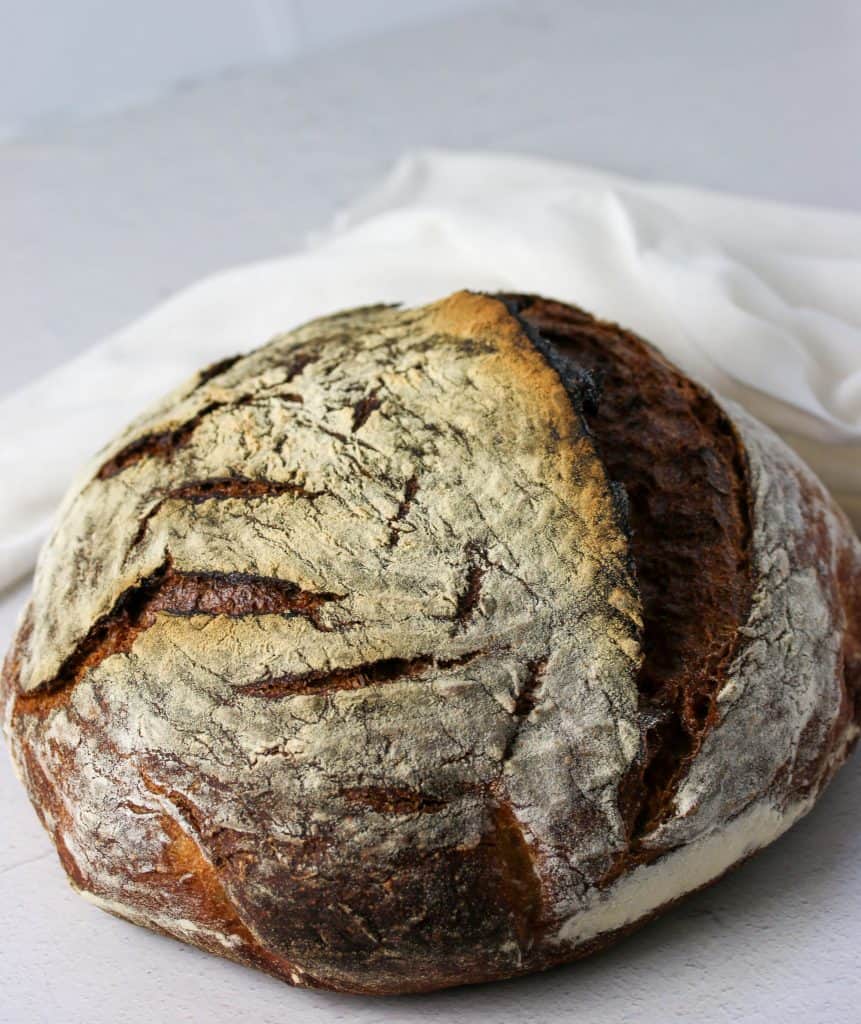
Once the dough has risen, place a sheet of parchment over the dough and flip the bowl to release the dough. Sprinkle the dough with flour and gently rub the surface with your hands. Using a bread lame, or the tip of sharp knife score the dough. I keep it simple and do 4 cuts, but you can get creative! Then use the parchment paper transfer the dough to your dutch oven.

Bake the dough on the center rack for 20 minutes, covered. Then remove the lid and continue baking for 20-30 minutes. At this point the bread should be done. However, if you want extra crispy crust, remove the bread from the oven, remove the loaf from the pot, and bake the bread on the oven rack for an extra 10 minutes. (My crust is always dark at this point, so I skip this step).
Last, transfer the bread to a wire rack and cool for at least 1 hour before slicing.

Recipe Tips
- Make sure your starter is active before you start. Drop a small piece in a bowl of water to see if it floats. It it does, then it’s ready! If not, then it may need 1-2 more feedings.
- Measure your flour using a kitchen scale . You can use measuring cups but for best accuracy it’s better use a kitchen scale and weigh out your flour. This ensures you don’t overmeasure, which can result in dense rolls. You can read my post on How To Measure Flour here.
- Use a large mixing bowl! This dough will expand quite a bit. So the bigger the better.
- Use a damp towel. You don’t want the dough to dry out on top creating a film that will prevent the dough from rising.
- Use the stretch and fold technique. Since this bread uses rye flour, it doesn’t rise as high as other breads without a little extra help. For extra height and structure in the bread, use the stretch and fold technique described in the instructions.
Why didn’t my dough rise?
- Starter wasn’t ready: This could be because your sourdough starter wasn’t quite bubbly and active enough. Be sure to do the “float test” before you begin.
- Cold kitchen: Another culprit could be a cold kitchen! If your kitchen is cold the bread will take longer to rise. Ideally, your kitchen should be around 70°F.
- Overproofed: If you overproof during the second rise, then there will be nothing left for the bread to do, and you will get no rise. So make sure to not let the dough rise for more than 30-45 minutes during the second rise.
Recipe FAQ’s
I highly recommend sticking to bread flour in this recipe since rye flour naturally does not rise high. The bread flour will give the bread extra lift and structure.
Sourdough rye bread can be stored at room temperature in an air-tight container or wrapped in plastic wrap. It is best if eaten within the first 3-4 days, but is should stay good for up to 1 week.
Sourdough rye bread can be stored at room temperature in an air-tight container or wrapped in plastic wrap. It is best if eaten within the first 3-4 days, but is should stay good for up to 1 week.

More sourdough recipes
Master The Art Of Baking!
Don’t miss out on the chance to elevate your baking skills! Join the Ultimate Baking Bootcamp today and unlock the secrets to creating perfect desserts every time. With expert guidance, step-by-step lessons, and insider tips, you’ll be baking like a pro in no time. Sign up now and start mastering your baking!

Sourdough Rye Bread
Ingredients
- 50 g (¼ cup) (1/4 cup) bubbly, active starter
- 365 g (1½ cups +1 tsp)warm water
- 20 g (1 tbsp) honey
- 106 g (1 cup) whole grain rye flour or light rye flour
- 400 g (3 ⅓ cups) bread flour
- 9 g (1½ tsp) kosher salt
- 3 tbsp caraway seeds
Instructions
- Make The Dough. Whisk the starter, water, and honey together in a large bowl. Add the flour and salt. Squish everything together with your hands until all of the flour is absorbed. Cover with a damp towel and rest for 30 minutes.
- Add Caraway. After the 30 minute rest, add the caraway seeds and work in the seeds with your fingers. Then work into a smooth ball.
- Bulk Rise. Cover the bowl with a damp towel and let rise overnight at room temperature. This will take about 6 to 8 hours (at 70oF, 21oC). The dough is ready when it no longer looks dense and has doubled in size. Optional: Stretch and fold the dough. About 30 minutes into the bulk rise, stretch and fold the dough for added structure and height. Begin by pulling up on the edge of the dough as high as you can stretch it without tearing and fold it in the middle of the dough. Continue doing this around the outside of the dough until you have completed one complete circle. Repeat this technique 2 to 3 times, space about 45 minutes apart.
- Shape. After the bulk rise, remove dough from bowl and place onto a lightly floured surface. Shape into a round. Start at the top and fold the dough toward the center. Turn the dough slightly and fold over the next section of dough. Repeat until you have come full circle. Flip the dough over and let rest for 5 to 10 minutes. Meanwhile line an 8-inch bowl with a towel and dust with flour. With floured hands, gently cup the dough and pull it toward you in a circular motion to tighten its shape. Using a bench scraper, place the dough into the bowl, seam side up.
- Second Rise. Cover the bowl and let rest for 30 minutes to 45 minutes.. The dough is ready when it looks puffy, and has risen slightly but has not yet doubled in size. Nearing the end of the rise, preheat the oven to 400oF.
- Score. Place the parchment over the dough and invert the bowl to release. Sprinkle the dough with flour and gently rub the surface with your hands. Using a bread lame, or the tip of sharp knife score the dough. I keep it simple and do 4 cuts, but you can get creative! Use the parchment paper transfer the dough to your dutch oven.
- Bake. Bake the dough on the center rack, in a preheated 400oF oven, for 20 minutes, covered. Remove the lid and continue to bake for 20-30 minutes. Optional: Remove from oven, and remove the loaf from the pot and bake the crust for an additional 10 minutes to crisp the crust. (My crust is always dark at this point, so I skip this step). Transfer to a wire rack. Cool for 1 hour before slicing.
Notes
- Make sure your starter is active before you start. Drop a small piece in a bowl of water to see if it floats. It it does, then it’s ready! If not, then it may need 1-2 more feedings.
- Measure your flour using a kitchen scale . You can use measuring cups but for best accuracy it’s better use a kitchen scale and weigh out your flour. This ensures you don’t overmeasure, which can result in dense rolls. You can read my post on How To Measure Flour here.
- Use a large mixing bowl! This dough will expand quite a bit. So the bigger the better.
- Use a damp towel. You don’t want the dough to dry out on top creating a film that will prevent the dough from rising.
- Use the stretch and fold technique. Since this bread uses rye flour, it doesn’t rise as high as other breads without a little extra help. For extra height and structure in the bread, use the stretch and fold technique described in the instructions.
- Storage: The loaf is best consumed within a week, stored in a plastic bag at room temperature. Otherwise freeze for up to 3 months.
- Adapted from Artisan Sourdough Made Simple


This is a really good recipe to add to the rotation. I didn’t have quite enough rye so added wheat. My starter had been fed the day before and put in the fridge and it was fine. Mixed it at 9 and baked it by 5 and it was great. Caraway is great but I can’t see 3 full tbl. I added 2 and it was too much. I’ll reduce it next time.
Thank you so much for sharing all of this! I love hearing how you made it work with what you had—subbing wheat for rye, using your cold starter, and adjusting the caraway. So glad it turned out great for you. And good to know about the caraway—I’ll keep that in mind for next time!
Wonderful aroma, crumb and taste. I make this once a week.
However, something is off
With baking process. Does
Not brown and can never get up to 205 degrees. I get
Up 195 degrees and loaf has a hollow tap. I had to bake over an hour at 400,
Including trying to brown
For 10 minutes. I did a cold fermentation for 8 hours this time, and let it sit for over an hour before baking.
Would that alter how it bakes?
Thank you so much for sharing all of this, and I’m so glad you’re loving the bread! That aroma, crumb, and taste coming through weekly is a huge compliment—thank you 🙏
As for the baking, you’re absolutely right that the cold fermentation changes things. Since the dough goes into the oven cold, it takes longer to warm up, which slows down browning and the internal temperature rise. Next time, I’d recommend letting the shaped dough sit at room temperature for 1.5–2 hours (or until it feels puffy and no longer cold to the touch) before baking. That should help it brown more easily and reach 205°F.
Also, ovens do vary, so if yours runs a little cool, you could try increasing the temperature to 410–415°F or extending the uncovered bake time. But I really think a longer room-temperature rest after cold fermentation will make a big difference.
Could i use molasses in this for color richness
Great question! Molasses would likely add beautiful color and a richer flavor. I haven’t experimented with it in this recipe yet, but it’s definitely worth a shot! Keep me posted if you try it!
This is the best sourdough rye bread we have ever had. Your recipe is easy to follow and it comes out perfectly. Hard to pace ourselves eating it! 😁 Thank you.
Oh my heart! 🥹 So thrilled you love this rye as much as I do. Easy to follow and perfect results is exactly what I aim for. Pacing is overrated anyway, right? 😉 Thank you so much!
I’ve made this bread several times and it’s always been delicious. Have to force myself to wait hour before cutting.This time after the 6 hour rise, I put it in the fridge overnight before continuing with shaping and second rise. Do you think that’s helpful or unnecessary? Also, when you lightly flour the surface prior to second rise; what type of flour do you use, all purpose, bread, rye etc.?
So glad you love this recipe—and I totally understand the struggle of waiting to slice! 😄
• Overnight fridge rest: That’s a great technique! It can actually enhance the flavor through slow fermentation and make the dough easier to handle. Just let it come back to room temperature slightly before shaping.
• Flour for dusting: I usually use a mix of bread flour and a little rye, but any of those will work. Bread flour gives a nice non-stick surface, while rye adds a touch more flavor. Use whatever you have on hand!
This is a wonderful sourdough rye! Your instructions are spot on. Is it possible to double the recipe?
Thank you so much, I’m thrilled you enjoyed it! Yes, you can double the recipe—just be sure to double all ingredients and keep an eye on mixing/kneading times. The bulk fermentation might take a bit longer, too. Happy baking!
this is the best rye bread I have ever made…..thanks so much!!!!
That is the best thing to hear! Thank you so much for making it and for your wonderful feedback—it means a lot! 😊
Thank you for the recipe! Do you preheat the Dutch Oven before baking g the bread?
Nope, no need to preheat for this one! Just place the dough in the cold Dutch oven and then into the hot oven. Hope you love the results!
Wonderful,light,airy& easy! Subbed Maple syrup for honey. Shaped into loaf and baked on parchment over baking stone preheated(ph) to 375°f convection with ph Castiron frying pan on shelf below with ~ 2 cups of boiled water for steam. The bread was done in 40 minutes. The bread slices so easily with lovely crumb. Our difficulty was exercising self-control not to eat it all in one go. Will definitely make again and again.
This makes me so happy! It sounds like you absolutely nailed it. Thank you for sharing your tweaks—the maple syrup is a great sub and your steaming technique is pro-level! Thrilled to hear it will be on repeat in your kitchen.
I’m excited to try this recipe. Does the sourdough starter need to be made with rye and bread flour too? Thanks!
Great question! No, it doesn’t. Your regular sourdough starter (even if it’s fed with all-purpose flour) will work perfectly in this recipe. The rye flour in the dough itself will provide that wonderful, characteristic flavor. Happy baking!
Hello I don’t have bread flour handy can I use AP flour? Thank you!
Yes, you can use all-purpose flour in a pinch, but since it has less protein than bread flour, your loaf may not rise as much. For best results, I’d recommend picking up bread flour next time—it’s usually available at most grocery stores or online (like Amazon). If you’re sticking with AP flour, you could add a bit of vital wheat gluten (about 1 tsp per cup) to help with structure. Happy baking, and let me know how it turns out!
Hello!
I am in the process of making this rye sourdough bread and I am confused about the amount of rye flour. It calls for 106 grams of rye flour with the cup measurement at 1 cup. Isn’t that light for the gram measurement? Or is rye flour that much heavier?
Thank you.
So 1 cup of rye flour weighs 106 g it weighs a bit less than traditional AP flour 🙂
The rye bread came out great.
So glad to hear your rye bread turned out great! Thanks for letting me know—happy baking! 😊
do I bake with parchment paper in dutch oven
Yes, I recommend using parchment paper to transfer the dough into the Dutch oven. You can bake the bread directly on the parchment paper—it makes the process much easier and keeps the dough from sticking. Happy baking!
What are your thoughts on adding a little cocoa powder (for a darker color) and maybe a little molasses. Try to make it like a pumpernickel?
You could definitely experiment with cocoa powder and molasses for a deeper color and richer flavor. I haven’t tried it with this recipe, but it’s worth testing! I actually have a pumpernickel recipe in my book if you’re interested. https://amzn.to/3EYDhlh
By far my favorite recipe with Rye!
Thank you! I’m so happy to hear that you love the recipe! 😊
Even though mine came out dense and doughy, I’m giving you 5 stars. The flavor was delicious and I’m sure the texture was my fault. It was my very first sourdough bake so I’m not terribly disappointed – still gonna eat it. My adult son took a bite and said, “Mmmm, Playdough” 🤣
I’m going to bake till I get it right!!!
Thank you so much for the 5 stars! Sourdough can be tricky at first, but it sounds like you’re on the right track. I love your determination, and that ‘Playdough’ comment made me laugh! 🤣 Keep baking—you’ll get it just right before you know it!
After bulk fermentation can I put in the refrigerator overnight and bake in the morning like I would do a regular sourdough loaf? Thank?
Yes, absolutely. Refrigerating the dough overnight after bulk fermentation is a great idea. It develops more flavor and makes the dough easier to shape in the morning. Just let it come to room temperature for about an hour before you score and bake. Happy baking
This recipe isn’t yours. If you’re going to take recipes from books, while not illegal, it’s probably best to credit the book you got it from instead of claiming you created it.
I did give credit to the cookbook I adapted this recipe from, as noted in the post. I’m not an expert in sourdough, so I wouldn’t claim it as my own! Please take the time to check the post for the proper credit.
Tell me you didn’t even look for a credit without telling me, you didn’t look for a credit. It’s right in the second paragraph in red, “ Today I’m sharing my recipe for Sourdough Rye Bread. I adapted this recipe from this cookbook, Artisan Sourdough Made Simple. If you’re new to sourdough this is a great resource to get you started on the path to sourdough greatness!”