
Sourdough Cheddar Dill Bread
This Post May Contain Affiliate Links. Please Read Our Disclosure Policy.
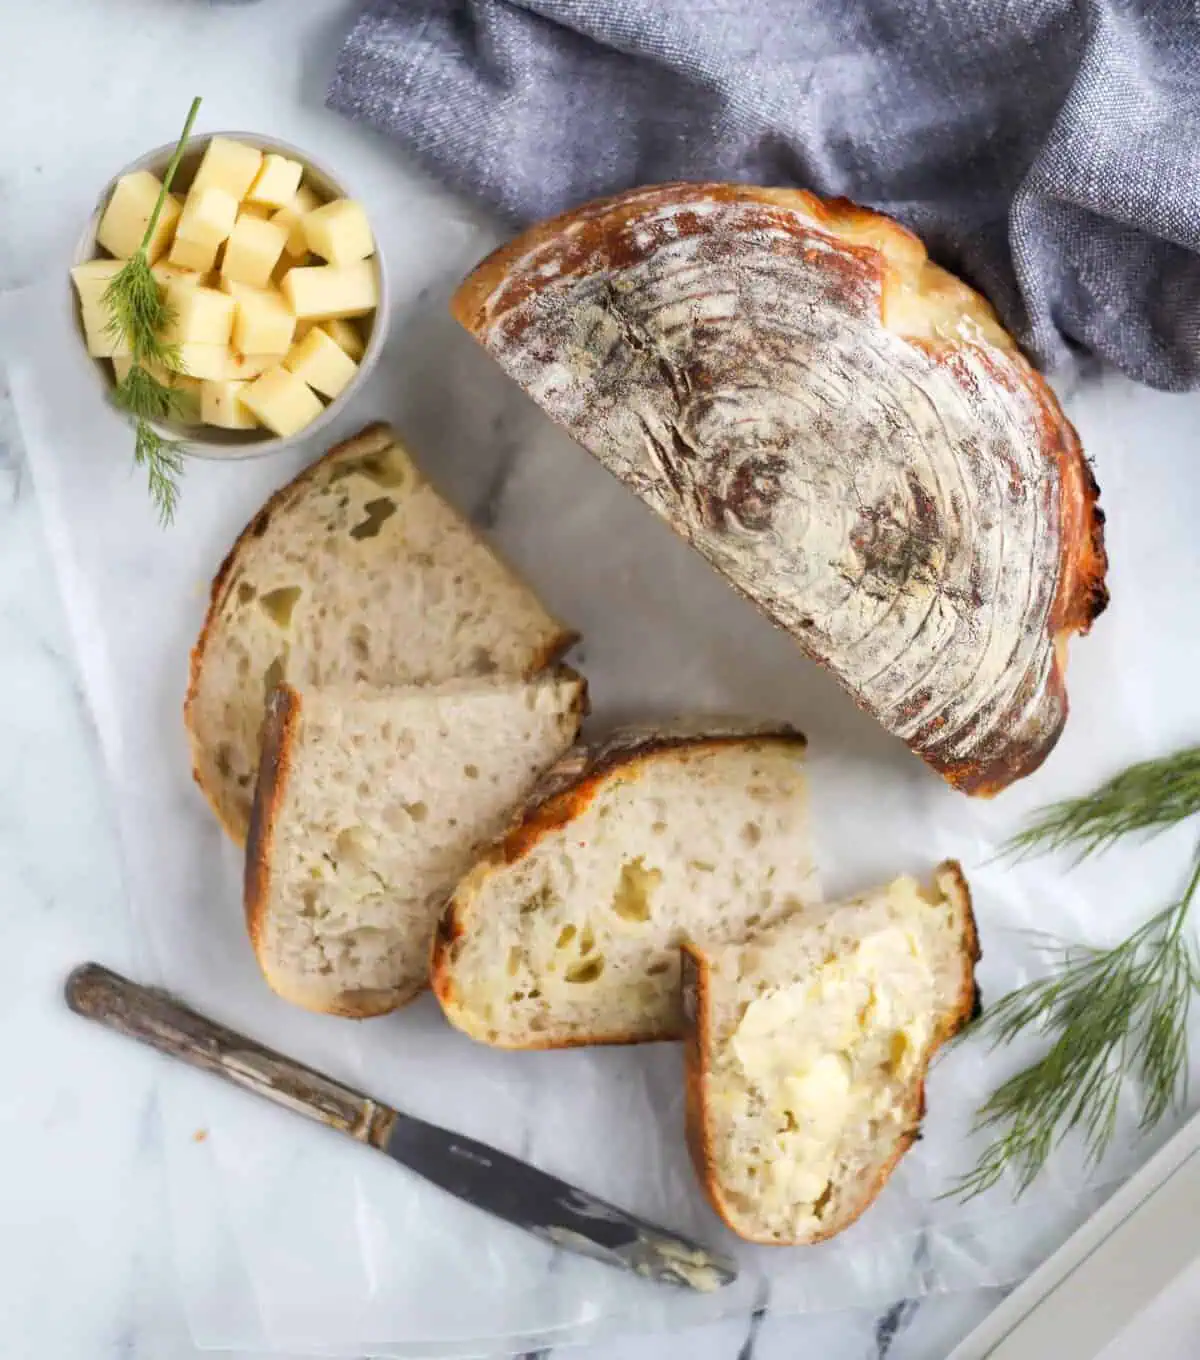
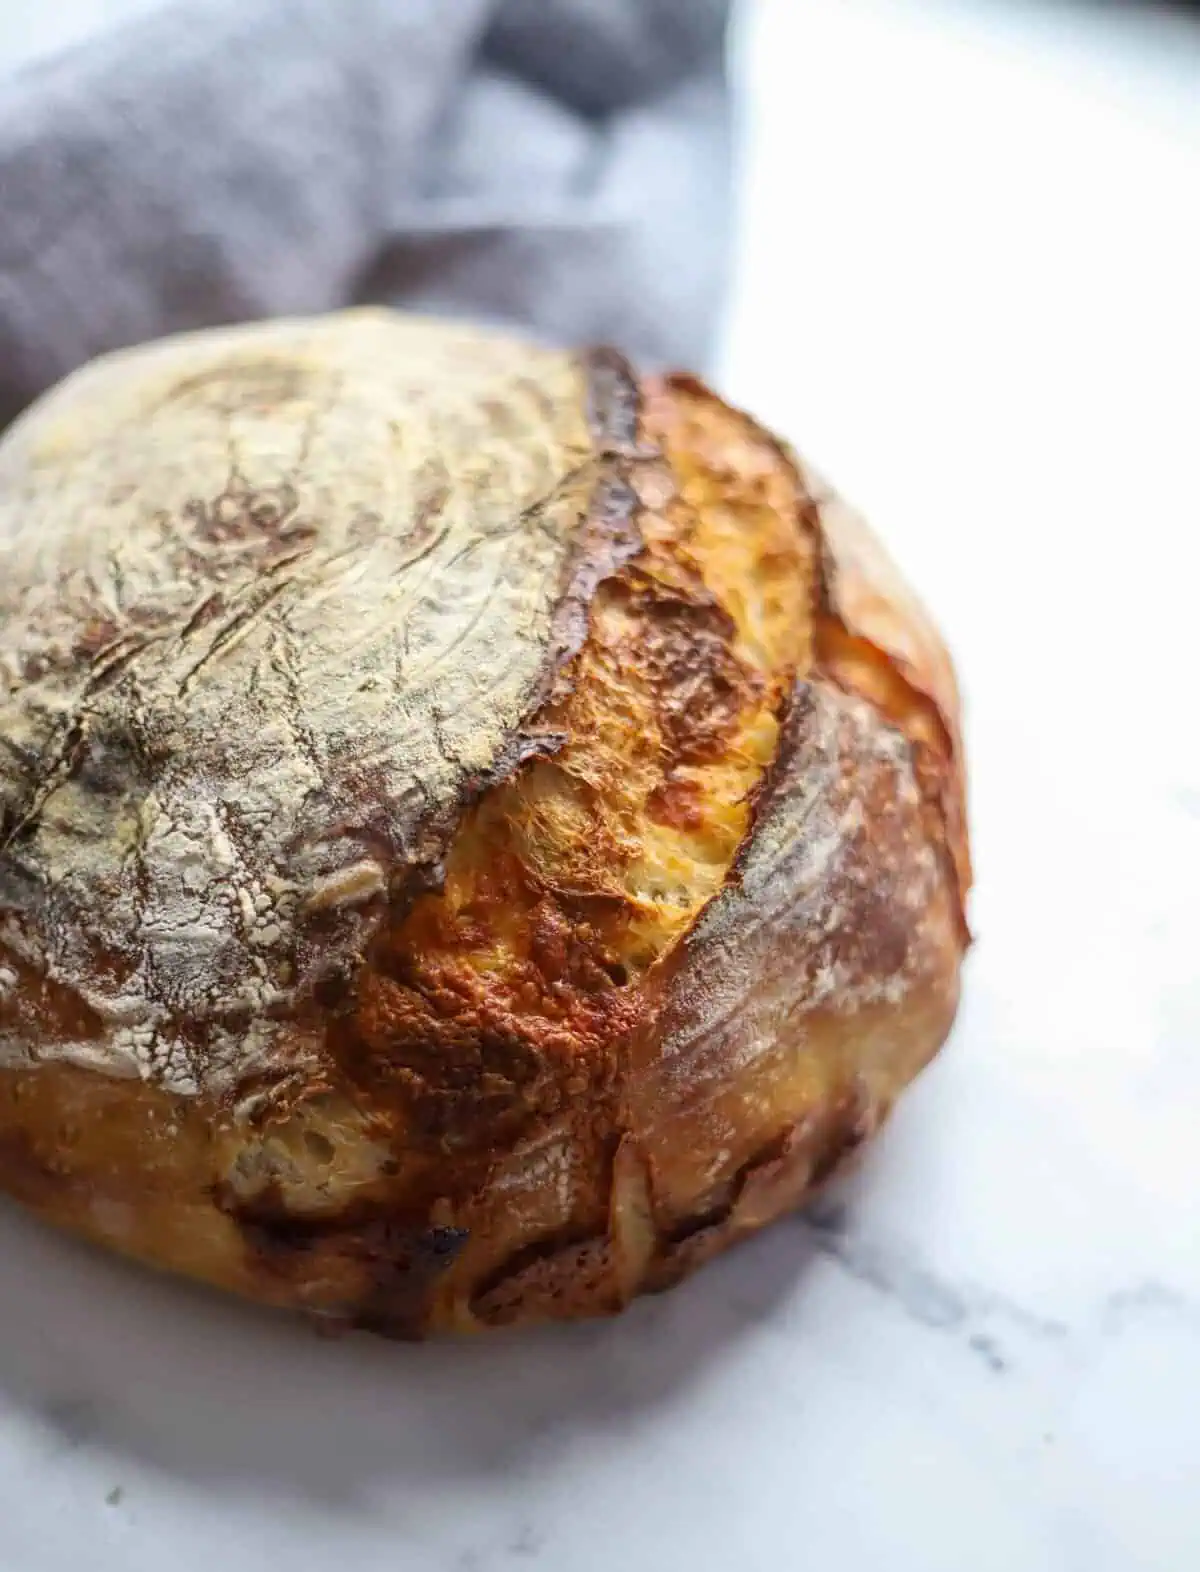
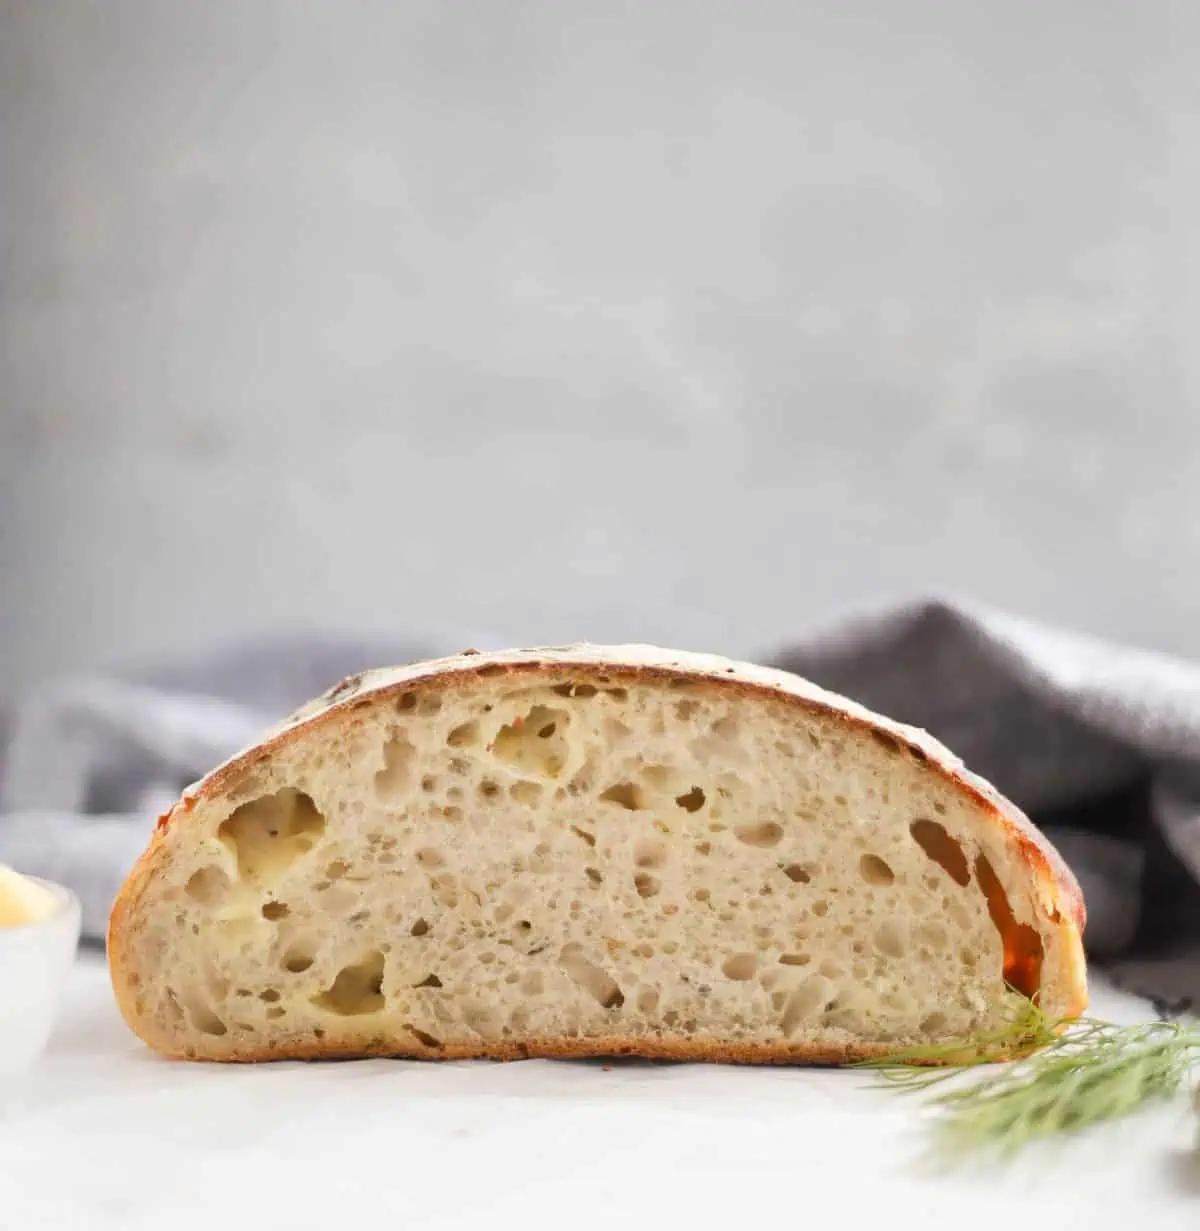
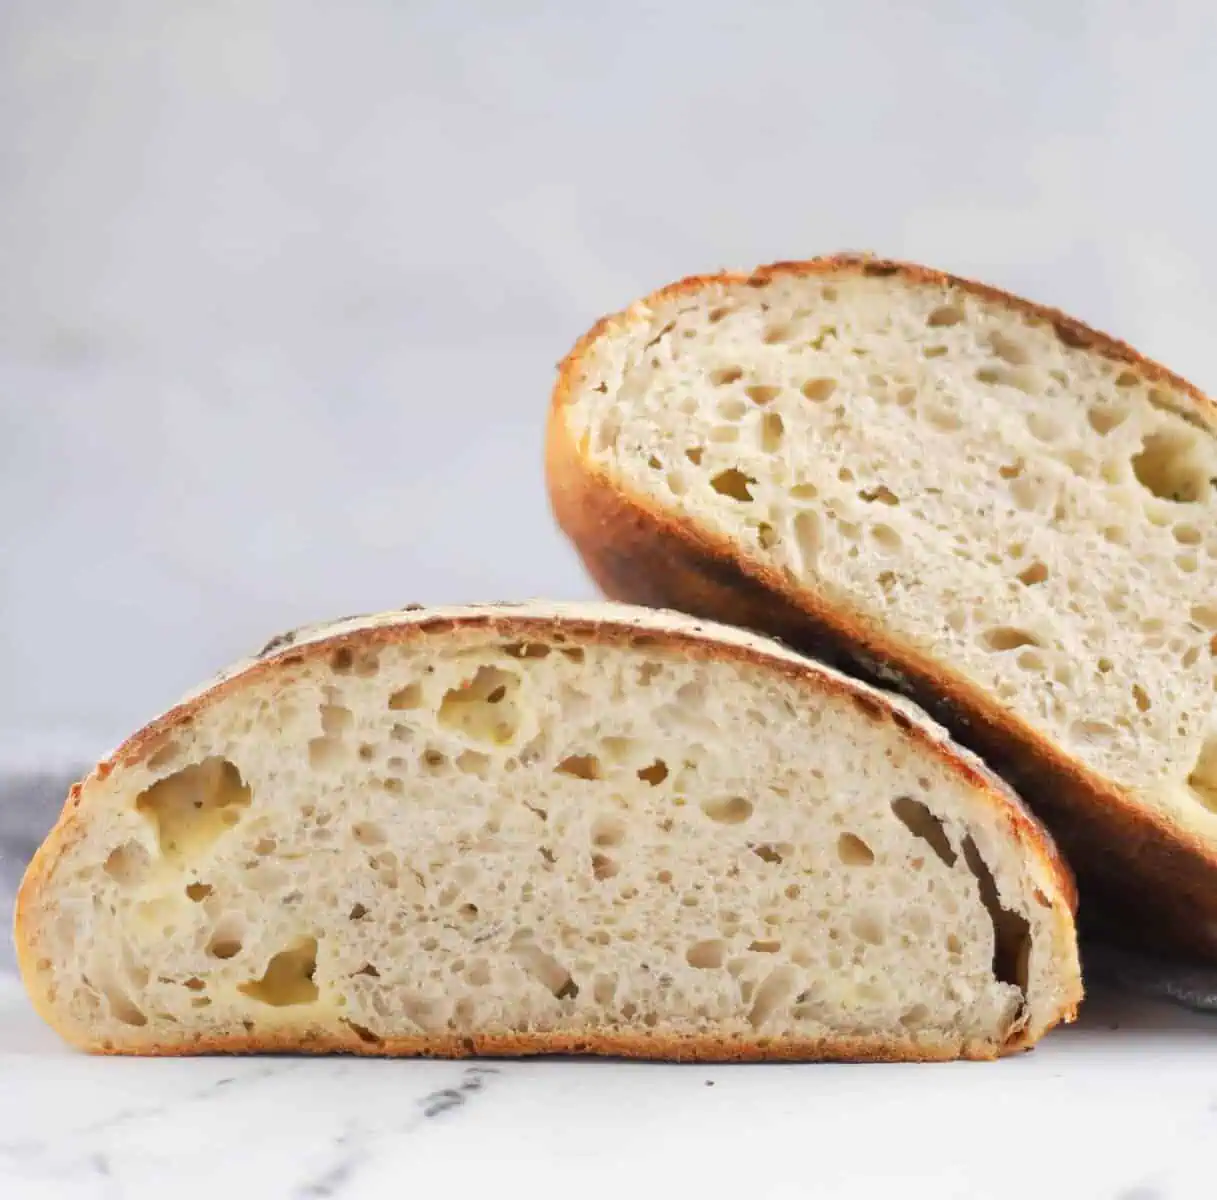
This sourdough cheddar bread might be my favorite sourdough bread recipe to date. Chunks of cheddar cheese running throughout this tangy, chewy bread paired with fresh dill. It’s a winning flavor combination and I can’t wait to share this sourdough cheddar dill bread recipe with you!
Ok I hate to play favorites here on the blog. I imagine that’s like picking a favorite kid or since I’m a teacher, playing favorites and picking a teacher’s pet.
But I’d be lying if I didn’t say this is my new favorite recipe on the blog. I mean it’s cheeeeeese friend! Pockets of ooey gooey cheddar inside a tangy, chewy sourdough bread. And if that wasn’t enough this sourdough cheddar bread gets hits with some more flavor with fresh dill folded in.
And cheddar and dill go together like. Well like you know. So if you’re looking for your next sourdough bread recipe to try out this weekend. Make. This. Bread. Now.
Ready To Take Your Baking To The Next Level?
Join the Ultimate Baking Bootcamp and master essential techniques like mixing methods and the why behind every recipe! Whether you’re a beginner or looking to refine your skills, this step-by-step class will help you bake with confidence and create flawless desserts every time. Start your baking journey today!
I love this classic sourdough boule bread recipe from Artisan Sourdough Bread Made Simple book so much I’ve started creating all sorts of fun creative variations from it. Like this cheddar dill version!
Thank me on Monday. Ok let’s stop messing around and start talking bread because I can’t wait any longer!!
What Is Sourdough?
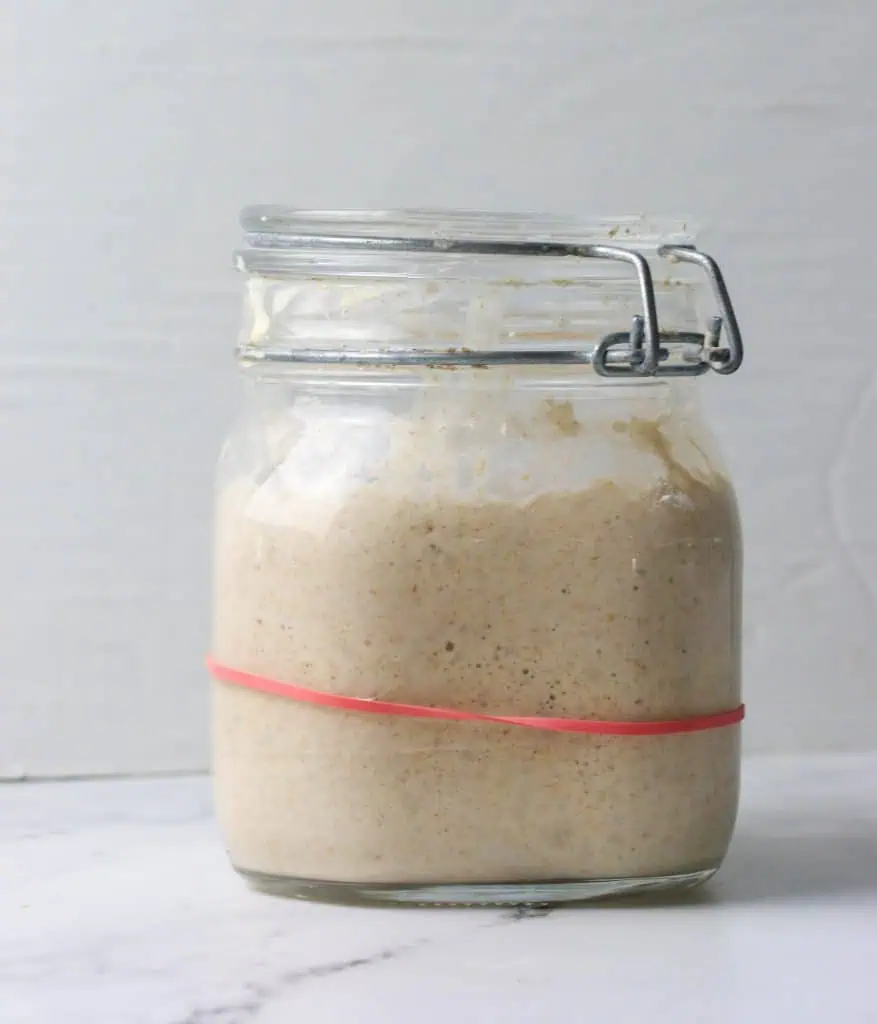
Sourdough is basically an ancient way of making bread. Sourdough doesn’t rely on commercial yeast, but on wild yeast. By simply combining flour and water, you create a live fermented culture from the wild yeast found on the grains of the wheat that the flour is made from. The more it is “fed”, meaning fresh flour and water, allows the wild yeast to multiply.
Because sourdough relies on wild yeast, the process can take much longer than commercial yeast bread recipes. But the complex flavor and texture is far superior of any other bread you will ever eat.
Is Sourdough Bread Better For You?
Yes. 1000% yes. Sure at first glance, the nutrition label might look the same to conventional bread. But the long fermentation process is what has sourdough sailing past the conventional bread loaves by a mile for its health benefits. Plus it’s made with just a few simple ingredients compared to store-bought bread that has added chemicals and preservatives.
Whole grains, in general, that bread is made with can contain lots of great minerals. But the body can have a hard time absorbing those minerals due to phytic acid that is present in grains. But the lactic acid created from the fermentation process helps to break down the phytic acid allow your body to be able to absorb more of those minerals than you would be able to with bread made from commercial yeast.
Also, sourdough bread can be much more easily digested and enjoyed, especially those with a gluten sensitivity. The long fermentation process helps to already start the process of breaking down the gluten in the bread making it much easier to digest.
So more vitamins, minerals, and it’s easier to digest. Basically, sourdough is awesome.
What Makes Sourdough Bread Sour?
So the thing that makes sourdough bread, well, sourdough, is its “sour” flavor. And although the bread relies on the wild yeast, the sourness doesn’t actually come from it.
According to the Kitchn, The sour flavor is due from two kinds of good for you bacteria — Lactobacillus and acetobacillus . These bacteria grow alongside the wild yeast in the sourdough culture creating lactic and acetic acid, creating that sour flavor.
The amount of sour your bread will have in the end can depend on how you develop the culture, the age of the starter, the flours used – but ideally it will have a touch of sourness that plays well with the earthy, sweet, yeasty flavors of the rest of the bread.
How do I make a sourdough starter?
If you’re completely new to sourdough bread, then be sure to check out my tutorial on How To Make Sourdough Starter From Scratch.
You can also check out this video from Traditional Cooking School on how to make a sourdough starter. And you can also enroll in their complete Sourdough course – it will teach you EVERYTHING!!
Timeline For Making This Sourdough Cheddar Bread
This timeline, from Artisan Sourdough Bread Made Simple, is based on you making this bread on the weekend. But you can adjust the timeline based on when you want to make it.
Now if you feed and maintain your sourdough starter at room temperature you can make this bread at the drop of a hat. If you’re a part-time sourdough bread baker, like me, then you will need to take your starter out of the fridge a few days earlier to get it bubbly and active before you can use it in the bread.
Thursday night: Remove Starter from Fridge and Feed
Friday: Feed twice (once in the morning, and one at night)
Saturday morning: Feed again
Saturday evening: Remove the amount of starter I need to make my dough. Feed my starter again, and pop back in the fridge until next week. Make the dough and let it rest overnight.
Sunday morning: Shape and refrigerate for its final proof (8-12 hours)
Sunday evening: Final bake!
How Can I Tell When My Sourdough Starter Is Ready To Use?
The Rubberband Trick
I like to put a rubberband around where the starter begins, and then I can easily tell when the the starter is doubled.
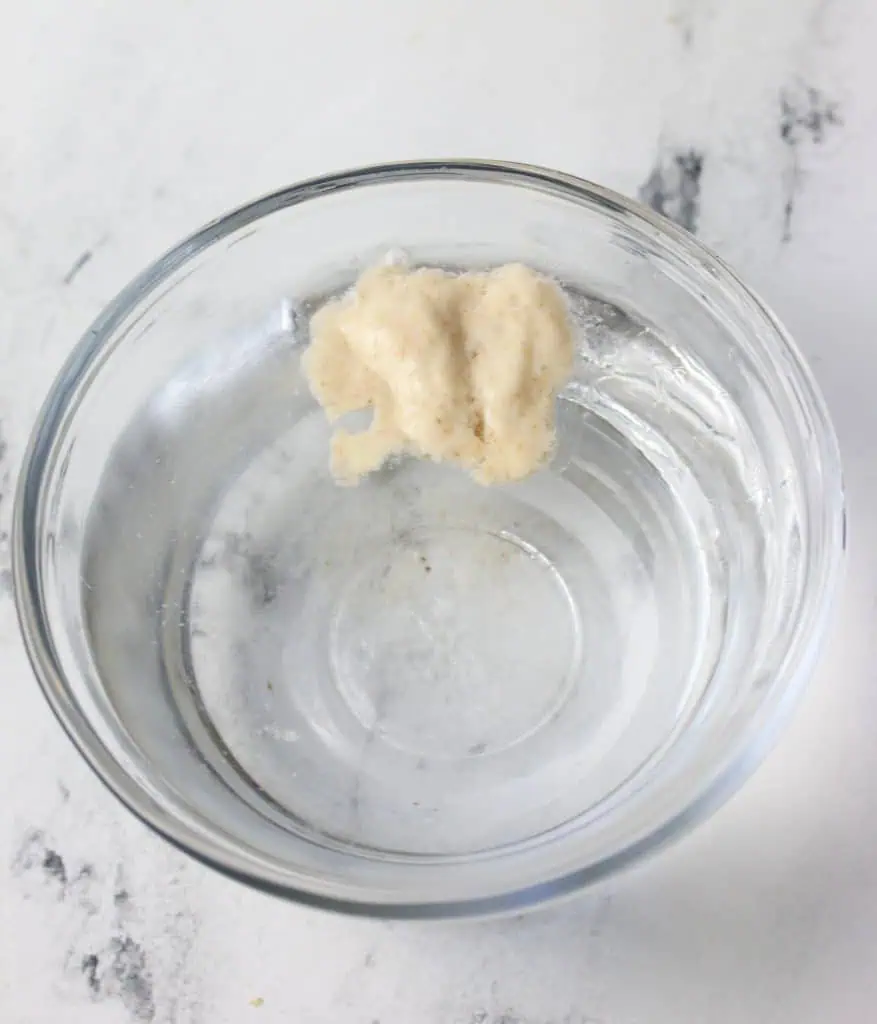
The Float Test
You need your starter bubbly and active before you use it in the recipe. The trick I’ve picked up is to take a small piece of starter and drop it into a glass of water. The starter should float if it’s ready to use.
If it doesn’t, then it may need another feeding before using.
What Kind Of Flour Is Best For Sourdough Bread?
I recommend bread flour. I love and use King Arthur Flour. And organic is best if you can afford it. You can also use a unbleached all purpose flour, or try using a combination of whole wheat flour and AP flour.
Ingredients For This Sourdough Bread Recipe
The best part about making sourdough bread is the simplicity of its ingredients! It starts with this Sourdough Bread Recipe and then cheddar and dill get folded into it. Let’s just say your kitchen is going to smell AH-MAZING.
- Bubbly, active sourdough starter (50 g, about 1/4 cup) – you can get my step by step tutorial here on making a starter –> How To Make Sourdough Starter From Scratch, and don’t forget to watch the video from Traditional Cooking School
- Bread Flour – (500 g, 4 cups + 2 Tbsp.) I’ve made this with all-purpose flour and it turned out fine. Not quite the chewy texture that you get with bread flour. I prefer using bread flour if I can.
- Water – (350 g, about 1 1/3 cups + 2 tbsp.) You want to use warm water.
- Salt – 1 1/2 teaspoon salt
- Cheddar Cheese – I cubed the cheese because I love the pockets of cheese, but you could also shred the cheese.
- Dill – Fresh dill is best but I think dried would work fine, just use less than the recipe calls for.
Tips For Making This Sourdough Cheddar Dill Bread Recipe
- Make sure your starter is active before you start. Drop a small piece in a bowl of water to see if it floats. It it does, then it’s ready! If not, then it may need 1-2 more feedings.
- Use Bread Flour. Yes you can use all purpose flour, but bread flour gives the best texture.
- Use A Kitchen Scale. For best accuracy, it’s best that you weigh your ingredients and not rely on volume (measuring cups)
- Damp Towel!! When you let the dough rise overnight, be sure to use a damp towel to cover it so it doesn’t dry out and not rise properly.
- Use A Bread Lame. Yes you can try and use a sharp kitchen knife to make the cuts in the top of the bread but a bread lame is a great handy tool that makes clean cuts every single time. I love my bread lame!!
How To Make This Sourdough Cheddar Dill Bread Recipe From Starter
1. Measure Out Your Starter
Once you have your starter ready you can make your dough. You want to start by measuring out your starter. You will need 50 g (about 1/4 cup). Be sure to stir down your starter in your jar before measuring.
It’s recommended to not make your bread in metal bowl, such as aluminum or copper, as it can cause an off taste and kill the starter, but stainless steel is non-reactive. Or you can use plastic or glass.

2. Add Your Water
Then you want to add the water and stir to dissolve and mix the starter into the water. I use a fork to do this. No fancy equipment needed here. You want to make sure the water is somewhere between lukewarm to cool.
Temperature of the water: The warmer the water the less time the dough will take to rise. If it’s the wintertime, and my kitchen is colder I like to use water on the warmer side. In the summer months, I use cooler water.

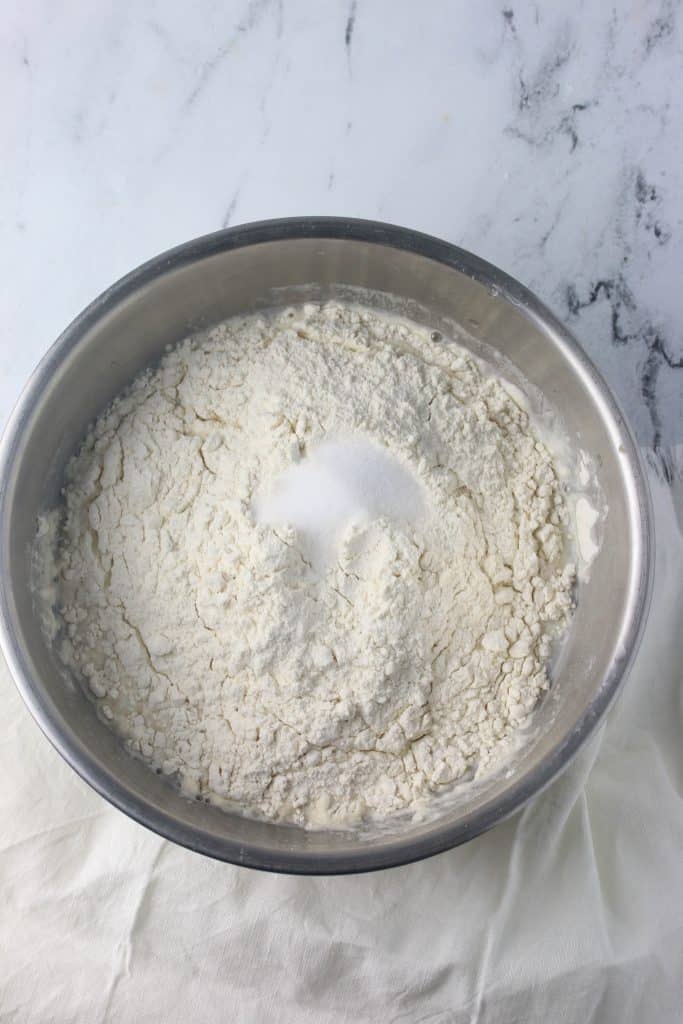
3. Add Your Flour And Salt
Then add the flour and salt. Again bread flour is best to use if you can for the best chewy texture. Bread flour has a high protein content than regular all purpose flour, which means more gluten will form. Gluten is the protein that will give bread its chewy structure.
If you can’t find bread flour, I’ve used AP in a pinch and I don’t get quite the same texture but it still tastes great!
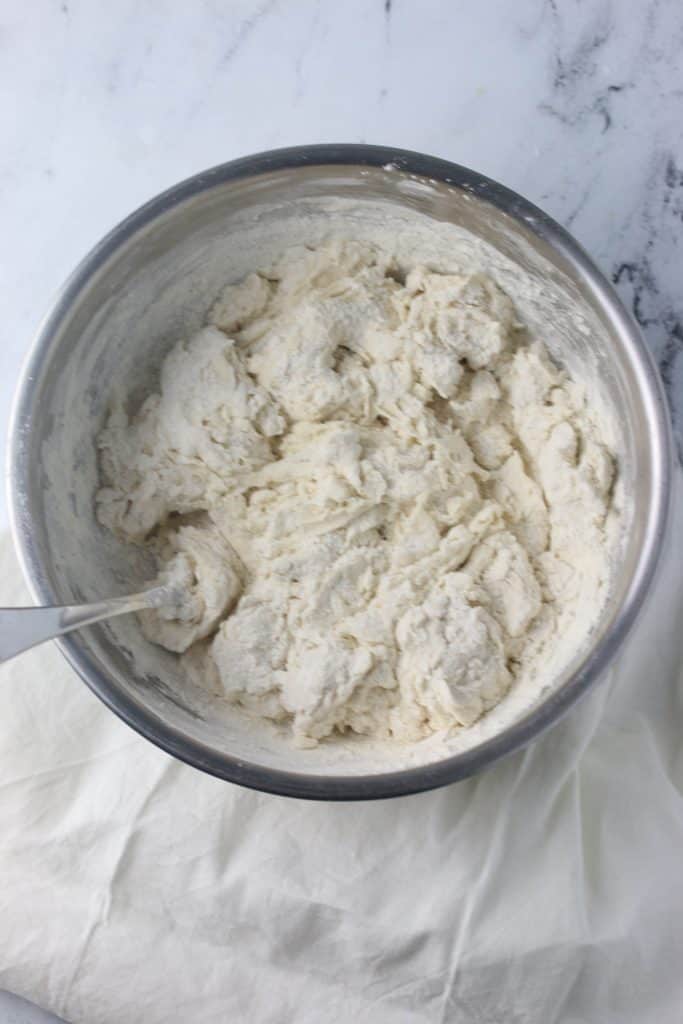
4. Stir Together
You then need to stir the mixture together until it forms a shaggy dough. You will need to get in there with your hands at the end and mix the dough together to work in all the flour. Personally, I think this is the BEST part!
The dough will be still shaggy at this point. Then the dough will need to rest for 1 hour before we add our cheese and herbs. This will give the gluten in the dough a chance to relax.
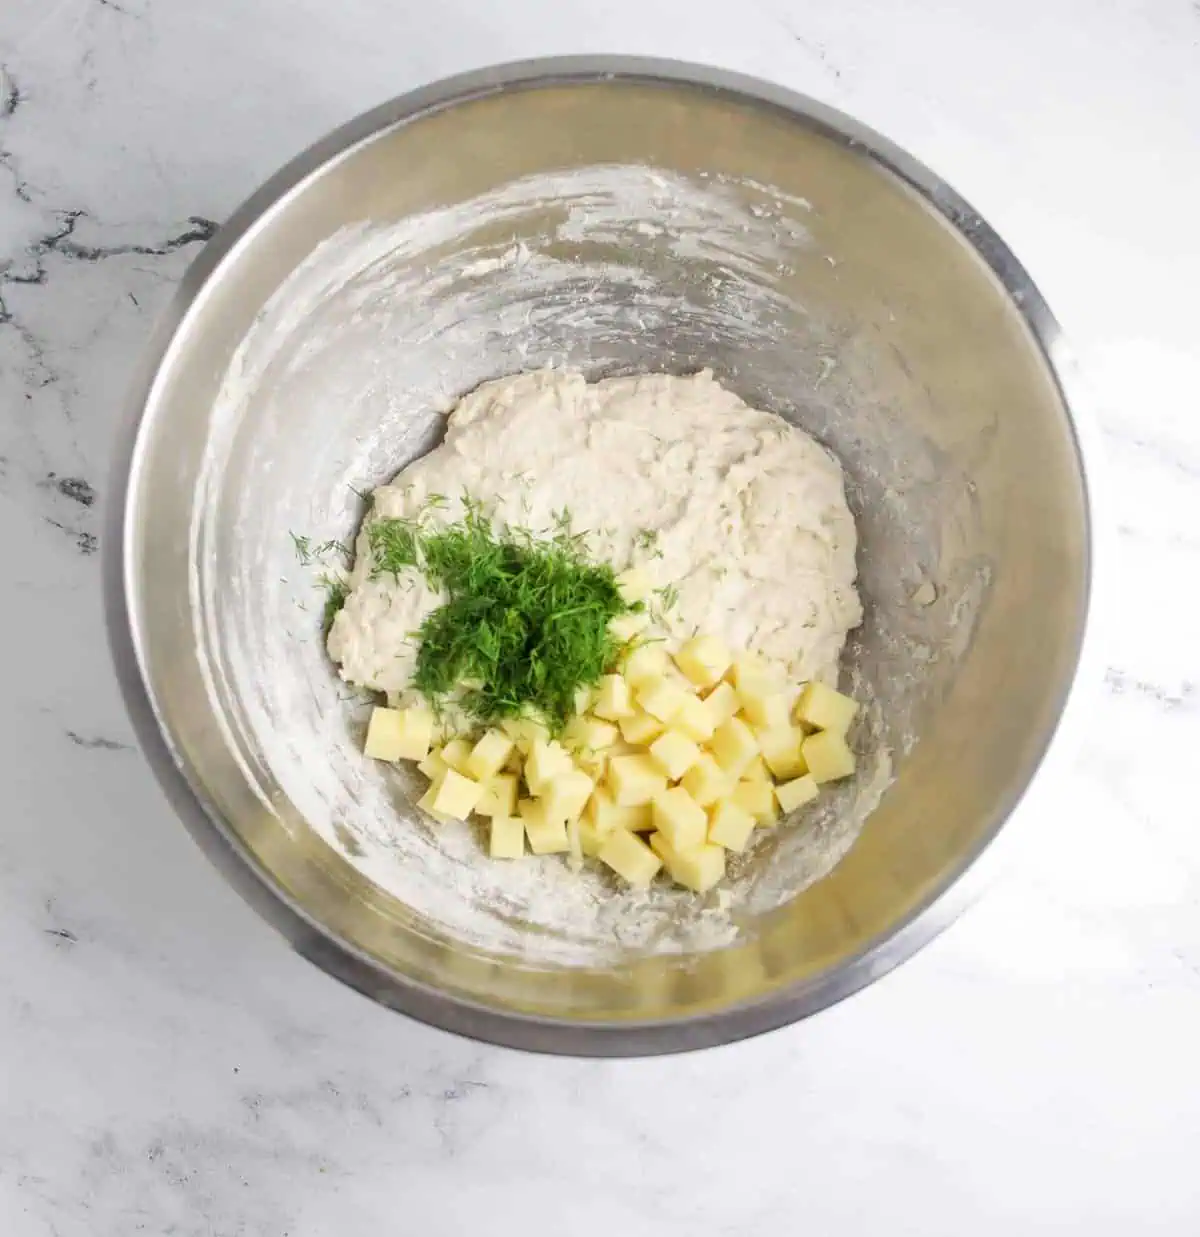
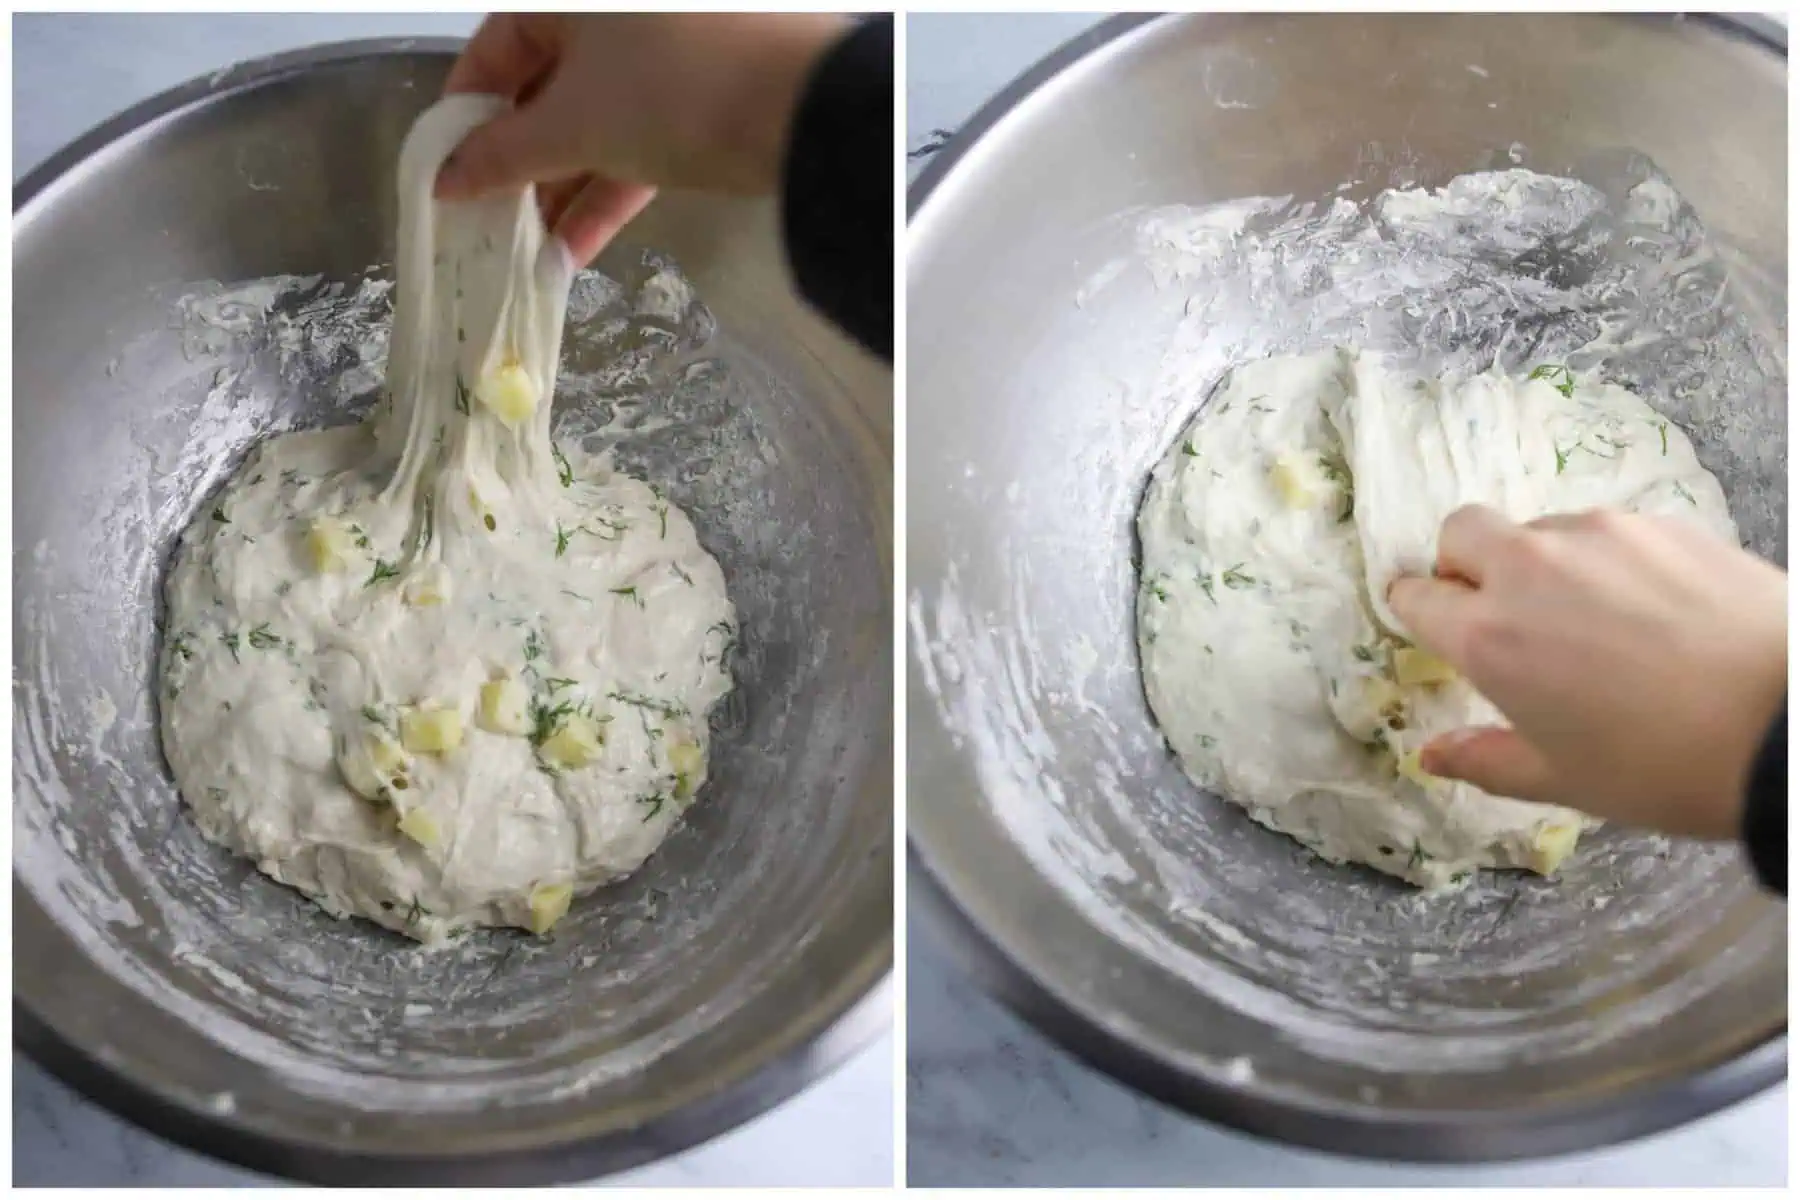
5. Add Cheddar And Dill
After 1 hour, you want to add the cheddar and dill and work it in with your hands. Don’t worry it won’t all be evenly dispersed yet, but you will be doing some stretches and folds over the next couple hours. Once the cheddar and dill is worked in, let the dough rest for 30 minutes before you start your first stretch and fold.
What Is A Stretch And Fold?
A stretch and fold is like it sounds. You will stretch the dough and fold it over on itself, which helps to develop that gluten structure. and create a loftier loaf in the end.
Using slight wet hands, grab a portion of the dough and stretch it upward as high as you can stretch it without tearing, and then fold it over toward the center of the bowl. And then give the bowl a quarter turn and repeat this stretch and fold technique until you have completed a full circle.
Repeat the stretch and fold, every 15 minutes, completing 4 sets total.
And then you need to cover the bowl with a DAMP towel and let it rise for 8-10 hours (I let mine rise overnight and have had no issues). Let me say that again, for the folks in the back…a DAMP towel!
I made the first mistake of not using a damp towel and found that my dough had dried out on top, and formed a crust not allowing my bread to rise like it should. So..damp, damp, damp.
Shaping The Dough
So now that we (us and the sourdough) had a good night’s rest. Now it’s time shape. You want to coax the dough out of the bowl onto a lightly floured surface. And then bring up the edges to the middle. Basically, fold the outside in towards the center until you have come full circle.
Then flip the dough over and let it rest for 5 to 10 minutes.
And while you’re waiting go ahead and line a bowl or banneton basket (traditional bread proofing basket) with a towel, or the linen liner the basket comes with, and dust with flour. And once the dough has rested, go ahead and place the dough in the bowl, seam side up.
Pro Tip: If you are using a banneton basket, with no liner, dust with rice flour. This will ensure the dough doesn’t stick.
Alright, yes you do have to cover the dough up again and let it rise for another 8-12 hours in the fridge. Just cover the dough and let it hang out in the fridge.

Time To Bake!
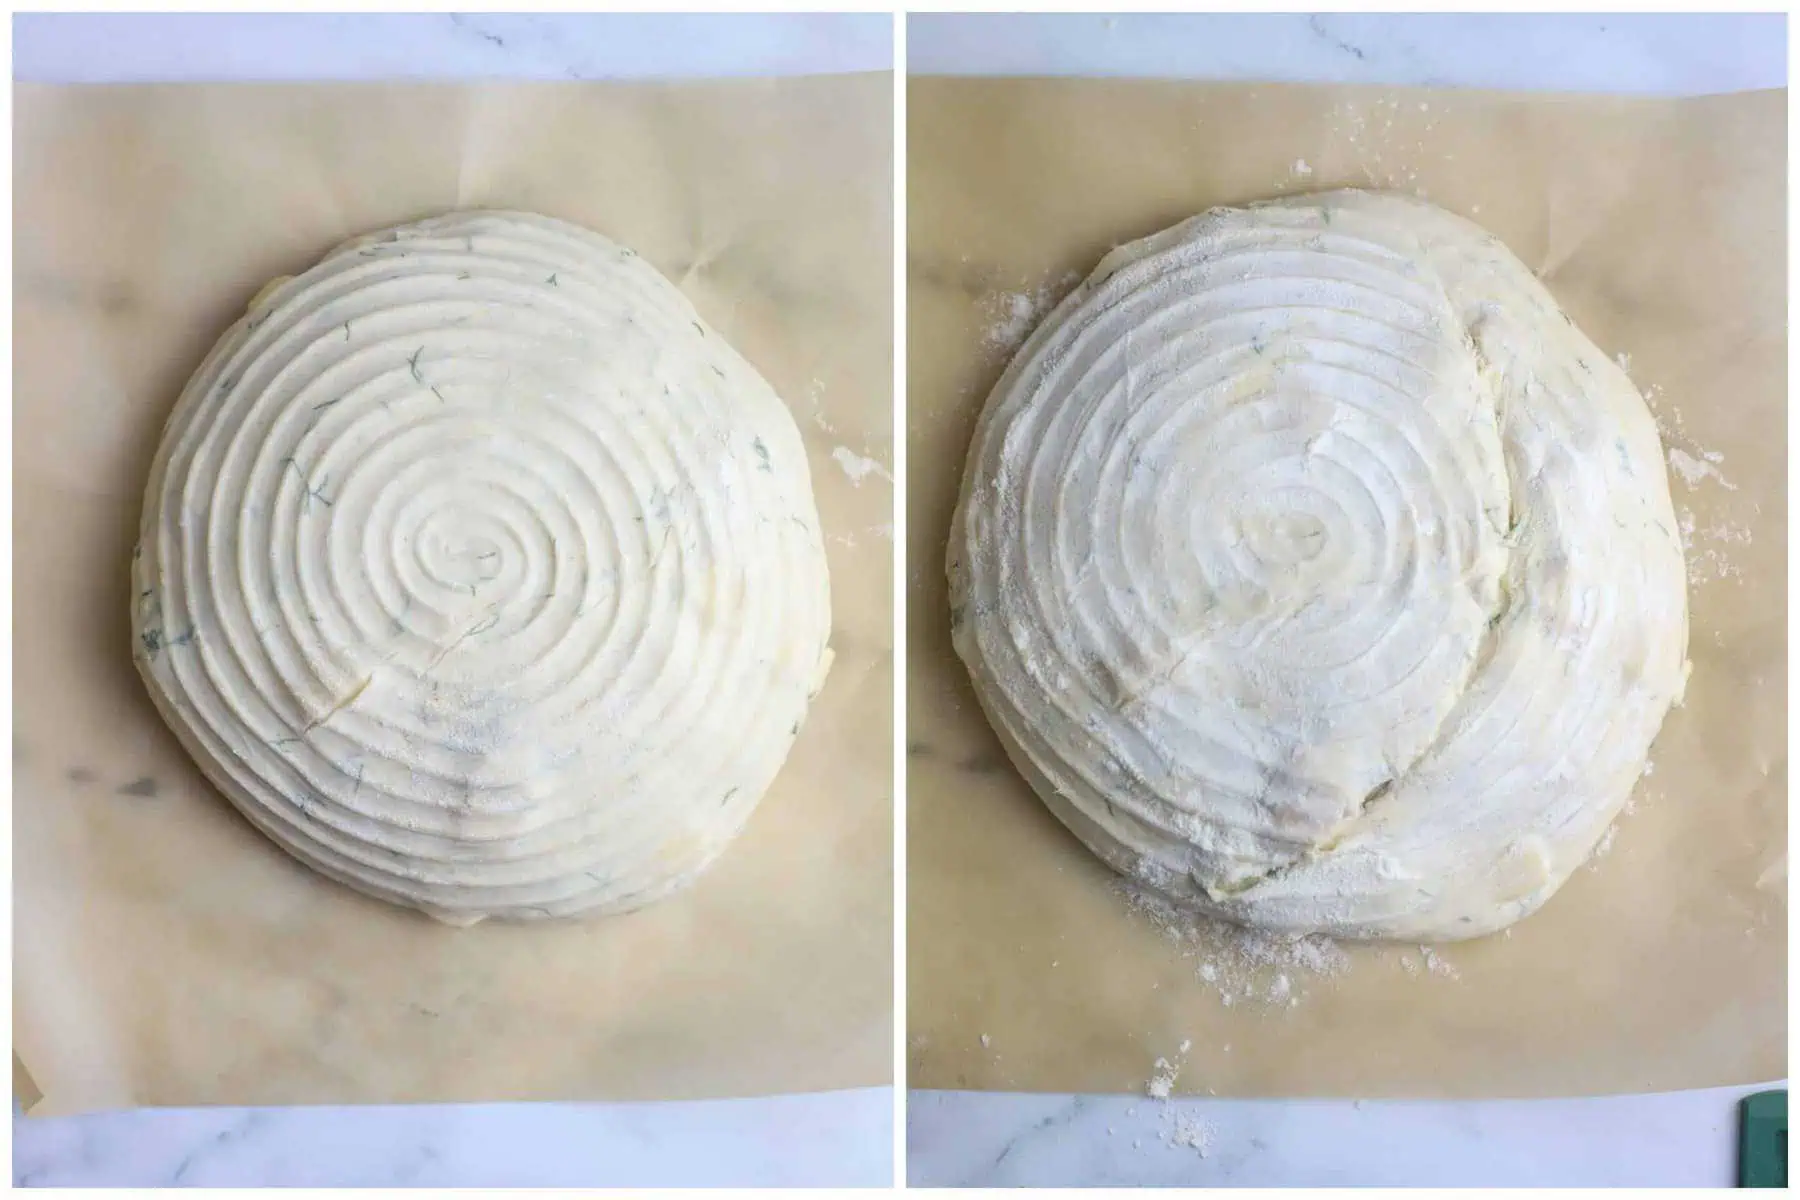
We have to do one more thing. Slash that bread! Yes welcome to bread art. You want to turn the dough out onto a piece of parchment paper, dust the top with flour, and then using a bread lame make slashes into your bread.
The lame will make clean, sharp cuts into the bread. Slashing the bread will give the bread a chance to expand let those gasses out that have built up in the bread. You can make a just a few simple cuts, or get as fancy as you want.
Once you have had your fun. Now it’s time to bake! Yes we made it!!!
Lift the parchment paper and place into a dutch oven.
You will bake with the lid on for the first 20 minutes, and then remove the lid. And then bake for an additional 20-3o minutes. Mine only takes 20 minutes, but the cookbook suggests 30 minutes, but mine has always gotten too dark for my preference.
Sourdough Cheddar Dill Bread FAQ’s
Can I Use A Different Cheese?
You could swap out the cheese and use another hard cheese.
Can I Use Dried Dill?
Fresh is best! But if you can’t find fresh, then dried would work I think. I haven’t tried it, but I would use less as dried is stronger.
Can I Use A Different Herb?
I think another herb would be great here! Try rosemary, maybe some chives, or even some chopped jalapenos! I have used this combination in my Quick Jalapeno Cheddar Bread and I think it would be delicious in sourdough.
Can I Use All Purpose Flour For Sourdough Bread?
You can, but again I recommend bread flour. But if you are using all purpose flour, I recommend using unbleached flour. Bleached flour has been treated with chemicals that can kill the starter.
Can I Use A Knife To Make Cuts In The Bread?
You can, but it needs to be very sharp. Otherwise it may just tear. So if you don’t have a bread lame (yet!) then use a very sharp knife.
What If I Don’t Have A Banneton?
A banneton, or proofing basket, is great. It can make some fun lines on the outside of the bread. But as you can see, I got started without one. I simply used a towel lined bowl and dusted the towel with flour.
Do I Need To Bake This In A Dutch Oven?
You don’t have to. I know folks who have had good luck baking in a cast iron.
Why Didn’t My Sourdough Bread Rise?
This could be because your sourdough starter wasn’t quite bubbly and active enough. Be sure to do the “float test” before you begin.
Another culprit could be a cold kitchen! If your kitchen is cold the bread will take longer to rise. Ideally, your kitchen should be around 70°F.
Make sure your water is warm. Just like the dough likes a warm kitchen, it will also like warm water to keep it happy and keep it rising.
How Do I Store Sourdough Bread?
Sourdough bread will actually last longer than storebought bread at room temperature because of the long fermentation process. The bread will be fine at room temperature for 4 to 5 days. Once the bread has cooled completely (you can let the bread sit out for a full day before wrapping to allow to cool) then store in a sealable plastic bag or bread box.
Whatever you do, don’t cut into the bread until it’s cooled which can affect the texture and make it dry out faster.
You can also freeze any leftover bread for 3 to 6 months. I always just store mine in a sealable plastic bag.
Sourdough Recipes:
- Sourdough Brioche Bread
- Whole Wheat Sourdough Sandwich Bread
- Sourdough Focaccia
- Sourdough Cinnamon Rolls
- Sourdough Sandwich Bread
- Sourdough Rye Bread
- Sourdough Blueberry Muffins
Tools To Make This Sourdough Cheddar Bread
You can check out My Favorite Sourdough Bread Tools and Resources.
- Sourdough cookbook – ok not necessary but it’s chock full of amazing recipes that once you master this loaf you will want to make next.
- Dutch Oven
- Bread Lame
- Bread Knife
- Cooling Rack
- Banneton basket (or 8-inch bowl lined with a towel)
And don’t forget to check out Traditional Cooking School’s complete Sourdough course – it will teach you EVERYTHING!!
Master The Art Of Baking!
Don’t miss out on the chance to elevate your baking skills! Join the Ultimate Baking Bootcamp today and unlock the secrets to creating perfect desserts every time. With expert guidance, step-by-step lessons, and insider tips, you’ll be baking like a pro in no time. Sign up now and start mastering your baking!

Sourdough Cheddar Dill Bread
Ingredients
- 50 g (1/4 cup) bubbly, active starter
- 350 g (1 1/3 cup + 2 Tbs.) warm water
- 500 g (4 cups + 2 Tbs.) bread flour
- 9 g (1 1/2 tsp.) salt
- 100 g (1 cup) cubed cheddar cheese
- 10-13 g (3-4 Tbs) chopped fresh dill
Instructions
- Make The Dough. Whisk the starter and water in a large bowl. Add the flour and salt. Squish everything together with your hands until all of the flour is absorbed. Cover with a damp towel and rest for 1 hour.
- Shape The Dough. After the dough has rested,add the dill and cheddar and work it in with your hands. Cover the dough with a towel for 30 minutes.
- Stretch And Folds. Using slight wet hands, grab a portion of the dough and stretch it upward as high as you can stretch it without tearing, and then fold it over toward the center of the bowl. And then give the bowl a quarter turn and repeat this stretch and fold technique until you have completed a full circle. Repeat the stretch and fold, every 15 minutes, completing 4 sets total. Cover with a damp towel, and let rise for 8 to 10 hours (at about 75°F). The dough is ready when its doubled in size and has bubbles on the surface.
- Shape. After the bulk rise, remove dough from bowl and place onto a lightly floured surface. Shape into a round. Start at the top and fold the dough toward the center. Turn the dough slightly and fold over the next section of dough. Repeat until you have come full circle. Flip the dough over and let rest for 5 to 10 minutes. Meanwhile line an 8-inch bowl with a towel and dust with flour. With floured hands, gently cup the dough and pull it toward you in a circular motion to tighten its shape. Using a bench scraper, place the dough into the bowl, seam side up.
- Second Rise. Cover the bowl and refrigerate for 8-12 hours. Nearing the end of the rise, preheat the oven to 500oF. Let the dutch oven (or baking vessel) preheat while you prepare the dough.
- Score. Place the parchment over the dough and invert the bowl to release. Sprinkle the dough with flour and gently rub the surface with your hands. Using a bread lame, or the tip of sharp knife score the dough. Use the parchment paper transfer the dough to your dutch oven. Lower the heat in the oven to 450F.
- Bake. Bake on a center rack, in a preheated 450oF oven, for 20 minutes, covered. Remove the lid and continue to bake for 20-30 minutes. Optional: Remove from oven, and remove the loaf from the pot and bake the crust for an additional 10 minutes to crisp the crust. (My crust is always dark at this point, so I skip this step). Transfer to a wire rack. Cool for 1 hour before slicing.
Notes
- Tools: Sourdough cookbook |Dutch Oven | Bread Lame | Bread Knife| Cooling Rack | Banneton basket
- Storage: The bread will be fine at room temperature for 4 to 5 days. Once the bread has cooled completely (you can let the bread sit out for a full day before wrapping to allow to cool) then store in a sealable plastic bag or bread box. Whatever you do, don’t cut into the bread until it’s cooled which can affect the texture and make it dry out faster. You can also freeze any leftover bread for 3 to 6 months. I always just store mine in a sealable plastic bag.
- Make sure your starter is active before you start. Drop a small piece in a bowl of water to see if it floats. It it does, then it’s ready! If not, then it may need 1-2 more feedings.
- Use Bread Flour. Yes you can use all purpose flour, but bread flour gives the best texture.
- Use A Kitchen Scale. For best accuracy, it’s best that you weigh your ingredients and not rely on volume (measuring cups)
- Damp Towel: When you let the dough rise overnight, be sure to use a damp towel to cover it so it doesn’t dry out and not rise properly.
- Use A Bread Lame. Yes you can try and use a sharp kitchen knife to make the cuts in the top of the bread but a bread lame is a great handy tool that makes clean cuts every single time. I love my bread lame!!
- Bread Timeline:
- Thursday night: Remove Starter from Fridge and Feed
- Friday: Feed twice (once in the morning, and one at night)
- Saturday morning: Feed again
- Saturday evening: Remove the amount of starter I need to make my dough. Feed my starter again, and pop back in the fridge until next week.
- Sunday morning: Shape and place in basket and proof in fridge for 8-12 hours.
- Sunday evening: Finish and bake.
- Adapted From Clever Carrot


Great recipe! I had a big crop of dill and I was looking for a way to use some of it up. I didn’t change a thing and it turned out beautifully. Cheesy, flavoursome sourdough! This will be a regular!
Thank you so much! 😊 I’m thrilled you loved it—there’s nothing better than a cheesy, herby sourdough, especially when it puts that fresh dill to good use! So happy it’s earned a spot in your regular rotation. Happy baking! 🍞✨
This bread came out perfect!
Thank you so much! I’m thrilled you loved it—cheddar and dill is such a delicious combo, right? Happy baking, and enjoy every slice!
Can you use dill seed?
I recommend sticking with fresh dill for the best flavor, but if you’d like to use dill seeds, you can try substituting about 1 teaspoon of dill seeds for the fresh dill. Keep in mind the flavor will be more concentrated, so adjust to taste.
My rise in the fridge wasn’t very much of a rise. Is it supposed to double in size or is it accurate to have minimal rise.
Hi JBias, on the second rise no it won’t double in size – most of the doubling in size happens during the first rise. Hope that helps!
Rachel, thank you for this fantastic recipe! It looks so good.
Can I use dried dill weed and or seed ?
I haven’t tried but if so I would use less than if I was using fresh
My dough was quite soft. I didn’t cook mine in a Dutch oven. Covered the dough with a roasting pan and put a pan of hot water in the oven. The dough really spread out. I took it out of the oven at 40 minutes as crust was dark brown and temp over 200. Let it cool and cut. Flavor is awesome but it may have needed another 5 -10 min. Flavor awesome! I’m wondering if you have better rise with the Dutch oven. My oven temp is correct.
Hi Marian, the soft dough may have to do with the dough itself – you may want to try a few pulls and folds during the rise time, or you make sure to shape it a little tighter. Make sure you use bread flour so the dough is strong enough to hold it’s shape. And a Dutch oven may help with it spreading out as well and rise up as opposed to spread out. Hope that helps!
Why is the 2nd rise in the refrigerator needed for this particular recipe, when other recipes do not call for this second long refrigerated rise? Other recipes call for a second rise that is much shorter and outside of the refrigerator.
Thank you!
From Toni (my husband, Nick, is the baker.
Hi Toni, the long slow second rise in the fridge will help improve flavor. It will slow down the yeast giving the natural bacteria time to develop. I haven’t tried this with a room temperature second rise, but if you do it this way it will have a shorter rise time.
Hi- is step 6 the second rise? I am confused because it seems like there is a second rise after the stretch and folds but you named the step before that the second rise? Am I doing something wrong because my bread has now been rising for 20 hours and it’s not even shaped yet
Hi Eve, my apologies but it looks like the step got duplicated but it does still go through two long rises like that. Since it has been rising for that long I would go ahead and shape it and bake it now. And the recipe has been updated now! Thank you for letting me know!
I made this for a potluck because my garden is overflowing with dill plants. I had so many people come up and tell me that this was the best bread they’d ever had. I’m thinking of making it my go-to potluck dish.
aw that’s awesome to hear Lindsey, I’m so glad everyone loved the bread! It’s one of my faves as well!
Your recipe at the end has the bread going through two bulk rises, but it looks like it only goes through one in the post.
Hi Vinci! It goes through two rises yes- and the second rise is mentioned in the post in the “shaping dough” section. Thanks!
Sourdough has always been a mystery to me! I can’t wait to make it.
Thanks Nadalie! It’s a great recipe to start with 🙂
Dill is one of my favorite herbs. I would love to try this bread!
Thanks Monica! Me too 🙂 if you love dill then you will definitely love this bread!
It sounds delicious! I’ve actually never made homemade bread so I definitely need to try
Hi Mimi! Yes sourdough is a bit time consuming but totally worth it!
wow I never knew what a “sourdough” starter was. Doesn’t seem that hard (I dont bake) but just takes time. Cheddar and dill sounds like a great combo – I love fresh dill. Can you make this for me???
Yes just takes time! And most of it once you have an active starter is basically hands off time! Ha ha I would love to make this for you (but may have to save a few slices for myself – its’ that good!) LOL.
This sounds delicious! Can’t wait to try making this.
Thanks Rachel! Let me know how it turns out!