
Sourdough Sandwich Bread
This Post May Contain Affiliate Links. Please Read Our Disclosure Policy.
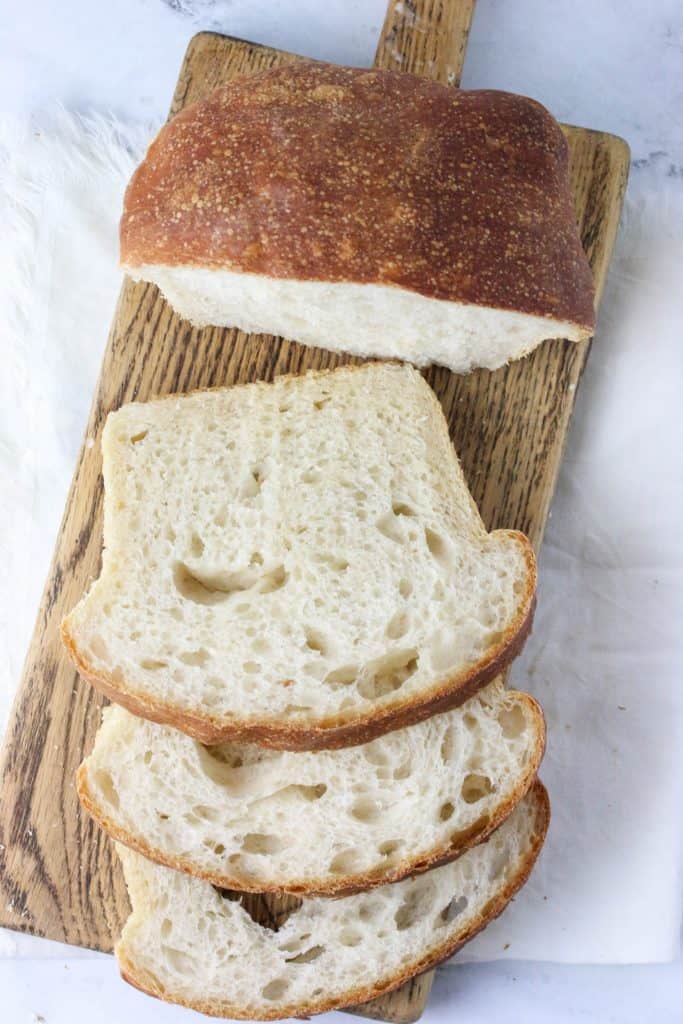
Soft, fluffy sourdough sandwich bread. Oh this is what dreams are made of! I’ve made so many loaves of this bread lately. I’ve turned it into avocado toast, BLTs, and just simply gifted it to friends because that’s how I roll. I have all the step by step photos, tips and tricks for you to master this soft sourdough sandwich loaf at home.

I’ve been pretty obsessed with baking with my Sourdough Starter these past few months stuck at home. It’s like part science. Part magic. And 100% holy moly deliciousness. In fact I created this free e-mail series, Sourdough Simplified to help you get started making sourdough and take away some of the confusion.
I’ve been baking up this Sourdough Bread Recipe (From Starter!) about once a week. I’ve ventured out to make some Sourdough Brioche Bread to make crazy good french toast. Some Whole Wheat Sourdough Sandwich Bread to make amazing sandwiches each day. And let’s not forget about the weekends. Those are reserved for what might be the BEST Sourdough Cinnamon Rolls I have ever eaten.
So this time, a soft sourdough sandwich white bread. Because this is what all sandwiches deserve.
Ok but let’s back it up a bit. Maybe you’re new to sourdough.
Ready To Take Your Baking To The Next Level?
Join the Ultimate Baking Bootcamp and master essential techniques like mixing methods and the why behind every recipe! Whether you’re a beginner or looking to refine your skills, this step-by-step class will help you bake with confidence and create flawless desserts every time. Start your baking journey today!
What Is Sourdough?
Sourdough is basically an ancient way of making bread. Sourdough doesn’t rely on commercial yeast (aka those little packets you have bought at the store), but on wild yeast. Wild yeast is everywhere around us and even on us!
By simply combining flour and water, you create a live fermented culture from the wild yeast found on the grains of the wheat that the flour is made from. The more it is “fed”, meaning fresh flour and water, allows the wild yeast to multiply.
Because sourdough relies on wild yeast, the process can take much longer than commercial yeast bread recipes. But the complex flavor and texture is far superior of any other bread you will ever eat.
For more Sourdough 101: What Is Sourdough?<– click here.
Is Sourdough Bread Better For You?
Yes. 1000% yes. Sure at first glance, the nutrition label might look the same to conventional bread. But the long fermentation process is what has sourdough sailing past the conventional bread loaves by a mile for its health benefits. Plus it’s made with just a few simple ingredients compared to store-bought bread that has added chemicals and preservatives.
Whole grains, in general, that bread is made with can contain lots of great minerals. But the body can have a hard time absorbing those minerals due to phytic acid that is present in grains. But the lactic acid created from the fermentation process helps to break down the phytic acid allow your body to be able to absorb more of those minerals than you would be able to with bread made from commercial yeast.
Also, sourdough bread can be much more easily digested and enjoyed, especially those with a gluten sensitivity. The long fermentation process helps to already start the process of breaking down the gluten in the bread making it much easier to digest.
So more vitamins, minerals, and it’s easier to digest. Basically, sourdough is awesome.

Make Your Sourdough Starter…
If you haven’t gotten around yet to making your sourdough starter then let’s get going! What are you waiting for? It will take about 5 days to make your starter before you can attempt this bread. But it will be worth it. Here is the full guide on How To Make Sourdough Starter From Scratch.
Once you have your starter raring to go then you will need to feed and mantain your starter.
Want to jump in to sourdough but don’t want to make your own starter? Totally fine! Just buy a sourdough starter and it will be ready to use in a couple days.

Ingredients Needed
The best part about this sourdough sandwich bread is that it requires very few ingredients. I think that’s what I love about making sourdough anything! Just simple, real ingredients. Six ingredients. That’s it!
- Sourdough starter
- Water
- Sugar
- Flour
- Salt
- Oil
Ingredient Notes
- Water – I have made this with my tap water no issues, but if you’re concerned about the quality of your tap water then use filtered or bottled water to be safe.
- Flour – I used a combination of bread flour and all purpose which gives it great structure and a soft loaf at the same time. You can use 100% AP flour but the bread may be harder to shape.
- Salt – Different types of salt can vary by weight. I used kosher salt for the best pure salt taste.
- Oil – I use a neutral tasting oil such as canola or vegetable oil but I think any oil would work here like grapeseed or olive. I haven’t tested it without coconut oil, however.
Start With An Active Starter
You want to make sure to start with an ACTIVE STARTER. An active starter is a starter that has doubled in size and you use it when it’s at it’s peak of rising. This is usually about 4 hours after feeding it (if you have been storing the starter in your fridge then it may take a couple feedings to get the starter to an active bubbly stage where it doubles in size within 4 hours).
The time it takes for it to double in size can vary depending on water temperature and room temperature. Warmer = rises faster. Colder = rises slower.
How can you tell when your starter is ready?
I have two ways:
1. The Rubberband trick
Place a rubberband around your starter jar where the height of the starter starts when you feed it. And then when you see it’s doubled in size, it’s ready! Like so…
Update: You can also use a sharpie to mark the outside of your jar! Will wash right off!

2. The Float Test
Still not sure? Take a spoonful (just be careful to not deflate the bubbles) and place in a bowl of water. Does it float? If it does, then you’re ready! If it doesn’t let the starter continue to bubble away before using it.

Making The Sourdough Sandwich Bread Dough
- Ok now that your starter is ready time to make that dough! You want to first stir together your active starter, water, sugar and oil.
- Then go ahead and stir in your flour and salt. It will be quite shaggy at first. I stir with a fork then I just get in there with my hands. Nothing. More. Satisfying.
- Cover with a damp towel for about an hour then work into a smooth ball. I do this by bringing the edges up to the center and the flip it over. And let the dough rise, at room temperature for 8 to 10 hours. I prefer doing this overnight!

Shaping The Dough
Now you can let the dough rise all day and bake it up at night, or start the dough in the P.M. like I do and then it’s ready to be shaped and baked the next morning. No way is wrong. Do what works for you.
- About 8-10 hours have passed and it’s doubled in size it’s time to shape the dough.
- Shaping the dough is pretty simple. I just scrape the dough onto a lightly floured counter. Then just dimple the dough with your fingertips to release any air bubbles.
- Roll the dough into a log and tuck the ends. Let it hang out for about 5-10 minutes to let the gluten relax. And then tighten the shape with your hands. Just cup the dough and pull it toward you.
- And then it’s time to place it in an oiled loaf pan to go through a second rise!

Final Rise
You want to place the dough into an oiled loaf pan. Be sure to cover your dough. And now it needs to rise for another 1 1/2 – 2 hours until the dough rises about an inch above the rim of the loaf of the pan.
This time can vary depending on how warm your kitchen is. The colder the kitchen the longer it will take! Ideally, the bread would rise in a warm kitchen, about 75oF. You can always put your bread somewhere warm, or try putting it up high too – like above your fridge is always a good spot.

Time To Bake!
Once the dough has risen, it’s time to bake! I bake my loaf in a 375oF oven for about 40-45 minutes.
Gorgeous loaf of sandwich bread is almost yours…

Recipe Tips
- Make sure your starter is active before you start. Drop a small piece in a bowl of water to see if it floats. It it does, then it’s ready! If not, then it may need 1-2 more feedings.
- Measure Your Flour Using A Kitchen Scale . You can use measuring cups but for best accuracy it’s better use a kitchen scale and weigh out your flour. This ensures you don’t overmeasure, which can result in dense rolls. You can read my post on How To Measure Flour here.
- Use A Large Mixing Bowl! This dough will expand quite a bit. So the bigger the better.
- Use a damp towel. You don’t want the dough to dry out on top creating a film that will prevent the dough from rising.
Why Didn’t My Sourdough Sandwich Bread Rise?
- Starter Wasn’t Ready: This could be because your sourdough starter wasn’t quite bubbly and active enough. Be sure to do the “float test” before you begin.
- Cold Kitchen: Another culprit could be a cold kitchen! If your kitchen is cold the bread will take longer to rise. Ideally, your kitchen should be around 70°F.
- Overproofed: Another reason I found as I continue on this sourdough journey, is you overproofed your dough. If you overproof then there will be nothing left for it to do, and you will get no rise. So when you place the risen dough in the pan, make sure to not let the dough rise for more than 2 hours. The only exception is if your kitchen is super cold and it’s still not puffy.

Recipe FAQ’s
Bread flour helps to give some structure to this recipe. But if you have to use 100% all-purpose flour, the texture might not be quite the same and it may be harder to shape.
Sourdough bread will be fine at room temperature for about a week. The acidity to the bread is actually a natural mold deterrent so it won’t go bad as quickly. I think it’s best, however, if eaten within the first few days. Any leftovers, I love turning into croutons! Don’t let any of this go to waste.
Yes! I freeze for up to 3 months. Just make sure the bread is completely cool before freezing it. I wrap it in a few layers of plastic wrap and then a final layer of tin foil or place in a plastic bag. I would just unwrap and thaw at room temperature when ready to enjoy!

More Sourdough Recipes
Tools To Make This Sourdough Recipe
You can check out My Favorite Sourdough Bread Tools and Resources.
- Loaf Pan
- Large mixing bowl
- Kitchen scale
- Sourdough cookbook – ok not necessary but it’s chock full of amazing recipes that once you master this loaf you will want to make next.
- Cooling Rack
Master The Art Of Baking!
Don’t miss out on the chance to elevate your baking skills! Join the Ultimate Baking Bootcamp today and unlock the secrets to creating perfect desserts every time. With expert guidance, step-by-step lessons, and insider tips, you’ll be baking like a pro in no time. Sign up now and start mastering your baking!

Sourdough Sandwich Bread
Ingredients
- 65 g (1/3 cup) bubbly, active starter
- 300 g (1 1/4 cups) warm water
- 12 g (1 Tbsp) granulated sugar
- 15 g (1 Tbsp) oil
- 400 g (3 1/3 cups) bread flour
- 100 g (3/4 cup plus 1 Tbsp) all purpose flour
- 9 g (1 1/2 tsp) salt
- melted butter for brushing on top (optional)
Instructions
- Make The Dough. In a large bowl, whisk together the starter, water, sugar, and oil together with a fork. Add the flours and salt. Mix to combine. Finish by hand, until a rough dough forms. Cover with a damp towel and let rest for 30 minutes to 1 hour. (If needed Replenish starter with flour and water at this point). After dough has rested, work the dough into a smooth ball, about 20 seconds. The dough will be supple and smooth when it comes together.
- Bulk Rise. Cover the bowl with a damp towel and let rise at room temperature, 70oF, until double in size, about 8 to 10 hours. The dough will look nice and domed when ready.
- Shape. Remove the dough onto a lightly floured work surface. Gently dimple the surface with your fingertips to release any large air bubbles. Roll the dough into a log, tucking the ends underneath. Let rest for 5 to 10 minutes. Meanwhile, lightly coat a 9-inch loaf pan with oil. With floured hands, cup the dough and pull it toward you to tighten its shape. Place into your loaf pan, seam side down.
- Second Rise. Cover the dough and let rest until it has risen about 1 inch above the rim of the pan, about 1 1/2 hours to 2 hours, depending on room temperature. Near the end of the rising time, pre-heat your oven to 375F.
- Bake. Bake the dough on the center rack in your 375F preheated oven for 40 to 45 minutes. When finished, remove the loaf from the oven and brush the crust with the melted butter (optional) Cool in the pan for 10 minutes, then transfer the loaf to a wire rack to cool completely before slicing.
Notes
- Active Starter is key! Make sure your starter is active before you start. Drop a small piece in a bowl of water to see if it floats. It it does, then it’s ready! If not, then it may need 1-2 more feedings.
- Use A Kitchen Scale. For best accuracy, it’s best that you weigh your ingredients and not rely on volume (measuring cups)
- Damp Towel!! When you let the dough rise overnight, be sure to use a damp towel to cover it so it doesn’t dry out and not rise properly.
- Storage: The loaf is best consumed within a week, stored in a plastic bag at room temperature. Otherwise freeze for up to 3 months.
- Recipe From: The Clever Carrot’s cookbook – Artisan Bread Made Simple


Hi there. For the bake time do you leave the lid on the whole time? Or make with no lid? Or both and if so how much time for both?
The towel is only for covering while the dough rises. For baking, bake the loaf uncovered for 40–45 minutes at 375°F. Enjoy!
I messed up on the first one so I’m doing it again. I’m in my 70s so it happens a lot. I love your recipe and am making it again today. The bread is wonderful but I have a question because I was gifted for Christmas a bread proofing box. Hardly any instructions so I was wondering can I use this for making your bread? Thank you for your help and for the wonderful bread recipe
Thank you so much for sharing this — I’m so glad you’re enjoying the bread! 💛 And yes, you can absolutely use a proofing box for this recipe. It’s simply a cozy, draft-free space that helps the dough rise more consistently. Just keep an eye on the dough and let it guide you rather than the clock. You’re doing a great job, and I’m so happy you’re baking it again. Thank you for your kind words! Be sure to let me know how your bread turns out this time around!
One more question Heather, what size bread pan do you use please? I see different sizes
Great question, Deborah! I use a standard 9×5 inch loaf pan for this recipe. Please let me know how it turns out for you, happy baking!
I really like your recipe and am makig
Thank you so much! I’m really glad you’re enjoying the recipe — happy baking! 😊
Love this recipe! I did a mix in of cinnamon chips and it is perfect. I will be doing this over and over.
Thank you!! Cinnamon chips sound like pure heaven in this bread, so glad it’s on repeat at your house! Happy baking!
Are the nutrition facts per loaf or per slice?
Thanks for your question! The nutrition facts are per slice. Hope that helps!
Mine keeps cracking on the sides – the top of the bread tears from the bottom. Why does it do that?
Thanks for your question! Cracking can happen if the dough isn’t scored deeply enough or if it’s a bit too dry. Make sure your dough is well-hydrated— it should feel soft and slightly sticky but still manageable. You can try adding a little more water next time and mixing well. Hope this helps! 😊
I had never made cookies using brown butter before . . . These are easy to make and dangerously GOOD!
Thank you for your great review! I’m thrilled you enjoyed the brown butter chocolate chip cookies and found them easy and delicious. Your feedback is much appreciated! 🍪
I live in an apartment, usually kept around 73 degrees during the day. I’ve used a heating pad to grow my starter, but was wondering if you have any other ideas of how to create a warm spot for the future? Not looking forward to my electric bill with the heating pad on all day! 🙂
Hi Jessica, thank you for asking! 73°F should be warm enough, but you could try placing the starter in the oven with the light on only, or on top of the fridge for extra warmth.
I was wondering how mixing the dough in a breadmachine worked out for Maureen?? She never said how it went!
I put a pan in the oven under the loaf pan and add ice and the steam seems to help with the rise.
That’s a great way to add steam, glad it worked out!
Just tried this. Followed your recipe exactly. Now to wait for it to cool to taste. Looks perfect!
Great, thank you, Jackie! Enjoy!
My Starter rose in 3 hours it’s established and passed the float test my house stays at 72 and I live in a high humidity area my 1st rise to about double in about 7 hours I rolled it and put it for the the 2nd rise and it has been 2 hours in the oven with a light on and has expanded but no where near the top of the loaf pan (I want to say my loaf pan is a large on not the standard size) what should I do ?
If you’re using a larger pan, the bread might not rise to the top, but no worries! Just make sure it bakes for the required time and passes the poke test (when you poke the bread, it should slowly bounce back). If it does, then it should be ready to enjoy!
Hi, thanks for the recipe just made this and was yummy, started another loaf but wanted to know if I let it bulk rise on counter, can I shape, put in greased bread pan, cover in damp towel and do 2nd rise overnight in fridge or will that over proof? Did not time this one properly!
Thanks!
Nope should be fine and may need to let rise at room temp the next day until ready. The fridge will slow down the proofing process.
Hi! This is the 2nd time using this recipe. I used all purpose only. The 1st time I added too much, but the dough simply rejected the extra. This time I used 3 1/3 cups and it’s perfect! East tweak with no bread flour.
wonderful Karen! I’m so glad it’s worked for you!
My dough rose over night, but is not rising in the loaf pan for the second rise. It did a little bit, but far from an inch over the pan?
I e put it in warmer place for the second hour.
What other reasons may cause it to not second rise??
Hi Amanda could be that your starter is newer and or wasn’t at peak point when used. Hope that helps!
Can I let it do a long ferment in the fridge and then let rise on the counter before I bake?
Yes you definitely can!
After trying several other recipes out there, and getting unsatisfactory results, I searched again and found yours. First of all, thanks for the tips — I’ve been baking for 50yrs and never knew about the “float” test!
Great recipe. Now I’m going to try mixing the dough in my bread maker, and then completing in the oven. I’ll let you know how it goes.
aw that’s wonderful Maureen! You’re so welcome 🙂 let me know how it goes!
No need to slash the top before baking??
no not for a sandwich bread 🙂
This is the best and easiest recipe I’ve tried to date! So yummy! One question though…is the nutrition facts listed based on 1 slice or two? Thanks so much!
Oh I’m so happy to hear! The nutrition facts is based on 12 slices. 🙂