
The BEST Scone Recipe (Without Eggs)

This Post May Contain Affiliate Links. Please Read Our Disclosure Policy.
I love ME some scones. Any scone. All the flavors. Doesn’t matter. So I love this simple scone recipe, made without eggs, because I use it to dream up any flavor variations to serve for brunch! I’ll show you step by step how to make this easy scone recipe and then let your creativity do the rest!

If you follow me and my little old baking blog, then you know that me and scones have some history. We go way back. Let me take you down memory lane.
I used to work at a bakery and when I did I made batch after batch. After. Batch. Of. Scones. There was a point that I thought I never wanted to see another scone.
Ready To Take Your Baking To The Next Level?
Join the Ultimate Baking Bootcamp and master essential techniques like mixing methods and the why behind every recipe! Whether you’re a beginner or looking to refine your skills, this step-by-step class will help you bake with confidence and create flawless desserts every time. Start your baking journey today!
But here we are. Why? Because scones are awesome. They never disappoint. So easy to make (seriously – like 10 minutes to whip up). They freeze well. Love me some freezer baking. And they just work with just about anything you want to throw in the bowl.
So basically, why not scones? And this simple scone recipe, is made without any eggs, but only heavy cream, which makes for a tender, rich scone is the only scone recipe you will ever need. You can throw whatever you want – creativity is the only limit here – and whip up your own scones in no time.
Most scones are usually made with the addition of eggs, and usually buttermilk or heavy cream. But this eggless scone recipe, is made without buttermilk, and instead heavy cream only. It’s my go to scone recipe – I think I’ve made just about every varation you can imagine. In fact these are one of 60+ Home Baking Projects To Try! So are you ready? Roll up those sleeves. Let’s bakes some simple homemade scones.
Why These Eggless Scones Are The Best
- Takes about 10 minutes to mix up
- As the name suggests, no eggs needed (so whether you’re out of eggs or have an allergy you don’t need them!)
- Uses heavy cream for maximum richness
- Totally customizable! Turn these into whatever type of scone you like.
- Great for freezing and making ahead of time.
Ingredients Needed
- All purpose flour -Tthis type of flour works perfect in scones. It has a mid range protein content so making for a perfectly tender scone.
- Baking powder – this is a quick bread by definition meaning it gets it rise (quickly) from a leavening agent such as baking powder as opposed to a yeast bread for example. And baking powder and baking soda are NOT the same thing. So don’t swap one for the other. You can read all about baking powder vs. baking soda here and really nerd out on some baking science.
- Sugar – Granulated sugar is what I used. But I’m guessing brown sugar would also be delicious.
- Salt – As always, I add a little salt to my baking recipes to help balance the sweetness.
- Butter – I always use unsalted butter while baking. Different brands can use varying amounts of salt in their salted butter making it hard to control the salt. And make sure your butter is COLD, COLD, COLD. This makes for a flaky scone (similar to making pie dough).
- Heavy Cream – I used heavy cream for richness. Again, make sure it’s cold! But if you want you could use buttermilk instead.
- Vanilla extract – Of course you can always swap this out if you are adding other flavors and add-ins.
How To Make This Easy Scone Recipe – Step by Step
When I finally do remembering hearing about scones, I always remember hearing the word, DRY, with them. How sad for scones! And so false! If you haven’t ever tried making scones for the same reasons I always had, because they just didn’t sound appealing I suggest you give them a try. They do not require a mixer, just your mixing arm, a bowl, a whisk, spatula, and pastry cutter.
To make the dough, it is as simple as whisking together your dry ingredients.

Then you want to cut in your butter into the bowl. It’s easier if you cube the butter first up into the bowl.
Remember the butter should be COLD, COLD, COLD!

Then using your pastry cutter, cut the butter up until the butter is pea-sized, crumbly, but still visible.
Like so…

Want to add some mix-ins?
If you want to stir in some chocolate chips, or maybe some citrus zest, some dried cranberries perhaps? Now’s the time!

You will still visible pieces of butter in the bowl and that’s what you want. Those butter pieces will help to create a flaky tender scone in the end. They will melt, and the water in the butter will steam and push apart the flour layers.
And then make a well (aka push the flour aside and create a hole for the wet ingredients) and stir in the heavy cream and vanilla extract.

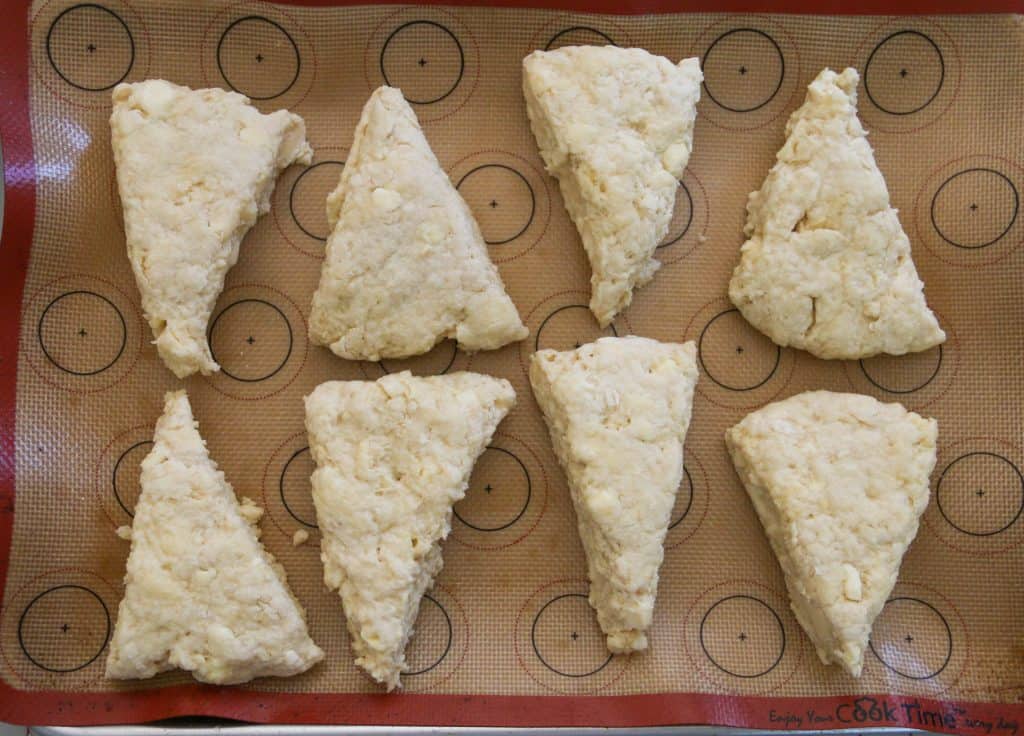
Cut the scones…
From there, you turn your dough onto your counter, knead the dough until it comes together and then pat into a circle.

…and cut into wedges. You want 8 equal sized wedges (basically cut ’em like you would a pizza). Easy peasy.

Then I recommend placing the scones on your baking sheet and freezing for 30 minutes (or refrigerating for 1 hour) to firm up the butter.
This really does make a difference in the rise of the scones!
HEATHER’S BAKING TIP: Before you bake these scones, brush the top of the scones with the little bit of heavy cream that is left in your measuring cup and sprinkle with coarse sugar.
Bake And Ice!
Or don’t. That’s your call. But please do. Because it’s totally worth it.
Just whisk up a little confectioners sugar, vanilla extract, and a little heavy cream (or milk).
Then drizzle away….you won’t regret it.

Baking Tips
- Measure flour correctly. Be sure to measure your flour correctly by scooping into your dry measuring cup and levelling off with a flat edge. For best accuracy use a kitchen scale. For a complete tutorial on how to measure your flour accurately, read this post.
- Use Cold Butter. Make sure to use cold butter. The cold butter will coat the flour which will shorten the gluten strands making for a tender scone. And because the butter is cold, it will not be absorbed by the flour, so when those pieces of butter are in the oven the water in the butter will turn to steam creating flaky layers and helping the scones to rise.
- Knead lightly. You don’t want to overwork the dough. Just knead enough for the dough to come together. Overworking the dough will develop the gluten causing the scones to be tough. It could also cause the butter to warm up and melt resulting in it getting absorbed into the dough.
- Freeze before baking. This helps to firm up the butter and make for a flakier, more tender scone. You can freeze for 30 minutes or refrigerate for 1 hour.
Recipe FAQ’s
Store leftover scones in an airtight container at room temperature for up to 2 days.
I like them of course fresh out of the oven. But they can last 1 to 2 days properly stored at room temperature.
You can also keep them store in the refrigerator for up to a week. Or better yet freeze them! Freezing desserts is my secret to always having baked goods at my fingertips.
Oh yes! That’s what I love about these scones. Once you cut them into wedges, you can freeze them by placing them on a cookie sheet. Then once frozen, wrap in either plastic wrap or store in a plastic bag in your freezer for up to 3 months. I like to do both to ensure they don’t have freezer burn.
Then when ready to bake, no need to thaw, just bake frozen. You will just need to tack on a few extra minutes of baking time.
I do this by cutting the 8 wedges and then cutting those in half again.
These half sized scones will take less baking time of course. After the first 10 minutes, rotate the pan in the oven and bake 5 minutes more.
Scone Variations
There are so many possibilities. Here are a few scone variations:
- Cranberry Orange Scones – Add 1/2 cup dried cranberries (or fresh cranberries) + 1 Tbsp. orange zest to the dough. Replace heavy cream with orange juice in glaze.
- Blueberry Lemon Scones – Add 1 cup blueberries + 1 Tbsp. lemon zest to the dough. Replace heavy cream with lemon juice in glaze.
- Chocolate Chip Scones – Add 1 cup chocolate chips to the dough.
- Cherry Chocolate Almond Scones – Add 1 tsp. almond extract, 1/2 cup dried cherries, 1/2 cup chocolate chips to the dough. Replace vanilla with 1/2 teaspoon almond extract in glaze.
- Lavender White Chocolate Scones– Add 1 tsp. lemon zest, 2 tsp. dried lavender, and 1 cup white chocolate chips to dough. Replace heavy cream with lemon juice in glaze.
- Cinnamon Chip Scones – Add 1 tsp. cinnamon + 1/2 c. cinnamon chips to dough. Brush scones with heavy cream. Make cinnamon topping: 2 Tbs. + 1 tsp. cinnamon and sprinkle on scones before baking. Drizzle in the vanilla glaze.
- Apple Cinnamon Scones – Add in fresh, chopped apple and cinnamon chips. Top with a cinnamon glaze when done baking.
- Maple Bacon Scones – Stir in chopped, cooked bacon, and make the dough with maple syrup. Top with a maple glaze when done.
- Peanut Butter Chocolate Chip Scones – Stir in peanut butter and chocolate chips to the dough!

Recipes To Try
Oh sky’s the limit! Here a few options to try:
Master The Art Of Baking!
Don’t miss out on the chance to elevate your baking skills! Join the Ultimate Baking Bootcamp today and unlock the secrets to creating perfect desserts every time. With expert guidance, step-by-step lessons, and insider tips, you’ll be baking like a pro in no time. Sign up now and start mastering your baking!

Basic Scone Recipe
Ingredients
- 2 cups (240 g) all purpose flour
- 3 tablespoons granulated white sugar
- 1 tablespoon baking powder
- ½ teaspoon table salt
- 5 tablespoons unsalted butter, cold
- 1 cup (240 mL) heavy cream
- 1 teaspoon vanilla extract
- coarse sugar for sprinkling on top
Instructions
- Preheat and prepare pan. Preheat your oven to 400oF. Line a cookie sheet with parchment paper or silicone baking mat.
- Combine dry ingredients. In a mixing bowl, whisk together all purpose flour, sugar, baking powder, and salt.
- Cut in butter. Using your fingertips, two knives, or a pastry blender, cut the butter into the dry ingredients until the butter are pea-sized. If adding mix-ins, stir them in now.
- Add wet ingredients. Make a well in the center of the dry ingredients and add the heavy cream and vanilla extract. Stir to combine.
- Shape and cut the scones. Empty the bowl onto a lightly floured surface. Knead the dough lightly to bring the mixture together. Pat the dough into a 8-inch circle. Using a sharp knife cut the circle into 8 triangle wedges. Place scones onto prepared cookie sheet, about 2 inches apart. Freeze for 30 minutes, or refrigerate for 1 hour before baking. Brush on a little heavy cream before baking and sprinkle on a little raw sugar before baking.
- Bake The Scones. Bake for 20-22 minutes. Remove from the oven and cool on a cooling rack.
Notes
- Storage: Store leftover scones in an airtight container at room temperature for up to 2 days. I like them of course fresh out of the oven. But they can last 1 to 2 days properly stored at room temperature. You can also keep them store in the refrigerator for up to a week. Or better yet freeze them! Freezing desserts is my secret to always having baked goods at my fingertips.
- Freezing: Once you cut them into wedges, you can freeze them by placing them on a cookie sheet. Then once frozen, wrap in either plastic wrap or store in a plastic bag in your freezer for up to 3 months. I like to do both to ensure they don’t have freezer burn. Then when ready to bake, no need to thaw, just bake frozen. You will just need to tack on a few extra minutes of baking time. You can also freeze baked scones. Once cooled, place in a freezer bag and freeze for 3 months. Thaw at room temperature before serving.
- Measure flour correctly. Be sure to measure your flour correctly by scooping into your dry measuring cup and levelling off with a flat edge. For best accuracy use a kitchen scale. For a complete tutorial on how to measure your flour accurately, read this post.
- Use Cold Butter. Make sure to use cold butter. The cold butter will coat the flour which will shorten the gluten strands making for a tender scone. And because the butter is cold, it will not be absorbed by the flour, so when those pieces of butter are in the oven the water in the butter will turn to steam creating flaky layers and helping the scones to rise.
- Knead lightly. You don’t want to overwork the dough. Just knead enough for the dough to come together. Overworking the dough will develop the gluten causing the scones to be tough. It could also cause the butter to warm up and melt resulting in it getting absorbed into the dough.


A cup of cream sounds like a lot – can you confirm that is the correct measurement? Ty
Yes, that’s correct! Since this is an eggless recipe, the extra cream gives the perfect texture. They turn out wonderfully tender – hope you enjoy them!
So, if you’re going to freeze or refrigerate the uncooked dough for up to an hour, shouldn’t you wait to preheat your oven until after you’ve put them in the refrigerator?
Yes, you can wait to preheat your oven. I’ll update that to reflect that because I hate having my oven on too early too! Sorry about that, thank you!
Holy cow!!! This is a delicious recipie !! I added strawberries and white chocolate chips. My coworkers are going nuts over them. Thank you.
aww that’s fabulous!! Thank you Bridget!
I learned that trick of freezing the scones before baking a few years ago, and you are so right! It really makes a difference!!
Oh Susan I couldn’t agree more!!
Thanks for the easy to follow recipe! I prefer scones without icing, but might try a less sweet option.
Hi Mark you can skip the icing and just sprinkle on a little sugar before baking if you prefer… enjoy!
I actually live near the castle where the stone of destiny stood in Scone, where the bake was first created. It’s the stone that Scottish Kings were coronated on. Scones are supposed to represent that stone. Of course Scottish scones are more round and not triangular unless they are tattie (potato) scones. Anyway here endeth the lesson and let me say your scones look lush.
wow! so cool
Felt like some scones and with so many cafes closed I thought I’d try it myself. Great recipe and worked out perfectly. Great tip about to over kneading the dough. I didn’t know that! Kids thoroughly enjoyed them and I ate 10 too many! LOL
they’re small – it’s ok! Enjoy
These scones are absolute perfection! My new favorite baking recipe!
wonderful Elizabeth