
How To Knead Dough
This Post May Contain Affiliate Links. Please Read Our Disclosure Policy.
If you’ve ever wondered how to knead dough properly — how long it should take, what it should feel like, or how to tell if you’ve done it enough — this guide will walk you through it step by step. I’ll show you exactly why kneading matters, how to knead by hand and with a mixer, how to handle sticky dough, and how to recognize when your dough is under kneaded or over kneaded. By the end, you’ll know what to look for so you can bake bread with more confidence and better results.

I still remember the first time I kneaded dough by hand. I stood at my kitchen counter thinking, Is this supposed to feel like this? The dough was sticky, uneven, and definitely not the smooth ball I saw in photos. I kept wondering if I was ruining it.
Over the years — from baking soft cinnamon rolls, rich pecan sticky buns, chocolate babka, everyday sandwich bread, and even sweet pull-apart monkey bread — I’ve learned that kneading isn’t about strength or perfection. It’s about understanding what’s happening in the dough.
When I knead dough, I’m not just pushing flour around the counter. I’m developing gluten. I’m building the structure that allows bread to rise properly and hold its shape. I’m taking something shaggy and turning it into something smooth, elastic, and ready to trap the air that yeast creates.
Once I understood what properly kneaded dough feels like and not just what it looks like bread stopped feeling mysterious. It became manageable. It’s something I teach in my Confident Bread Baker class! It’s bread baking 101.
So think of this as me standing next to you in the kitchen, walking you through it step by step.

Why Do You Knead Dough?
When you knead dough, you’re developing gluten. Gluten forms when flour is hydrated and worked. It creates stretchy strands that give bread structure. Without enough gluten development, your dough won’t be strong enough to trap the air bubbles produced by yeast. You can read more here about what is gluten in baking?
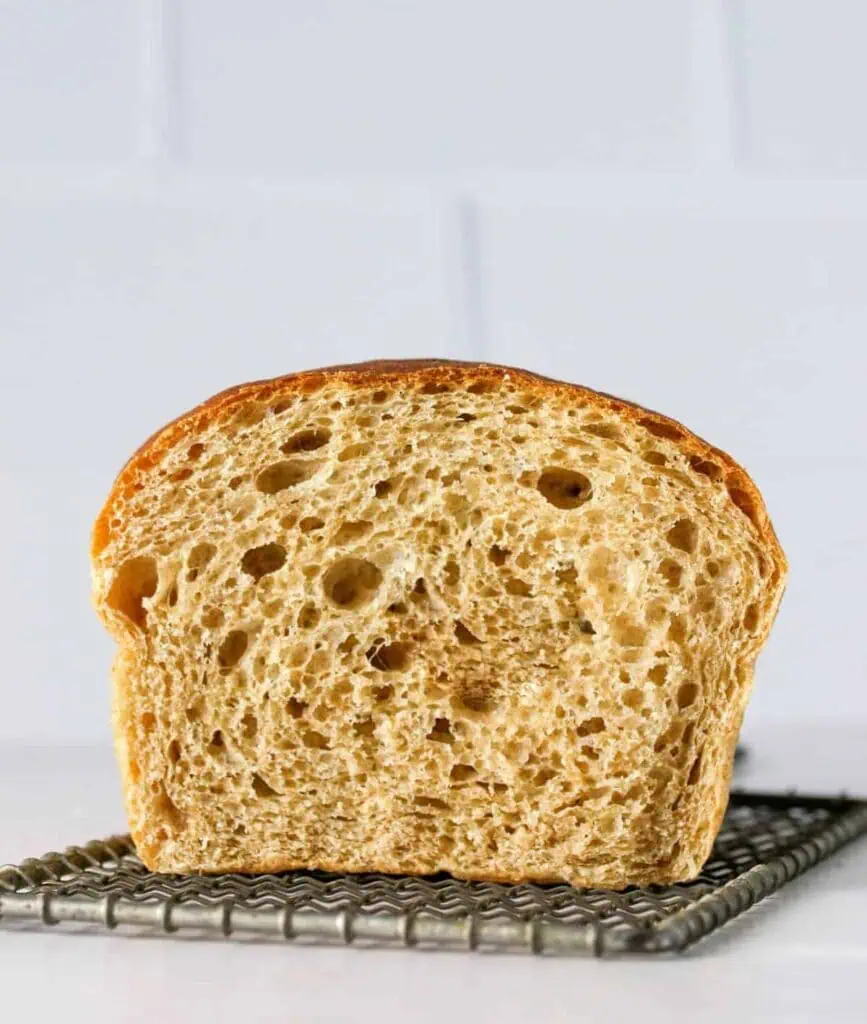
That trapped air is what gives you properly developed gluten gives your bread a soft crumb, good oven spring, and a strong, even rise. It also creates structure, allowing the loaf to hold its shape instead of collapsing or spreading.
If you’ve ever had dense bread, flat loaves, or rolls that didn’t rise properly, underdeveloped gluten could be the reason. Kneading is how you build that structure intentionally.

How to Knead Dough
At its simplest, kneading is a rhythm: Push. Fold. Turn. Repeat.
Here’s exactly how I do it:
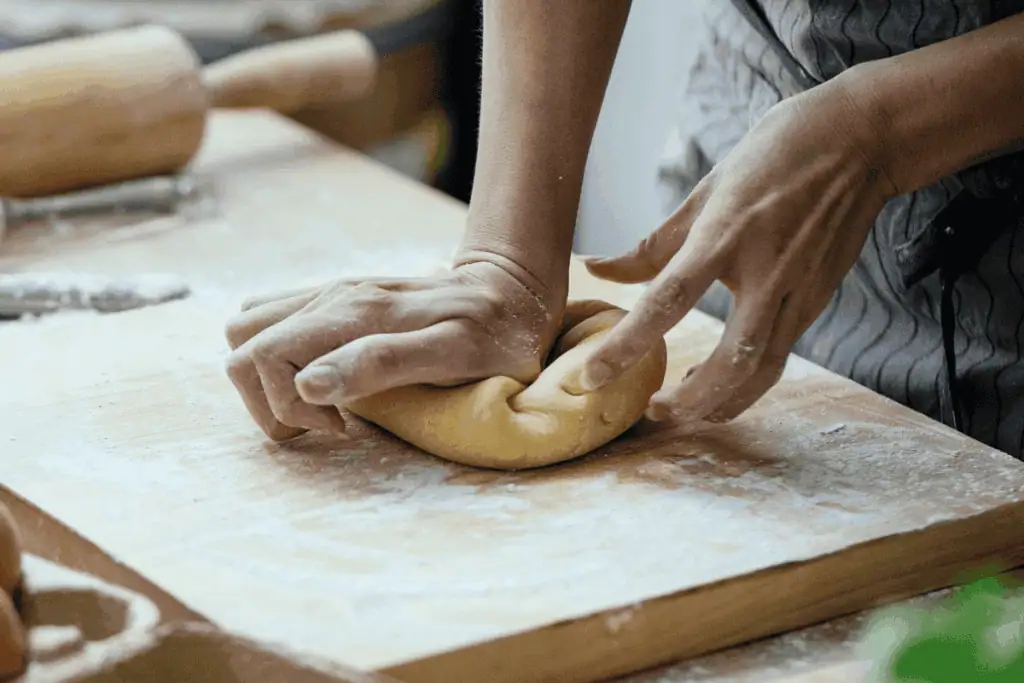
- Lightly flour your counter. Don’t overdo it! You don’t want to dry out your dough. Remember the more flour you add to the counter will get into your dough. The dough will get less sticky as you knead.
- Place the dough on the lightly floured surface.
- Use the heel of your hand to push the dough away from you. You aren’t trying to push it down into the counter but away from you.
- Fold the dough back over itself and roll it back towards you using your fingertips. Kneading should feel like this rocking motion with your hands.
- Rotate it a quarter turn and repeat. You can use one or both hands as you knead. Do what feels comfortable!
That pushing motion stretches the gluten strands. The folding motion layers them. The turning keeps everything even. It doesn’t need to be aggressive. It should feel steady and controlled.
And you don’t want to handle the dough and “play with it” because your fingers if they are kind of digging into the dough it can find the interior sticky parts. This will make you think the dough is stickier than it actually is and may have you add more flour than needed.
At remember at first, the dough may look shaggy and uneven. That’s completely normal. As you knead, it should begin to smooth out and feel more elastic.
Kneading Dough by Hand
You may want to knead the dough by hand if the dough is too heavy for your mixer or if you don’t own a stand mixer. When kneading by hand, plan for about 8–12 minutes depending on the dough. It will take longer by hand than if you are using a mixer.
When kneading the dough by hand you want to keep small dish of flour nearby to lightly sprinkle on your hands or the surface if need be as you are kneading. You can also use a bench scraper to help scrape up the dough off the counter as you are kneading by hand.
Here’s what you’ll notice along the way:
At the beginning of kneading, the dough will look rough and shaggy. It may stick to your hands, and if you try to stretch it, it will tear easily rather than stretch smoothly. As you continue kneading, you’ll notice it starting to change. The dough will look smoother and feel more cohesive. When you stretch it, it will begin to stretch slightly before tearing, showing that the gluten is developing. Toward the end of kneading, the dough should feel smooth and elastic. It will be soft and slightly tacky but not overly sticky, and it will hold its shape much better when you set it down on the counter.
Resist the urge to keep adding flour too quickly. Sticky dough doesn’t always mean you’ve done something wrong — sometimes it just needs more kneading.

Kneading Dough with a Mixer
If you’re using a stand mixer with a dough hook, kneading usually takes 5–8 minutes on medium-low speed. You don’t want to knead on too high of a speed or you could risk overkneading the dough or burning out your motor.
Here’s what I look for:
- The dough pulls away from the sides of the bowl.
- It may stick slightly to the bottom — that’s fine.
- It wraps around the hook without climbing aggressively.
Stop the mixer and feel the dough occasionally. You want it to feel soft, elastic, and slightly tacky. Keep in mind that mixers can overwork dough more easily than your hands can, so always check a minute or two before the recipe suggests.

How to Handle Sticky Dough
Sticky dough is one of the biggest stress points for new bakers. First, know this: some doughs are supposed to be sticky.
Enriched doughs like cinnamon rolls or pecan sticky buns often feel softer and tackier. High-hydration artisan doughs can feel loose and slightly messy before they come together. For really sticky doughs you may want to fold the dough instead of knead it (with something like for this no knead cranberry walnut bread recipe).
Here’s how I handle sticky dough:
- Knead a little longer before adding flour.
- Use a bench scraper to scrape up the dough and fold it over itself.
- Let the dough rest for 5–10 minutes to allow gluten to relax.
- Add flour sparingly, one tablespoon at a time if truly necessary.
Adding too much flour during kneading can result in dry, dense bread later.
How to Tell When Dough Has Been Kneaded Enough
This is where confidence builds. The best test is the windowpane test.
Pinch (don’t tear) off a small piece of dough and gently stretch it between your fingers. If it stretches thin enough for light to pass through without tearing, your gluten is properly developed.
Now if the dough tears quickly and feels tight, it needs more kneading. Properly kneaded dough should feel:
- Smooth
- Elastic
- Slightly tacky
- Stretchy without ripping

Although keep in mind the windowpane test isn’t ideal for all recipes – especially whole wheat bread recipes like my whole wheat sandwich bread. Because of the bran present in the flour interferes with gluten formation. So in this case, go with time kneaded. Trust the process!
Another quick test is the poke test. When you press it gently with your finger, it should spring back lightly.
What Does Underkneaded Dough Look Like?
Underkneaded dough is typically rough and shaggy in appearance, and it feels weak and slack rather than smooth and elastic. When you try to stretch it, it tears easily instead of stretching thin.
After baking, underkneaded bread often has a dense crumb with irregular air pockets and poor oven spring. Instead of rising upward with structure, the loaf may spread outward and look flatter than it should.

What Does Overkneaded Dough Look Like?
Overkneading is more common with mixers. Overworked dough can become:
- Very tight
- Stiff and hard to shape
- Dry in texture
Instead of stretching smoothly, it may tear or feel resistant. If you think you’ve overkneaded, let the dough rest for 10–15 minutes. Sometimes gluten just needs time to relax before shaping.
If you’re using a stand mixer remember to knead on low speed. To check dough lift up the dough hook. The dough should leave the sides of the bowl and cling to the dough hook but still stay attached to the bottom of the bowl. It should not ball up around the dough hook. If it does it’s overkneaded.

Bread Recipes To Bake Up
Now that you are a kneading dough expert let’s make some bread! Here are some of my favorite bread recipes to try:
Ready to Bake Bread with Confidence?
If you’re excited about this recipe but still feel unsure working with yeast, that’s exactly why I created Confident Bread Baker.
Inside the class, you’ll learn how to properly knead, proof, and troubleshoot dough so you get soft, fluffy, reliable results — not guesswork.
Because once you understand your dough, bread baking stops feeling intimidating and starts feeling doable.

Ingredients
- 1 batch yeast dough
- 1 –2 tablespoons flour for dusting surface if needed
Instructions
Kneading Dough by Hand
- Lightly flour a clean countertop. Place the dough onto the surface.
- Using the heel of your hand, push the dough away from you in one smooth motion.
- Fold the dough back over itself toward you.
- Rotate the dough a quarter turn.
- Repeat the push, fold, and turn motion for 8–12 minutes, or until the dough becomes smooth and elastic.
- Test the dough using the windowpane test. Stretch a small piece of dough between your fingers. If it stretches thin without tearing, it is properly kneaded.
Kneading Dough with a Stand Mixer
- Attach the dough hook to your mixer. Mix the dough on medium-low speed.
- Knead for 5–8 minutes (or as directed by the recipe), stopping occasionally to check the texture. The dough should pull away from the sides of the bowl and feel soft and elastic.
- Perform the windowpane test to confirm gluten development.
Video
Notes
- Properly kneaded dough should feel smooth, elastic, and slightly tacky — not sticky or dry.
- Underkneaded dough will look rough and tear easily.
- Overkneaded dough may feel tight, stiff, and difficult to shape.
- Avoid adding too much flour during kneading, as this can lead to dense bread.


