
Sourdough Rye Bread
This Post May Contain Affiliate Links. Please Read Our Disclosure Policy.
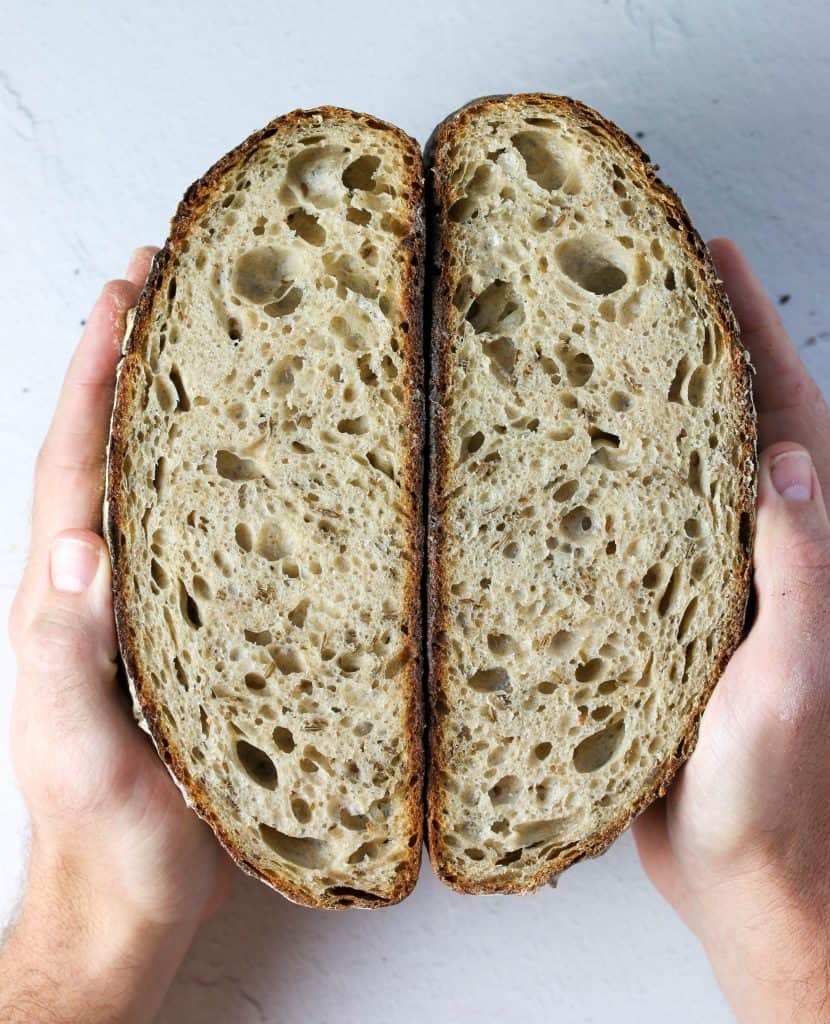
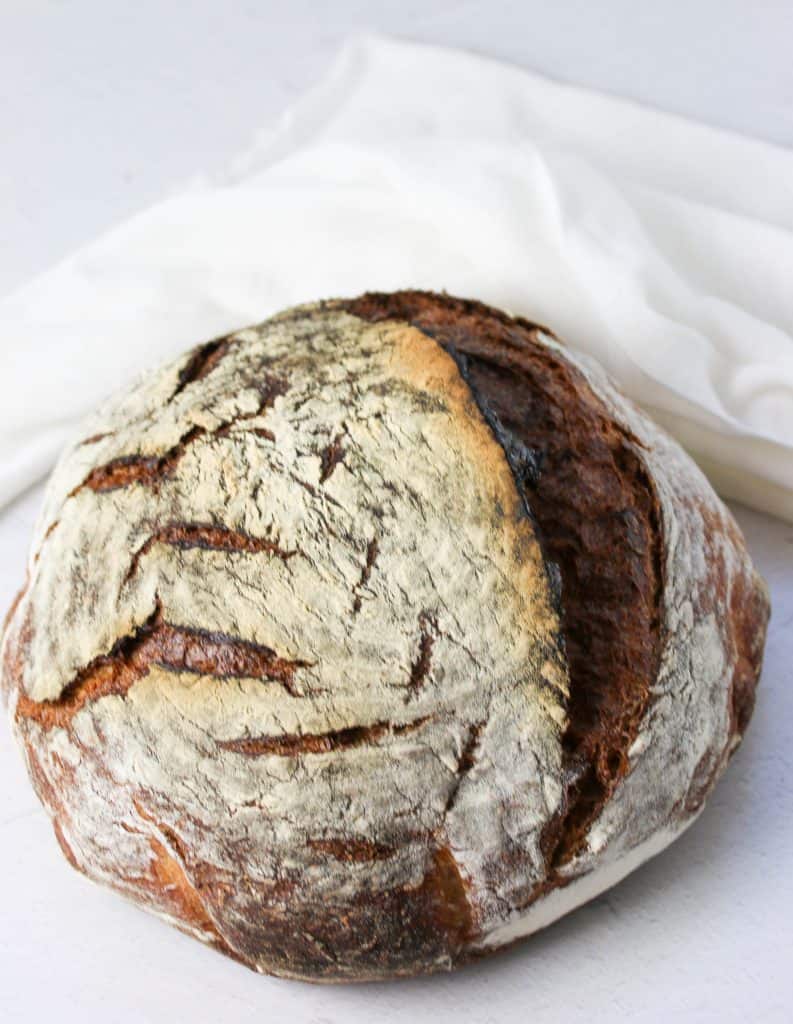
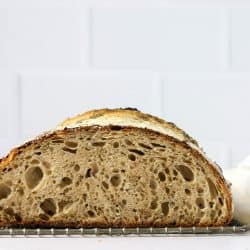
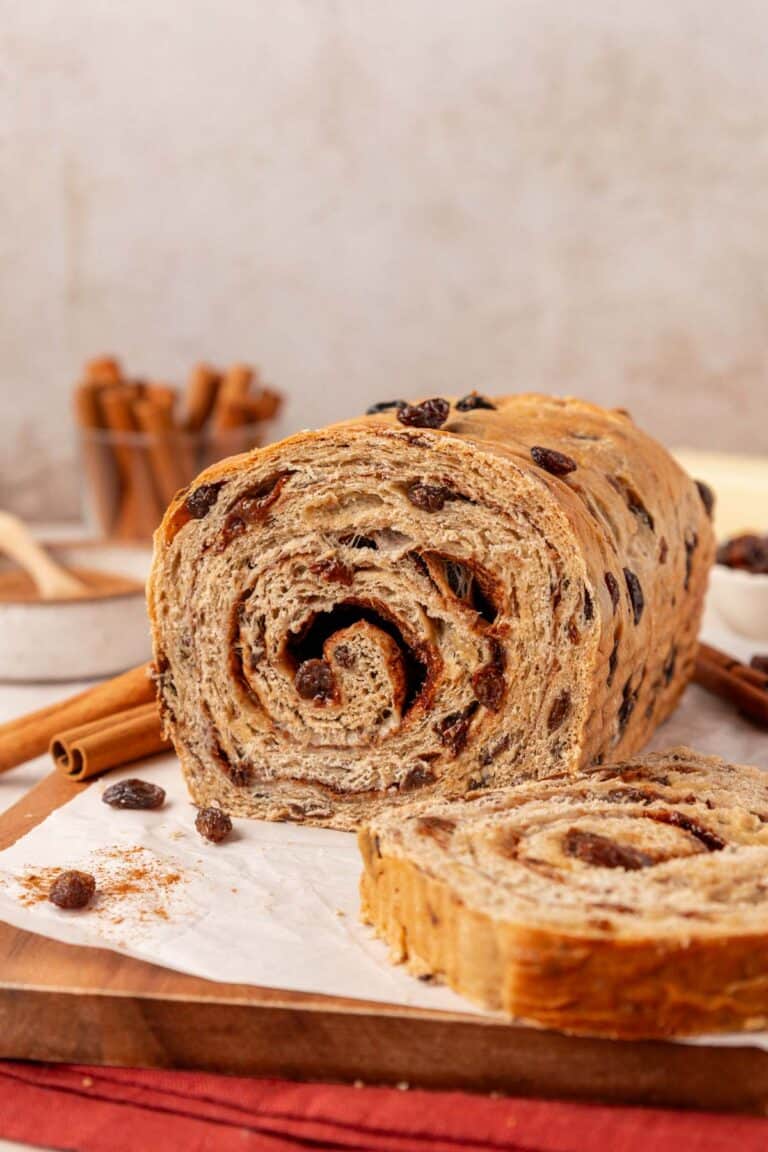
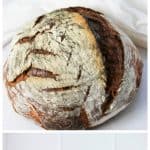
Sourdough Rye Bread is perfectly soft and chewy, with a deep golden crust and wonderfully complex flavors! It’s a great homemade bread for sandwiches, toast, or just snacking on. I’ve included all the tips and tricks you need to be successful in making your own at home.
I have fallen head over heels for sourdough bread in all it’s wonderful shapes, sizes, and forms. Something about the slightly sour flavor gives classic recipes a refreshing and exciting twist. I have used my Sourdough Starter to make Sourdough Focaccia for Italian nights, Whole Wheat Sourdough Sandwich Bread for healthier lunches, and even Sourdough Cinnamon Rolls for Sunday mornings.
Today I’m sharing my recipe for Sourdough Rye Bread. I adapted this recipe from this cookbook, Artisan Sourdough Made Simple. If you’re new to sourdough this is a great resource to get you started on the path to sourdough greatness!
This bread has extra depths of flavor thanks to the rye flour, plus it gets the most incredible brown crust. The sourdough and rye are perfect complements to each other, making for an addictive homemade bread!
Ready To Take Your Baking To The Next Level?
Join the Ultimate Baking Bootcamp and master essential techniques like mixing methods and the why behind every recipe! Whether you’re a beginner or looking to refine your skills, this step-by-step class will help you bake with confidence and create flawless desserts every time. Start your baking journey today!
Table of contents
- What is sourdough?
- Rye flour 101
- Is sourdough rye bread better for you?
- Make your sourdough starter…
- Ingredients Needed
- Start With An Active Starter
- Make the dough
- Add the caraway seeds
- Bulk Fermentation
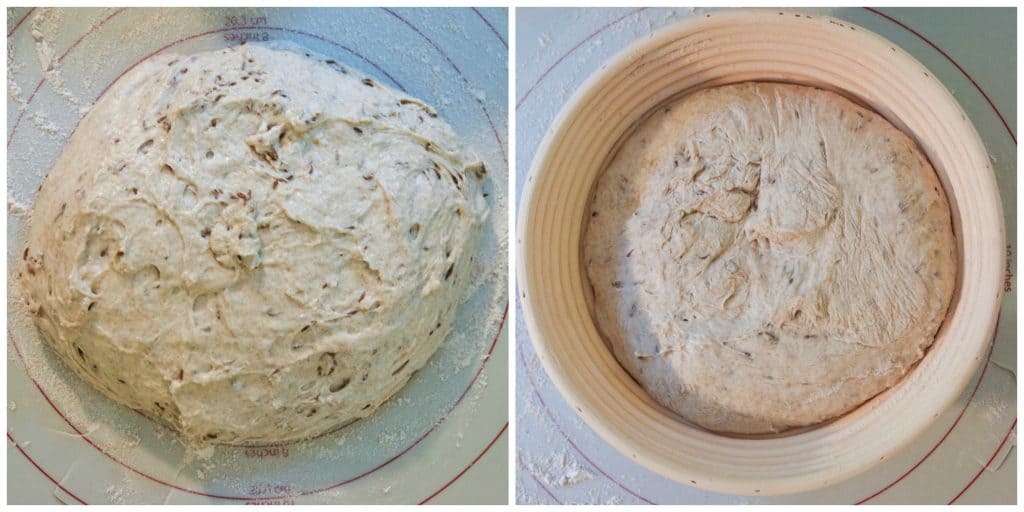
- Shaping The Dough
- Second rise
- Score and bake
- Recipe Tips
- Why didn’t my dough rise?
- Recipe FAQ’s
- More sourdough recipes
What is sourdough?
Sourdough is basically an ancient way of making bread. Sourdough doesn’t rely on commercial yeast (aka those little packets you have bought at the store), but on wild yeast. Wild yeast is everywhere around us and even on us!
By simply combining flour and water, you create a live fermented culture from the wild yeast found on the grains of the wheat that the flour is made from. The more it is “fed”, meaning fresh flour and water, allows the wild yeast to multiply.
Because sourdough relies on wild yeast, the process can take much longer than commercial yeast bread recipes. But the complex flavor and texture is far superior of any other bread you will ever eat.
For more Sourdough 101: What Is Sourdough?<– click here.
Rye flour 101
Rye is similar to wheat, in that it has three layers – endosperm, germ, and bran. Rye flour can come in varying degrees of color – from light, medium to dark – based on how much of the rye kernel used.
This bread adds onto the flavors and texture of sourdough by adding rye flour. Rye flour is a grain that has less gluten than typical flour, which means that breads with 100% rye flour are usually tough and don’t rise well. But when you mix rye flour with bread flour, you get the wonderful flavor of rye with the soft, moist inside of traditional bread.
Is sourdough rye bread better for you?
Yes. 1000% yes. Sure at first glance, the nutrition label might look the same to conventional bread. But the long fermentation process is what has sourdough sailing past the conventional bread loaves by a mile for its health benefits. Plus it’s made with just a few simple ingredients compared to store-bought bread that has added chemicals and preservatives.
Whole grains, in general, that bread is made with can contain lots of great minerals. But the body can have a hard time absorbing those minerals due to phytic acid that is present in grains. But the lactic acid created from the fermentation process helps to break down the phytic acid allow your body to be able to absorb more of those minerals than you would be able to with bread made from commercial yeast.
Also, sourdough bread can be much more easily digested and enjoyed, especially those with a gluten sensitivity. The long fermentation process helps to already start the process of breaking down the gluten in the bread making it much easier to digest.
This bread also has the added benefits of rye flour, which is full of extra nutrients, vitamins, and soluble fiber. It is harder to refine than wheat, so it keeps many of the nutrients that wheat flour does not. So more vitamins, minerals, and it’s easier to digest. Basically, sourdough rye bread is awesome.
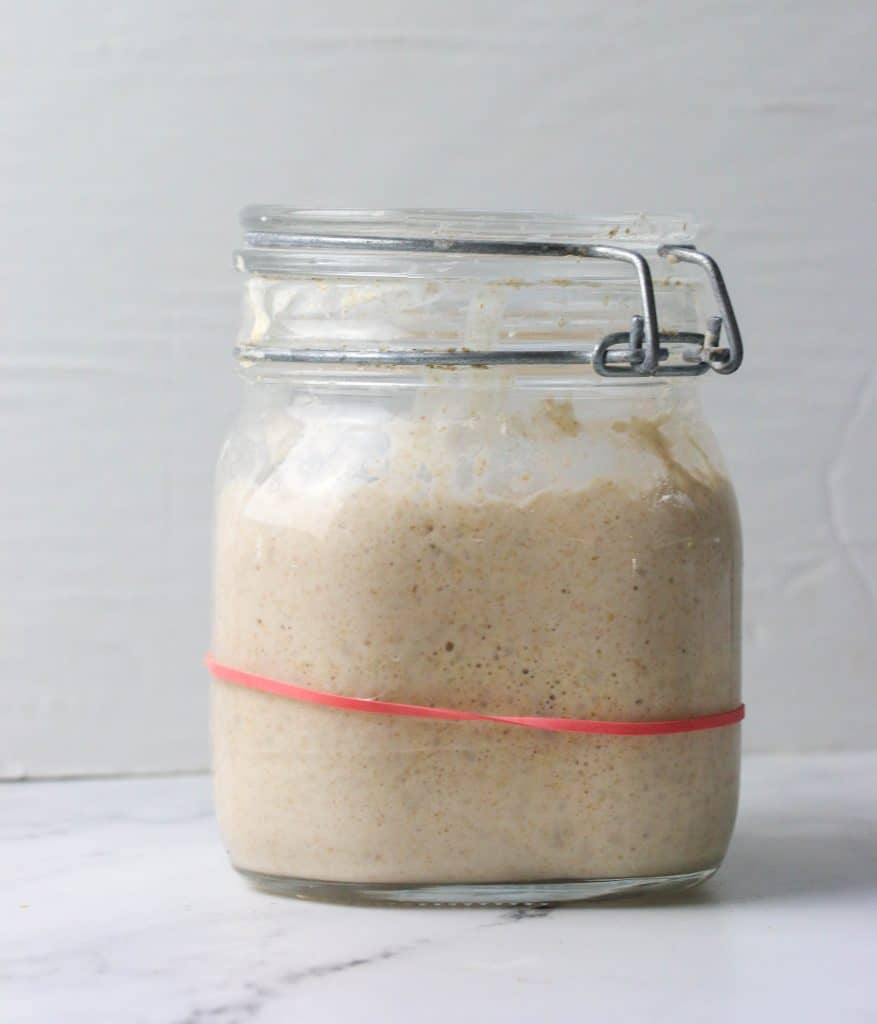
Make your sourdough starter…
If you haven’t gotten around yet to making your sourdough starter then let’s get going! What are you waiting for? It will take about 5 days to make your starter before you can attempt this bread. But it will be worth it. Here is the full guide on How To Make Sourdough Starter From Scratch.
Once you have your starter raring to go then you will need to feed and mantain your starter.
Want to jump in to sourdough but don’t want to make your own starter? Totally fine! Just buy a sourdough starter and it will be ready to use in a couple days.
Ingredients Needed
- Sourdough Starter – Make sure you start with an active, bubbly sourdough starter. I have two ways to tell when your starter is active below.
- Water – Make sure you use warm water. If you use cooler water it will take longer to rise.
- Honey – I like to use raw honey, this helps to feed the yeast in your starter so it can rise.
- Rye flour – I used a light rye flour, so it’s a great way to ease into baking with whole grains if you’re new to it but you can use any type of rye flour here, it will just affect the color of the bread and somewhat of the texture.
- Bread flour – Bread flour has a higher protein content than regular AP flour, which can help to develop the necessary gluten that gives the bread structure. The whole grains in the rye flour can inhibit gluten production so using bread flour with it helps to give the dough structure so it can rise properly.
- Kosher Salt – Salt is important not just for flavor but also inhibiting the yeast production. Without salt, your yeast can cause your bread to become overproofed. Kosher salt has larger granules than regular table salt, so if you use table salt use less. I like kosher salt because it has no additives and a purer taste and the granules are easily mixed in.
- Caraway seeds – These are optional but to me rye bread needs to that have that caraway taste!
Start With An Active Starter
In order to get a tall lofty loaf with a nice crumb, you need to make sure your starter is nice and bubbly. Now if you’re like me you like to keep in the fridge all week and bake on the weekends. But using a starter straight from the fridge isn’t active enough to produce a nice, big loaf in the end. So its important to get it active again and give it a few feedings before you use it.
So how do you know when your starter is ready to use for your dough? Well I have two ways for you tell.
The Rubberband Trick
I like to put a rubberband around where the starter begins, and then I can easily tell when the the starter is doubled.
The Float Test
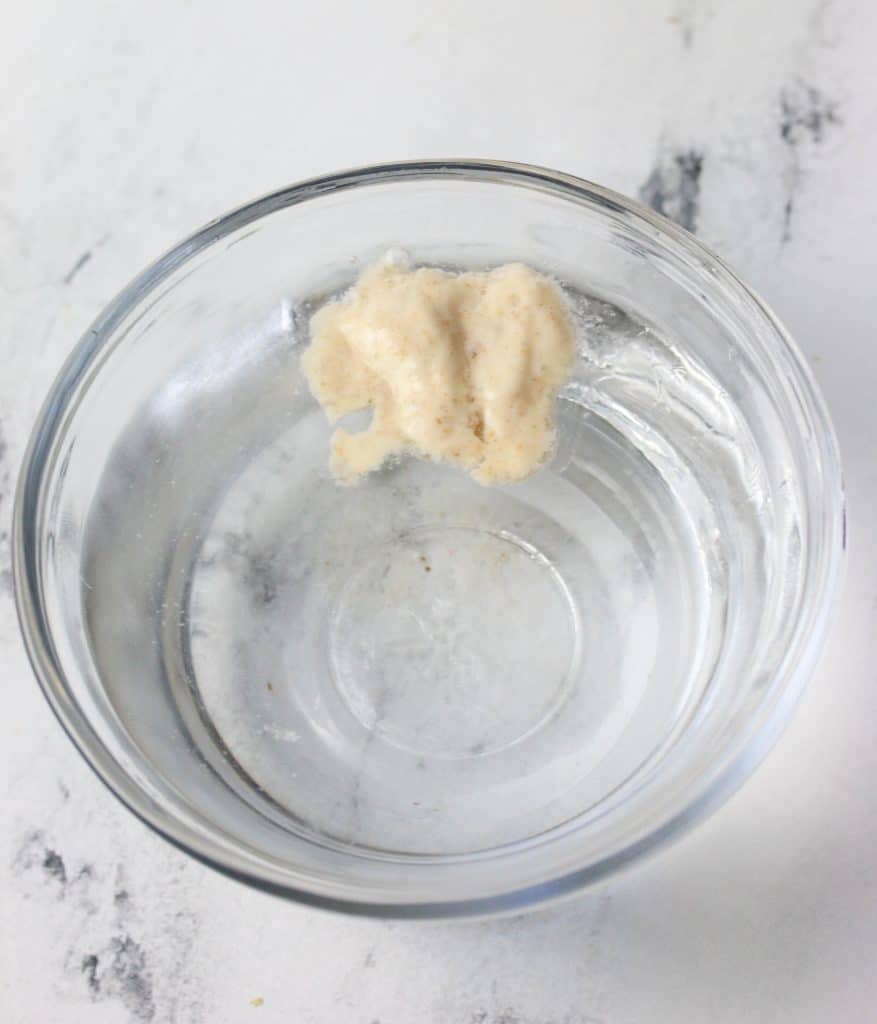
I also like to give my starter the float test. This just means to take a small amount and place it gently into a small dish of water and see if it floats. If it doesn’t, then you may need to give your starter more time and more feedings. If it does, then it’s good to go. But I like to use the rubberband trick first and this is more reliable. But the float test is a nice backup!
Make the dough
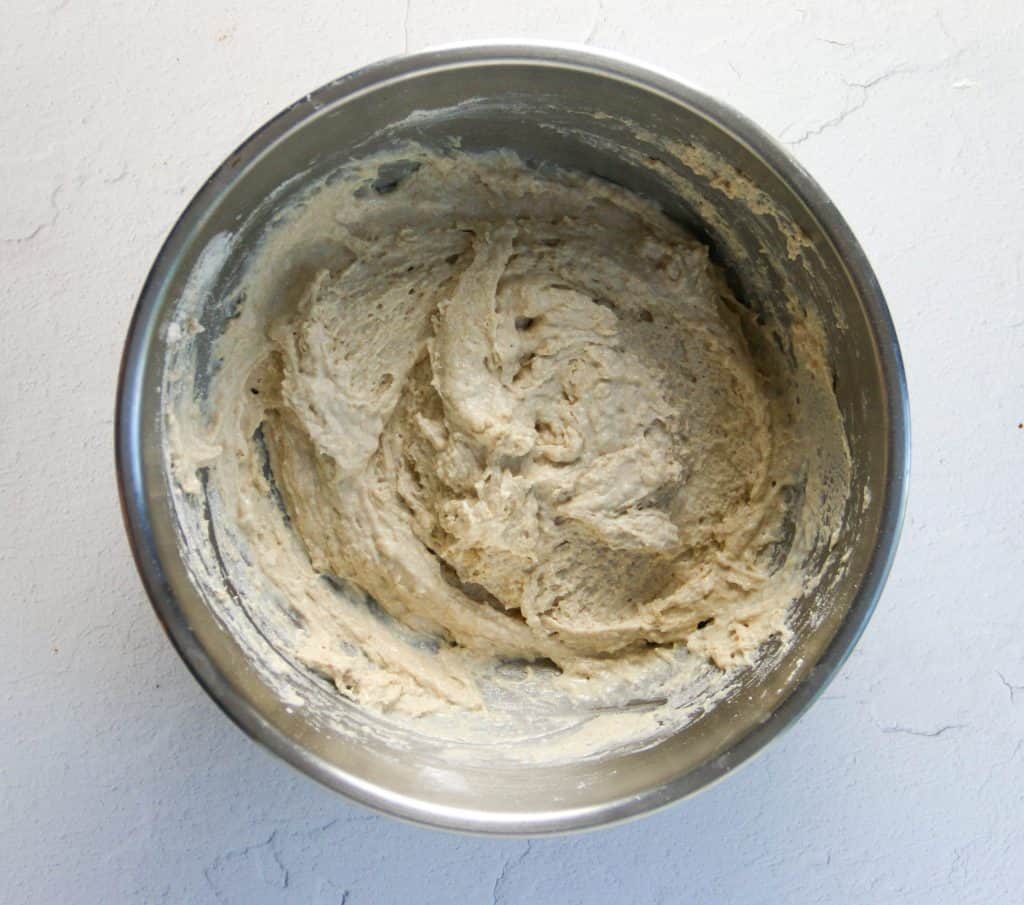
Ok now that your starter is ready time to make that dough! You want to first stir together your active starter and water. Then stir in the flour and salt. Use your hands to squish everything together until all the flour is absorbed. Then cover with a damp towel and let the dough rest for 30 minutes.
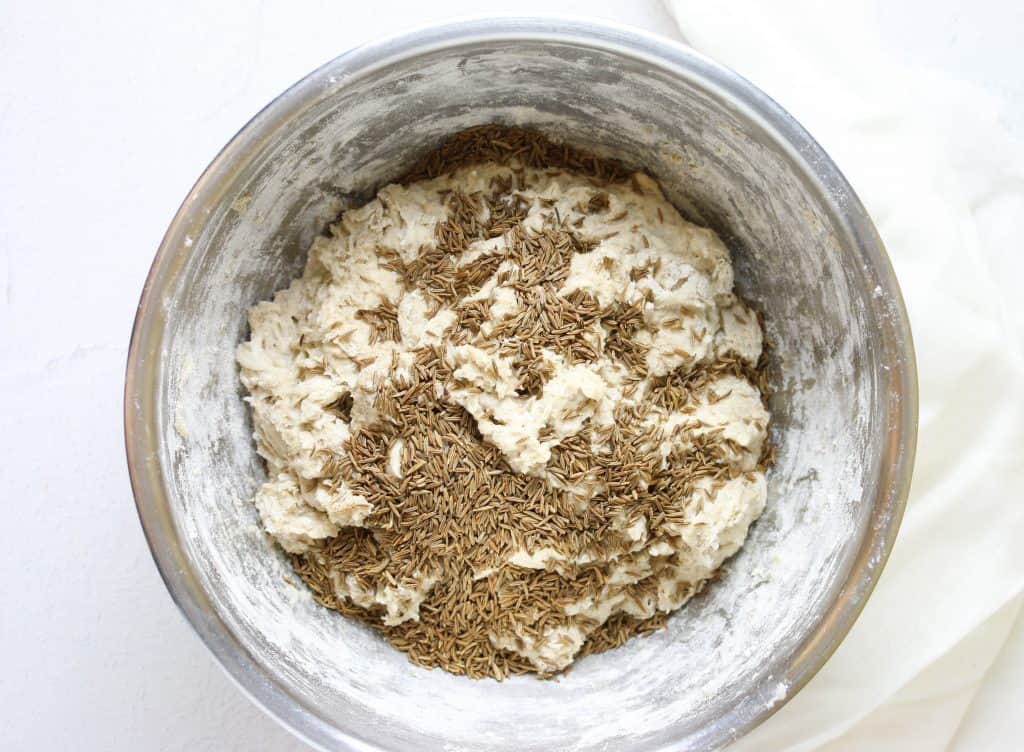
Add the caraway seeds
After the 30 minute rest, add the caraway seeds and work in the seeds with your fingers. Then work into a smooth ball.
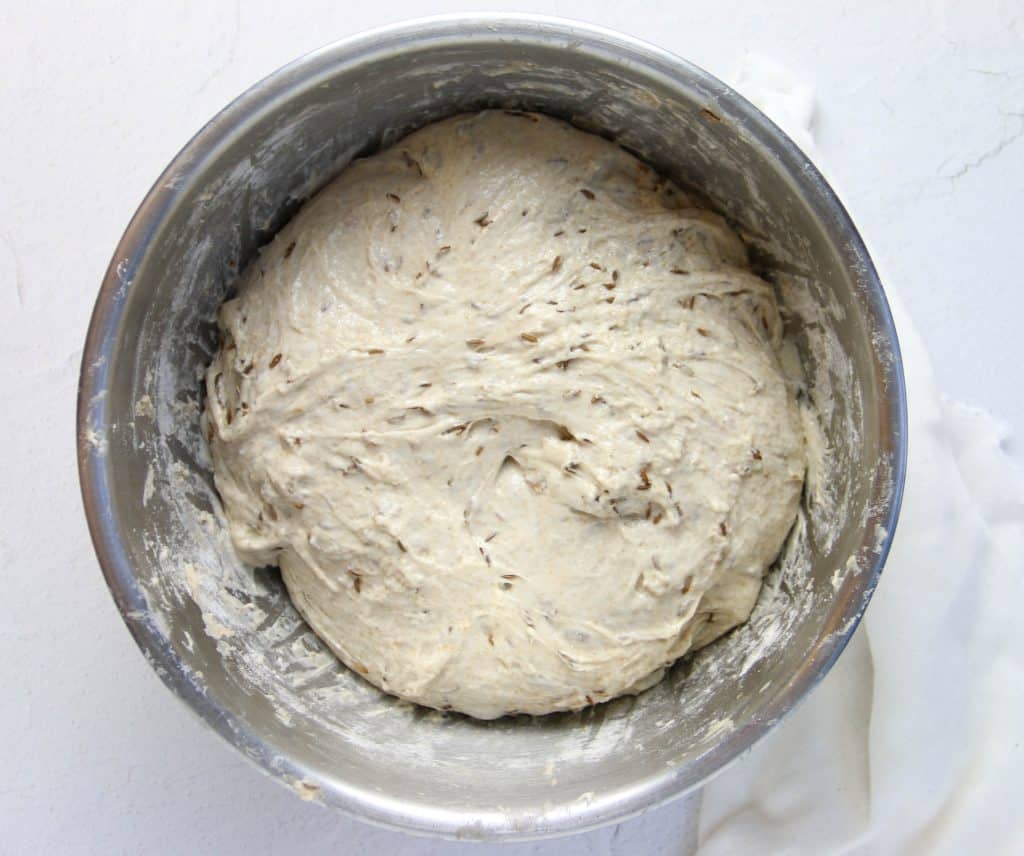
Bulk Fermentation
Now it’s time for the rise! Cover the bowl with a damp towel and let it rise at room temperature for 6-8 hours, preferably overnight. The dough should double in size and no longer look dense.
If you want a little more structure and height, stretch and fold the dough 30 minutes into the rise. Begin by pulling up on the edge of the dough as high as you can stretch it without tearing and fold it in the middle of the dough. Continue doing this around the outside of the dough until you have completed one complete circle. Repeat this technique 2 to 3 times, spaced about 45 minutes apart.
Shaping The Dough
After the dough has doubled in size, it’s time to shape the loaf. Start by scraping the dough onto a lightly floured surface. Use your hands to shape the dough into a round. Do this by starting at the top and folding the dough toward the center. Turn the dough slightly and fold over the next section of dough. Repeat this until you have come full circle and you have a nice round of dough.
Flip the dough over and let rest for 5 to 10 minutes. Meanwhile line an 8-inch bowl with a towel and dust with flour. With floured hands, gently cup the dough and pull it toward you in a circular motion to tighten its shape. Using a bench scraper, place the dough into the bowl, seam side up.
Second rise
Now it’s time for the second rise. Cover the bowl and let rest for 30 minutes to 45 minutes.. The dough is ready when it looks puffy, and has risen slightly but has not yet doubled in size. Nearing the end of the rise, preheat the oven to 400oF.
Score and bake
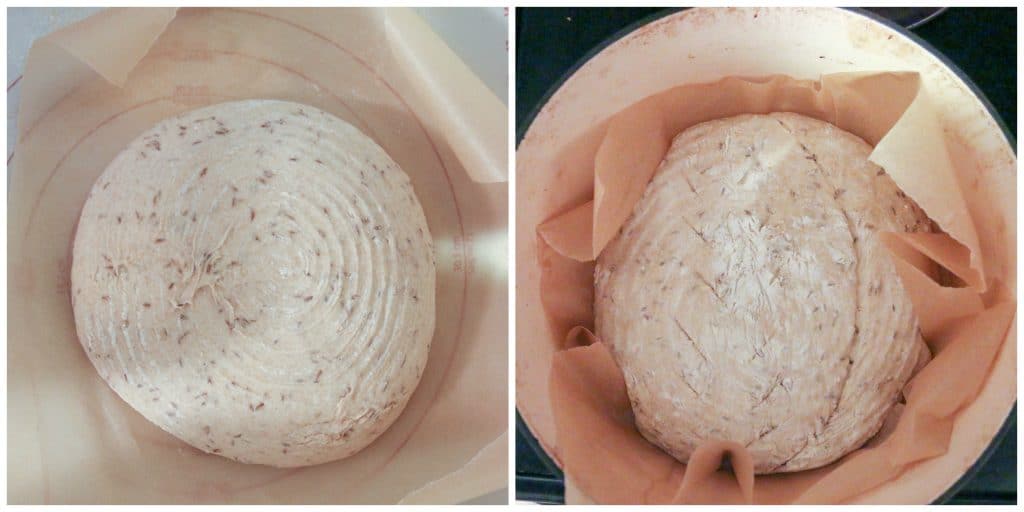
Once the dough has risen, place a sheet of parchment over the dough and flip the bowl to release the dough. Sprinkle the dough with flour and gently rub the surface with your hands. Using a bread lame, or the tip of sharp knife score the dough. I keep it simple and do 4 cuts, but you can get creative! Then use the parchment paper transfer the dough to your dutch oven.
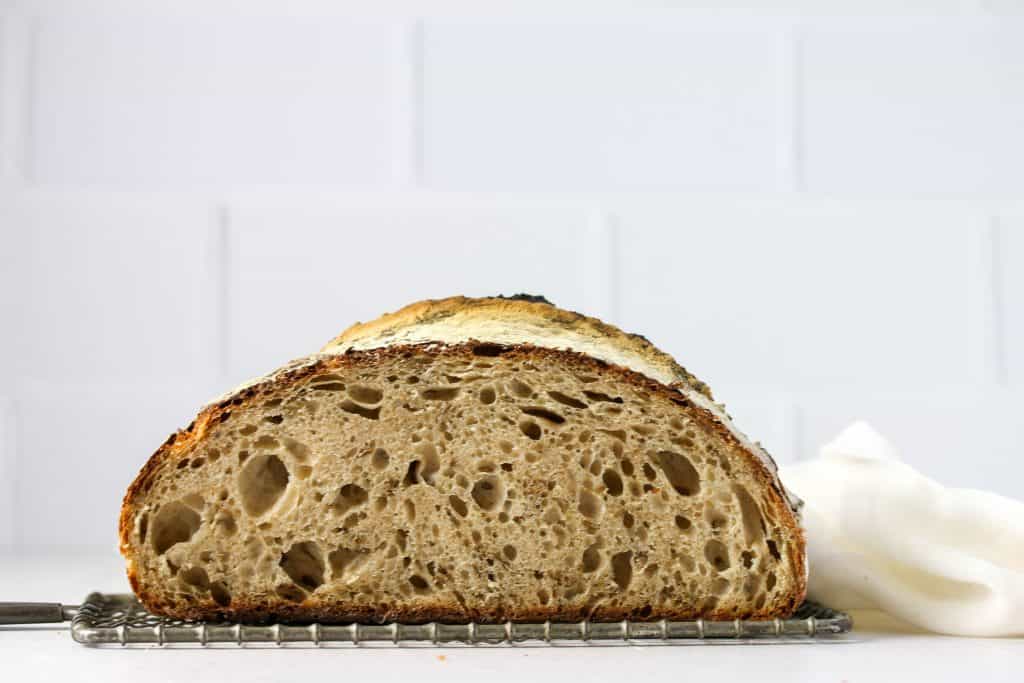
Bake the dough on the center rack for 20 minutes, covered. Then remove the lid and continue baking for 20-30 minutes. At this point the bread should be done. However, if you want extra crispy crust, remove the bread from the oven, remove the loaf from the pot, and bake the bread on the oven rack for an extra 10 minutes. (My crust is always dark at this point, so I skip this step).
Last, transfer the bread to a wire rack and cool for at least 1 hour before slicing.

Recipe Tips
- Make sure your starter is active before you start. Drop a small piece in a bowl of water to see if it floats. It it does, then it’s ready! If not, then it may need 1-2 more feedings.
- Measure your flour using a kitchen scale . You can use measuring cups but for best accuracy it’s better use a kitchen scale and weigh out your flour. This ensures you don’t overmeasure, which can result in dense rolls. You can read my post on How To Measure Flour here.
- Use a large mixing bowl! This dough will expand quite a bit. So the bigger the better.
- Use a damp towel. You don’t want the dough to dry out on top creating a film that will prevent the dough from rising.
- Use the stretch and fold technique. Since this bread uses rye flour, it doesn’t rise as high as other breads without a little extra help. For extra height and structure in the bread, use the stretch and fold technique described in the instructions.
Why didn’t my dough rise?
- Starter wasn’t ready: This could be because your sourdough starter wasn’t quite bubbly and active enough. Be sure to do the “float test” before you begin.
- Cold kitchen: Another culprit could be a cold kitchen! If your kitchen is cold the bread will take longer to rise. Ideally, your kitchen should be around 70°F.
- Overproofed: If you overproof during the second rise, then there will be nothing left for the bread to do, and you will get no rise. So make sure to not let the dough rise for more than 30-45 minutes during the second rise.
Recipe FAQ’s
I highly recommend sticking to bread flour in this recipe since rye flour naturally does not rise high. The bread flour will give the bread extra lift and structure.
Sourdough rye bread can be stored at room temperature in an air-tight container or wrapped in plastic wrap. It is best if eaten within the first 3-4 days, but is should stay good for up to 1 week.
Sourdough rye bread can be stored at room temperature in an air-tight container or wrapped in plastic wrap. It is best if eaten within the first 3-4 days, but is should stay good for up to 1 week.
More sourdough recipes
Master The Art Of Baking!
Don’t miss out on the chance to elevate your baking skills! Join the Ultimate Baking Bootcamp today and unlock the secrets to creating perfect desserts every time. With expert guidance, step-by-step lessons, and insider tips, you’ll be baking like a pro in no time. Sign up now and start mastering your baking!
Sourdough Rye Bread
Ingredients
- 50 g (¼ cup) (1/4 cup) bubbly, active starter
- 365 g (1½ cups +1 tsp)warm water
- 20 g (1 tbsp) honey
- 106 g (1 cup) whole grain rye flour or light rye flour
- 400 g (3 ⅓ cups) bread flour
- 9 g (1½ tsp) kosher salt
- 3 tbsp caraway seeds
Instructions
- Make The Dough. Whisk the starter, water, and honey together in a large bowl. Add the flour and salt. Squish everything together with your hands until all of the flour is absorbed. Cover with a damp towel and rest for 30 minutes.
- Add Caraway. After the 30 minute rest, add the caraway seeds and work in the seeds with your fingers. Then work into a smooth ball.
- Bulk Rise. Cover the bowl with a damp towel and let rise overnight at room temperature. This will take about 6 to 8 hours (at 70oF, 21oC). The dough is ready when it no longer looks dense and has doubled in size. Optional: Stretch and fold the dough. About 30 minutes into the bulk rise, stretch and fold the dough for added structure and height. Begin by pulling up on the edge of the dough as high as you can stretch it without tearing and fold it in the middle of the dough. Continue doing this around the outside of the dough until you have completed one complete circle. Repeat this technique 2 to 3 times, space about 45 minutes apart.
- Shape. After the bulk rise, remove dough from bowl and place onto a lightly floured surface. Shape into a round. Start at the top and fold the dough toward the center. Turn the dough slightly and fold over the next section of dough. Repeat until you have come full circle. Flip the dough over and let rest for 5 to 10 minutes. Meanwhile line an 8-inch bowl with a towel and dust with flour. With floured hands, gently cup the dough and pull it toward you in a circular motion to tighten its shape. Using a bench scraper, place the dough into the bowl, seam side up.
- Second Rise. Cover the bowl and let rest for 30 minutes to 45 minutes.. The dough is ready when it looks puffy, and has risen slightly but has not yet doubled in size. Nearing the end of the rise, preheat the oven to 400oF.
- Score. Place the parchment over the dough and invert the bowl to release. Sprinkle the dough with flour and gently rub the surface with your hands. Using a bread lame, or the tip of sharp knife score the dough. I keep it simple and do 4 cuts, but you can get creative! Use the parchment paper transfer the dough to your dutch oven.
- Bake. Bake the dough on the center rack, in a preheated 400oF oven, for 20 minutes, covered. Remove the lid and continue to bake for 20-30 minutes. Optional: Remove from oven, and remove the loaf from the pot and bake the crust for an additional 10 minutes to crisp the crust. (My crust is always dark at this point, so I skip this step). Transfer to a wire rack. Cool for 1 hour before slicing.
Notes
- Make sure your starter is active before you start. Drop a small piece in a bowl of water to see if it floats. It it does, then it’s ready! If not, then it may need 1-2 more feedings.
- Measure your flour using a kitchen scale . You can use measuring cups but for best accuracy it’s better use a kitchen scale and weigh out your flour. This ensures you don’t overmeasure, which can result in dense rolls. You can read my post on How To Measure Flour here.
- Use a large mixing bowl! This dough will expand quite a bit. So the bigger the better.
- Use a damp towel. You don’t want the dough to dry out on top creating a film that will prevent the dough from rising.
- Use the stretch and fold technique. Since this bread uses rye flour, it doesn’t rise as high as other breads without a little extra help. For extra height and structure in the bread, use the stretch and fold technique described in the instructions.
- Storage: The loaf is best consumed within a week, stored in a plastic bag at room temperature. Otherwise freeze for up to 3 months.
- Adapted from Artisan Sourdough Made Simple


I am in awe. Absolute awe I tell you! Love love love this recipe. My first time so far. I crushed the caraway seeds to release more flavor and substituted black strap molasses for the honey as I was after deeper undertones.
Happy happy dense chewy flavorful rye-y outcome..and the distinctiveness of sourdough came through as well.
Look forward to playing with pickle juice.
Much gratitude.
I love the idea of crushing the caraway seeds!! Great idea going to have to try. And love the idea of adding molasses – I bet it’s more “pumpernickel” like..which can’t go wrong there!!
I followed your recipe yesterday and today for the first time with great success and praises from my family, all three generations of it. I doubled the quantities and made two substantial loaves, with the following substitutions:
I used all purpose Manitoba flour in lieu of bread flower. And lacking caraway seeds, I used roasted onion flakes. I baked one loaf in a large Le Creuset Dutch 0ven the other one in a Pyrex deep cake dish. Both came out outstanding, with superb taste, and as we say in french: “croute craquante, mie fondante”. Thank you for such a great recipe!!!
Thank you Jean-Pierre I’m so glad you loved this bread as much as we did! And I love the idea of using onion flakes. Sounds delish!
would doing the stretch and fold throughout the 6-8 hour bulk ferment be too much?
No I find it helps with adding height to the bread in the end 🙂
I love this recipe. I think I’ve made 5 or 6 times since I found it not including the double batch I have going today. I’m proofing it in the fridge so it can develop a better flavour. Will it be fine to leave it around 18 hours?
Hi Christina, since it’s in the fridge, the slow cold proof extra time should be just fine. Let me know how it turns out and I’m so glad you loved this recipe as much as I have!
I’ve made this loaf many times now, and it’s definitely a favorite. Rye bread isn’t always available commercially, and when it is, it’s not nearly this good. I also recommend subbing pickle juice for part of the water. Thanks!
Thanks Karen! I’m so glad you loved this recipe…and Yes I’ve haear subbing in pickle juice is amazing. Going to have to try that myself!
Thanks for sharing! Does it keep long?
I find my sourdough bread lasts about a week or so if wrapped well…sometimes longer as sourdough doesn’t mold as quickly as regular bread.
This look so good! What a great way to enjoy bread with less gluten !
yes it’s one of the many perks 🙂 enjoy!
My first try at sourdough rye and using a dutch oven. It was delicious! My husband loved it too. I baked at 450 and longer time as Roland did since I’m at high altitude, bottom crust was a bit too dark. I’m sure because I had to lower my oven rack, my Dutch oven wouldn’t fit in my oven with the rack in the middle, the handle on the cover was too high. Today, I’ll watch the time and move my oven rack back to the middle after taking lid off of my Dutch oven.
Have you tried this in a loaf pan?
aw glad to hear that! I haven’t tried in a loaf pan, but if you do let me know 🙂
Delish!
thanks for the great rye recipe. Per Scott’s suggestion I subbed in 200 g of pickle juice and just like that, Jewish Deli rye!!! Fantastic!
Great recipe , easy sourdough rye .
A very good recipe for a light rye. I liked that I could build my dough in the morning and bake my bread. right after dinner. A few points:
* Next time I will cut the carraway by half or more. I only need a hint in my ideal loaf.
* I raised the baking temp to 450F, 30 minutes covered and 20 minutes uncovered. 400F just seems too low.
* Next time I will probably go 30 minutes covered, 25-30 minutes uncovered to develop a more substantial crust.
* I baked in a Dutch oven.
* I also recommend the stretch & folds
Hi Roland, glad you liked the recipe! Yes you can definitely use less caraway – I love lots of caraway 🙂 and glad you were able to make adjustments that worked!
I made a sourdough starter a few weeks ago and had been struggling to make a loaf that didn’t turn out gummy. I just tried this recipe with some organic rye flour from my local whole food shop and it turned out amazing! Beautiful crumb and so soft!
I set the oven a little higher at about 225c. Also omitted the caraway seeds. I fed my starter in the morning, made the dough in the evening, only had time for two stretch and folds before bed, bulk ferment overnight and baked mid morning after the second rise (It’s pretty cool in my house at the moment). Thanks for a great recipe! Will be baking lots more!
Hi Rhiannon! I’m so glad the recipe turned out well for you and you are having success with sourdough. It’s so much fun to bake with 🙂
I fed the starter Friday night. Mixed the dough Saturday morning and baked Saturday evening. I used a stand mixer and doubled the recipe. I also performed the stretch and folds.
This is a nice easy recipe to make really good bread!
aw that’s Awesome Lori I’m so glad you loved the bread!
Great recipe! Thank you.
Thank you Lori!!
What about using a stand mixer in steps 1& 2? Is that an option? I find your bulk proofing directions confusing: 6-8 hours or overnight. Overnight to me is more like 12 hours, at least not 6. And, is 70 degrees warm enough?
I did follow the recepie, sort of. Had some rising issues but that was on me. Bread tasted delicious. Will again.
Hi Adam! I don’t see why you couldn’t use your stand mixer, I find it easier to just make with a bowl and my dough whisk then lugging out my mixer haha. Yes I’ll clarify the directions so the bulk rising is 6-8 hours (some people have it done it for longer overnight in the fridge but I haven’t tried this). And The original recipe stated 70 degrees but I have started letting it rise at 75-78F. I’ll make sure to update the recipe with these changes. And I am glad you found it delicious!
This is super close to my grandmother’s recipe that I lost a while back but I just wanted to verify that it’s really 3 TABLESPOONS of Caraway seeds as that seems like a lot?
Yes 3 tablespoons is correct, but you can always use less based on your preference. I love the taste of caraway 🙂 but reduce if you would like. I hope you love it as much as your grandmother’s recipe!
I love it too so I’m going to keep it at 3 tablespoons then! Such a great recipe, thanks! Just made a loaf and subbed 200 grams of the water with 200 grams of pickle juice for giggles and it’s delish as well!
Oh wow pickle juice?! Why haven’t I thought of this. So saving my pickle juice for next time..thank you Scott!
My pleasure, just make sure you cut back on the salt because the pickle juice more than makes up for it. I tried 3 grams of salt and it seemed about right. Also, you should be able to buy pickle juice from your local liquor store if you don’t want to wait for leftover pickle juice. I use this stuff – https://www.amazon.com/Van-Holtens-Pickle-Brine-Mixer/dp/B08BG9V43S
Oh good call..thank you!
Thank you Scott for the tip on the salt can’t wait to try as soon as those pickles are gone 🙂
Question? Have you ever tried subbing a dark beer for some of the wated?
Thanks for your reply.
I haven’t but I bet it would be delicious! Let me know if you try 🙂
You dont mention when to add the honey
Oh thank you Jayme! I stir that in with the water and starter at the start. Sorry about that. I’ll make sure to update the recipe!
I add into the water and starter with oil, before tbe dry ingredients.
Hi – thanks for this recipe. I made it and came out great. I’d say the stretch and folds should be mandatory. I did 4 sets then did an overnight proof in the refrigerator in a banneton. Baked at a higher temperature closer to 450F in a Lodge combo cooker 20 mins covered and 20 mins uncovered then left in the oven for an extra 5 mins after I turned it off. Also toasted the caraway seeds lightly.
Hi Rina, Yes I agree I think the stretch and folds help SO much! And LOVE the idea of toasting the seeds, so trying that! Glad you loved the recipe:)