
Why Are My Cookies Flat?

This Post May Contain Affiliate Links. Please Read Our Disclosure Policy.
If you have asked yourself the questions, why are my cookies flat? and can’t figure out why then this is a MUST read! Here are 10 reasons why your drop cookies are flat, and how to stop cookies from spreading.

So as a kid I didn’t realize yet what a nerd I was. And as I got older not just a nerd but a baking nerd. Like I love reading about why my cookies failed and the chemical reactions happening in my cakes. Hi, my name is Heather and I’m a baking nerd. Do they have support groups for people like me? Oh right it’s called blogging.
Now as a kid, I remember thinking how weird it was that one cookie recipe could provide such inconsistent results. Why were some of my cookies flat, and some were thick and chewy, instead of perfect cookies every time?
Perfect cookies is all in knowing the science of cookies and following some simple baking rules. When it comes to baking chocolate chip cookies, or any kind of drop cookies really, there are quite a few factors that can affect how much your cookies spread from temperature of your baking ingredients, baking ingredients amounts, how long the butter and sugar are creamed for, temperature of your oven, and cooking time.
I have some quick tips for you to be sure to pay attention to the next time you are baking cookies so you don’t end up asking yourself the question, why are my cookies flat?!
These are my 10 reasons why you have flat cookies that spread into a big old cookie puddle (and of course followed up with the “what you should do” to help stop cookies from spreading so you end up with perfect cookies every time).
Ready To Take Your Baking To The Next Level?
Join the Ultimate Baking Bootcamp and master essential techniques like mixing methods and the why behind every recipe! Whether you’re a beginner or looking to refine your skills, this step-by-step class will help you bake with confidence and create flawless desserts every time. Start your baking journey today!
See Also:
- Pucker up and enjoy one of these homemade lemon cookies with easy lemon glaze drizzled over them!
- Coconut macaroons are an easy gluten free chewy coconut cookie. Dip in chocolate for an easy chocolate treat!
- Grab a jar of peanut butter and make these wonderfully easy old fashioned peanut butter cookies with criss cross pattern on top!
- Make these brown sugar chocolate chips cookies made with 100% brown sugar making them wonderfully chewy!
Why Are My Cookies Flat? – 10 Reasons Why
1. You didn’t use the right amount of flour.
If you use too much flour you will get cakey cookies. Too little flour and it may not have enough structure to hold up in the oven, aka flat cookies.
How To Fix? If you want the best chocolate chip cookies, and accuracy every time weighing your flour using a kitchen scale will ensure you get the right amount of flour that the cookie recipe calls for.
Using a scale, and weighing your flour will probably solve 50% of your cookie spreading problem. Flour is the #1 ingredient people measure wrong.
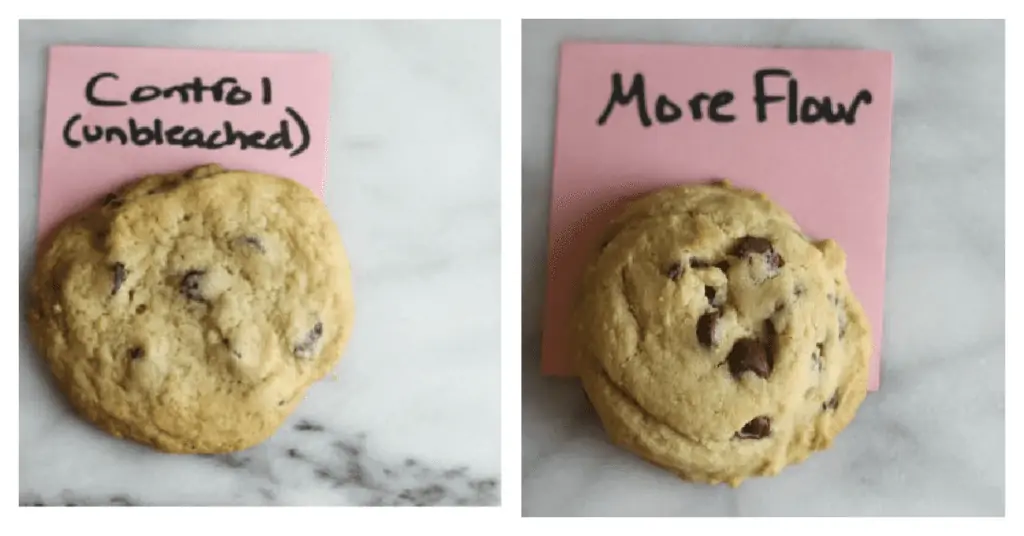
You can see below what happens if you don’t measure your flour correctly. You can see how much the chocolate chip cookies spread and became big flat cookies when too little flour was used compared to the control cookie. Too litte flour can result in flatter cookies.
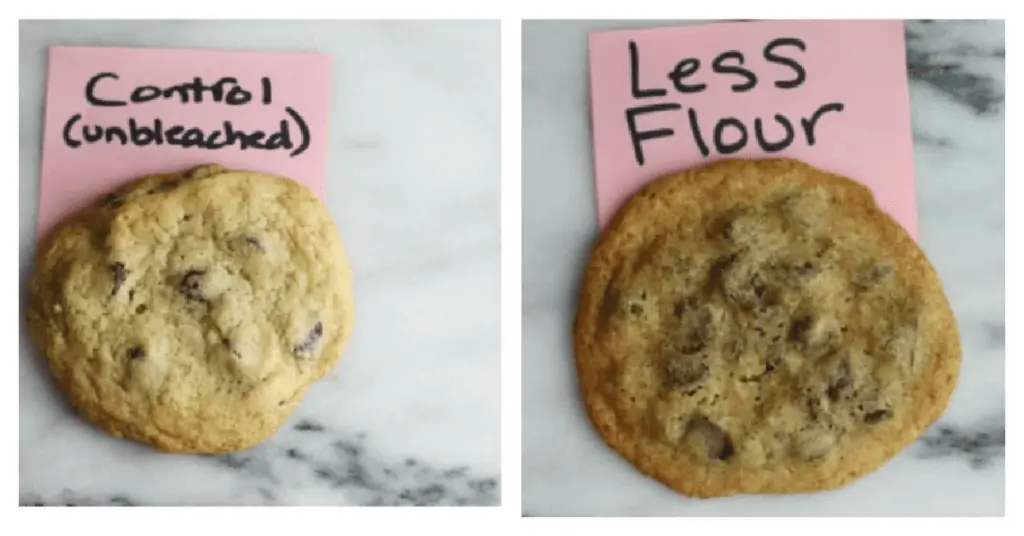
And the exact opposite can happen so instead of asking why are my cookies flat, you might be asking why did my cookies not spread at all? If you add too much flour, then your cookies won’t spread much at all.
How To Measure Flour The Right Way
Measuring your flour is so important I also wrote a big old long nerdy post on that too that you can read.. If you don’t feel like reading that let me sum that up for you…
Spoon and Level. Dip a spoon into your flour and fill your measuring cup a spoonful at a time. Do not pack the flour down. Do not tap the sides of your cup. This could result in 25% more flour than the recipe calls for. Just keep spooning the flour into your cup until it’s heaping at the top. Then with a flat edge run it across the top to level it off.
2. You didn’t use room temperature butter
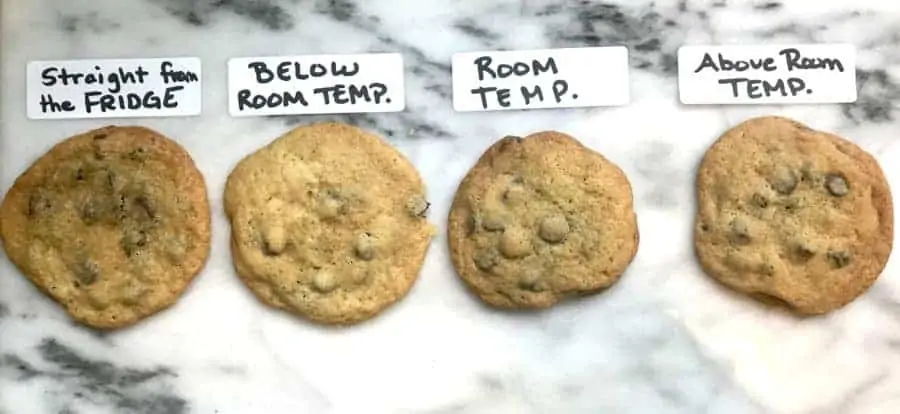
Another reason causing your cookies to spread, is if your butter is too cold or too warm that it will cause your chocolate chip cookies to go flatter than you want.
How To Fix? To get those perfect cookies every time that don’t go too flat, you want room temperature butter. Room temperature butter is especially important during the creaming process of making your cookie dough in order to trap air.
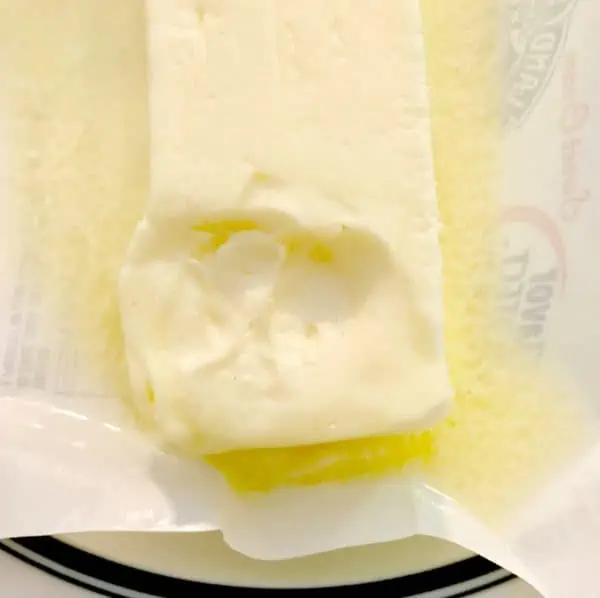
Room temperature butter should be about 68-70oF. You should be able to indent your finger into the butter, but not press it straight through. If you can’t make an indent, it’s too cold. If your finger presses straight through or you see melted spots, like this butter below, it’s too warm.
Having properly softened butter is important during the creaming process where sugar gets dissolved and air pockets form and are trapped that will help with the cookies rising in the oven.
Cold butter means that less air is able to be trapped during the creaming process, which result in flatter cookies that don’t have as much lift.
Too warm butter and the sugar will punch right through creating no air pockets so you will end up with very flat cookies.
If you want to read my full post on how butter temperature affects cookies read my full post, What Does Butter Do In Cookies?
How To Soften Butter Quickly
Here are two easy ways to bring your butter to room temperature quickly:
- Cut your butter into your cubes. By cutting your butter up smaller decrease the time it takes to soften that butter. Cut your butter into small chunks and then wait about 30 minutes or so.
- Your butter can go from softened to melted pretty quickly. Microwave on 20% power in 30 second intervals until softened. (usually takes about 1 minute 30 seconds for my microwave)
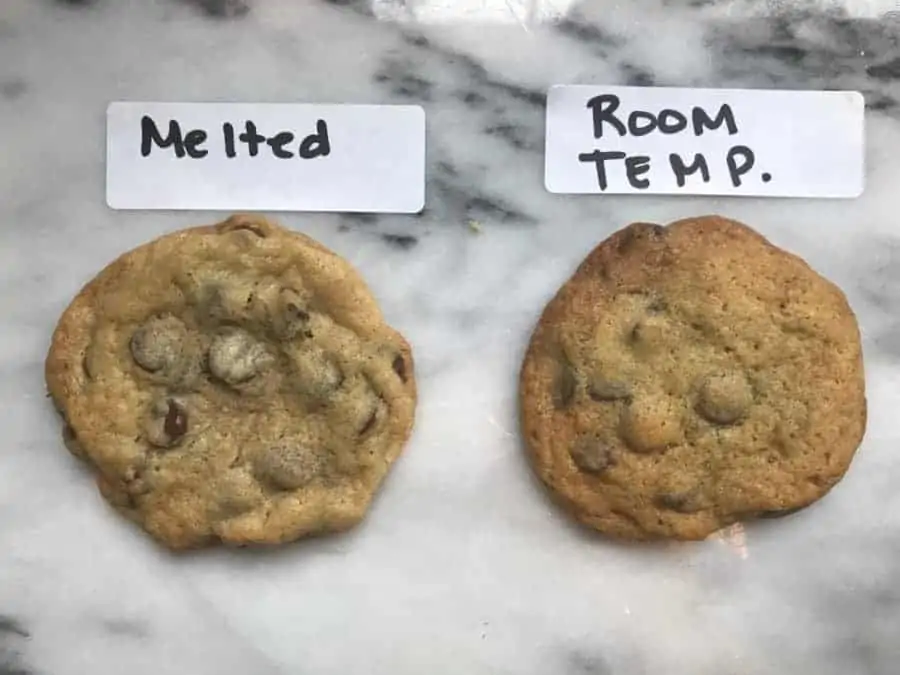
Can I use melted butter?
Yes you can, in fact of of my favorite cookie recipes, calls for melted butter, these Browned Butter Chocolate Chip Cookies, but if you don’t want flat cookies, then I recommend chilling your cookie dough to firm up the butter so your chocolate chip cookies don’t spread then as much when baking.
Melted butter will not allow for all that trapped air that will expand in your oven. You can see the difference in cookie spreading below between these two chocolate chip cookies – one with made with melted butter, and one made with room temperature..
3. You creamed the butter and sugar for too long.
Most chocolate chip cookie recipes will call for a specific time of creaming, usually about 2 to 3 minutes. There’s a reason for that!
If you cream the butter for too long it will cause the butter to warm up too much and make it soft to hold onto those air pockets created by the sugar. This will cause your cookies to spread flat in the oven.
How To Fix? Set a timer during the creaming step , and cream on medium speed. Do not cream for longer.
Creaming Butter And Sugar 101
When you cream the butter and sugar together you are trapping air inside that cookie dough. The sugar crystals punch holes into the butter. Those holes will fill up with gasses from the leavening agents causing your cookies to rise.
4. Your oven temperature is incorrect.
An incorrect temperature can cause your chocolate chip cookies to spread too much.
Just like a cold oven can affect your cookies, so can an oven that is too hot. If your oven is too cold, then it can cause your cookies to spread too much before the edges set. And if your oven is too hot, it will cause the edges set too quickly before the cookie can spread at all causing for a cookie that spread less.
How To Fix? Make sure you are preheating your oven properly before and that your oven is running at the correct temperature.
Oven Temperature 101
Double check your oven temperature is correct. Now what if your oven doesn’t tell you when it’s ready? Buy an oven thermometer. An oven thermometer is an cheap and easy investment to be sure your oven is running at the correct temperature. No more guessing games.
An oven thermometer is the only way to be sure your oven when it says 350 degrees its actually at 350 degrees. This way if your oven runs hot or cold you can adjust the temperature accordingly so your cookies bake up the way they should. For more Oven 101, read this post!
5. Your baking powder and baking soda are old.
So if you don’t bake your favorite cookie recipe all the time, and when you do go digging out your baking powder and baking soda from the back of the cupboard and dust off the tops of your baking powder and soda, then they may be too old to use.
Baking powder and baking soda are what we call leavening agents. These ingreidents are what makes your cookies rise. If they are too old, they may have become inactive. Inactive = they won’t do squat for your cookies, aka flat cookies are bound to happen in your future.
How To Fix? Check your leavening agents to freshness if they haven’t been used in a while before you start your making your cookie recipe. If they are old or expired it could explain why your cookies are flat! So throw them out and get new.
How To Check If Your Leavening Agents Are Active
To Check Your Baking Soda: Measure out a 1/2 cup of hot tap water. Add 1/4 teaspoon of vinegar (baking soda needs an acid to react with). Add 1/4 teaspoon of baking soda. It should bubble up violently immediately. If not, throw it out.
To Check Your Baking Powder: Measure out a 1/2 cup of hot tap water. Add in a 1/2 teaspoon of baking powder. It should bubble immediately. If not, throw it out.
6. You didn’t add enough chocolate chips.
Now is not the time to skimp! Adding chocolate chips to the cookie recipe actually helps your cookies from spreading in the oven. They give the cookies structure and will keep your cookies from going flat. So adding less than the recipe calls for, could be a reason why your cookies to spread.
So go for it, stir in those extra chips to help your cookies from going flat.
7. You didn’t chill the cookie dough.
Maybe this should be reason #1 as to the question, why are my cookies flat? I truly believe the best cookie it has to have the cookie dough chilled. A colder cookie dough = less spreading. Chilling the cookie dough will also allow the flour to fully hydrate and make for a softer, chewier cookie. Chilling the cookie dough will greatly improve your cookie’s texture.
By chilling the cookie dough, it solidifies the fat in the cookie dough. And the longer the fat stays a solid in your hot oven, the less spreading your cookies will do.
How To Fix? Do a test cookie to see if your cookie dough need to be chilled if the recipe doesn’t call for it to see how much it spreads. That way if your test cookies are flat, you can chill the cookie dough before baking more. I like to chill my cookie dough for 24 hours but you can chill the cookie dough up to 72 hours. If you’re short on time, even a 30 minute chill, 1 hour chill will help firm up the butter and reduce the cookie spreading. Cover your bowl of cookie dough and refrigerate until ready to use.
Here are two oatmeal cookies to compare what happens when you chill or don’t chill your cookie dough. The cookie on the left was baked immediately, where the cookie on the right the cookie dough chilled for 24 hours. By chilling the cookie dough it resulted in a cookie that spread less, and made for a softer chewier cookie as well.

8. You baked on a hot baking sheet.
If you’re baking more than one batch of cookies, you want to make sure your baking sheet is properly cooled before using again. If the baking sheet is too warm, it will cause your cookies melt and spread too much in the oven.
How To Fix? I always recommend having more than one baking sheet to bake with so you can rotate one batch in while the first one cools. If you only have one, then let the cookie sheet cool for a few minutes so it’s not hot and then run under warm water to cool them down faster.
Cookie Sheets 101
Different cookie sheets can also results in how much cookies spread, color of the cookies in the end, and their overall texture. If you find one you like stick with it! But it’s important to invest in some quality cookie sheets. Sorry Dollar Store you ain’t going to cut it this time. You want heavy duty aluminum cookie sheets that are going to heat evenly.
Here are my favorite baking sheets- Chicago Metallic Traditional Uncoated Pan and Nordic Ware Aluminum Half Sheet – I also prefer light colored aluminum baking sheets as opposed to dark colored cookie sheets because I find the dark ones heat too quickly and cause overly crispy cookies with dark bottoms. I also prefer rimmed baking sheets, because I find if I use parchment paper it can tend to slide right off the baking sheet if there isn’t a rim.
9. You didn’t line your baking sheets properly.
If you cookies bake on tinfoil or a greased cookie sheet the metal surface and/or the butter or grease can cause for a slippery surface which can result in the cookies to spread too much in the oven.
How To Fix? Use either parchment paper or a silicone baking mat. Both parchment paper or a silicone baking mat are great non-stick surfaces that can help prevent your cookies from spreading. Do not grease your baking sheets. Using parchment paper or a silicone baking mat, also allows for easy transfer of your cookies from the baking sheet to a cooling rack and easy cleanup.
10. You used more white sugar than brown sugar.
Using brown sugar in your cookies will result in a chewier, and sometimes thicker/cakier cookie. Brown sugar is able to hold onto more moisture than white sugar, so will help prevent spreading, and is acidic due to the molasses, so it will react more with the leavening agents causing for a thicker cookies. My favorite cookie recipe, these New York Times chocolate chip cookies (listed below) use more brown sugar than white sugar.
So if your cookie calls for more white sugar than brown sugar it could explain why your cookies are flat.
How To Fix? Use 50% white and brown sugar, or try using more brown sugar than white sugar. Just be sure to keep the overall sugar amount called for in the cookie recipe the same.
Quick Trick On How To Fix Your Flat Cookies
Another fun trick, is to when the cookies come out of the oven use a spoon and gently push the cookie edges back in a little bit. Like so…

What Can I Use Flat Cookies For?
If your cookies spread out too much, don’t throw them away! Here are a few ideas to turn that batch of cookies into something amazing:
- Eat them anyway. I mean ok, maybe they won’t win any beauty contests. And maybe they don’t have the exact texture you were going for, but I find that if the dough was tasty the cookies will be too.
- Crumble them. Make them into a whole new dessert. Like a trifle. Layer those cookie crumbles with some pudding. No one will be the wiser.
- Layer them into an icebox cake. Flat crispy cookies are ideal for an icebox cake. No one has to know you were going for perfect chocolate chip cookies and ended up with big old cookie puddles.
- Top A Sundae! I mean cookies crumbled into ice-cream with some Easy Hot Fudge Sauce. Yes please!
More Cookie Troubleshooting
Sometimes cookies spreading may not be your only problem. I get it! So here are some more cookie problems and how to solve them.
Make sure to line your pans with parchment paper or a silicone baking mat. You can always try greasing your baking sheets but this can contribute to extra spreading, but will help with the cookies not sticking.
Your oven has hot spots. Try rotating your pans halfway through baking. Scooping your cookie dough balls using a 1-inch cookie scoop can ensure they are all the same size and bake evenly.
Make sure to use a light colored cookie sheet and bake in the center of your oven.
You may have overmixed the dry ingredients once you added them into. Try mixing them less. I like to stir the last of the dry ingredients in by hand as opposed to finishing with my stand mixer.
You also may have added too much flour. Be sure to spoon your flour into your cup. You may have added not enough sugar or fat. Try adding a ¼ cup more to help make them tender.
You may have overbaked them. I usually find about 10 minutes (up to 12) is the perfect time. You want the edges set, golden brown, and the tops should be puffy and set, but still look not quite done yet. They will finish baking outside the oven.
You also added too much flour. Be sure to spoon your flour in the cup. You also may have stored them improperly. Be sure to put into an airtight container.
You underbaked them. So bake them a few minutes longer next time. Your oven temperature was too low, so increase your temperature by 25 degrees. Try adding more sugar or a higher ratio of brown sugar. Brown sugar helps with browning.
Your cookie dough contained too much sugar. Try reducing the sugar amount next time by ¼ cup. Or use more brown sugar than white sugar. Brown sugar will make for chewier cookie.
You may overbaked the cookies. Take them out a few minutes earlier next time. You used a dark cookie sheet. Be sure to use a light colored heavy duty aluminum cookie sheet.
Your oven temperature was too high. Try lowering the temperature 25 degrees (Fahrenheit). Use all butter. Do not chill the dough, or try letting the dough sit at room temperature for a few minutes before baking.
You used too much flour. Be sure to measure your flour accurately by spooning the flour in to the cup. Or try reducing the flour by a ¼ cup. You need to add more fat to your recipe next time. Try adding a few more tablespoons next time. You didn’t let the cookies cool long enough. Cool the cookies a few minutes longer
More Cookie Posts To Help You
Want to nerd out more? Here are a few more cookie science articles to check out:
More Cookie Recipes To Try
Here are some cookie recipes to try now that you have why your cookies spread, and are ready to bake!
More Recipes To Check Out
- Peanut Butter Cream Cheese Frosting
- Self Rising Flour Biscuits
- 20 Self Rising Flour Recipes
- Milk Bar Cake
- How To Pasteurize Eggs
- How To Store And Freeze Cupcakes
Here is my favorite chocolate chip cookie recipe to try now that you’ve learned your biggest mistakes!
Master The Art Of Baking!
Don’t miss out on the chance to elevate your baking skills! Join the Ultimate Baking Bootcamp today and unlock the secrets to creating perfect desserts every time. With expert guidance, step-by-step lessons, and insider tips, you’ll be baking like a pro in no time. Sign up now and start mastering your baking!

Jacque Torres Chocolate Chip Cookies
Ingredients
- 2 cups minus 2 tablespoons (8 1/2 ounces) cake flour
- 1 ⅔ cups (8 1/2 ounces) bread flour
- 1 ¼ teaspoons baking soda
- 1 ½ teaspoons baking powder
- 1 ½ teaspoons coarse salt
- 2 ½ sticks (1 1/4 cups) unsalted butter
- 1 ¼ cups (10 ounces) light brown sugar
- 1 cup plus 2 tablespoons (8 ounces) granulated sugar
- 2 large eggs
- 2 teaspoons pure vanilla extract
- 1 ¼ pounds chopped chocolate see note
- 8 ounces semi-sweet chocolate for dipping after baking
Instructions
- In a large mixing bowl whisk together the flours, baking soda, baking powder and salt into a bowl. Set aside. 2 cups minus 2 tablespoons (8 1/2 ounces) cake flour 1 ⅔ cups (8 1/2 ounces) bread flour 1 ¼ teaspoons baking soda 1 ½ teaspoons baking powder 1 ½ teaspoons coarse salt
- Using a mixer fitted with paddle attachment, cream butter and sugars together until very light, about 5 minutes. 2 ½ sticks (1 1/4 cups) unsalted butter 1 ¼ cups (10 ounces) light brown sugar 1 cup plus 2 tablespoons (8 ounces) granulated sugar
- Add eggs, one at a time, mixing well after each addition. Stir in the vanilla. 2 large eggs 2 teaspoons pure vanilla extract
- Reduce speed to low, add dry ingredients and mix until just combined, 5 to 10 seconds. Add the chopped chocolate and mix on low speed to incorporated. You can scoop the cookie dough at this point into balls or chill the cookie dough in the bowl. Press plastic wrap against dough and refrigerate for 24 hours, up to 72 hours. 1 ¼ pounds chopped chocolate
- When ready to bake, preheat oven to 350℉ (180℃). Line a baking sheet with parchment paper or a nonstick baking mat. Set aside.
- Scoop six 3 1/2-ounce mounds of dough (the size of generous golf balls) onto baking sheet. I only bake 6 on a cookie sheet at a time because of their size. These are large cookies! You can scoop smaller cookies but adjust the baking time.
- Bake until golden brown but still soft, 18 to 20 minutes. Cool on the baking sheet for 5 minutes, then transfer to a wire rack.
- Once cookies are cooled, melt the chocolate in a bowl. Then dip the bottom of each cookie in the melted chocolate or spread the chocolate on with an offset spatula. Place the cookies back onto the parchment paper chocolate side down and let cool until harden. 8 ounces semi-sweet chocolate
Notes
- Room temperature: Store cooled cookies in an airtight container in a dry place for up to 4 days.
- Freezing dough: Freeze scooped dough balls on a parchment-lined baking sheet, then transfer to a freezer bag. Bake from frozen, adding a few extra minutes to the baking time.
- Freezing baked cookies: Once cooled, cookies can be frozen in an airtight container for up to 3 months. Thaw at room temperature before serving.
- Chocolate: For the chocolate in the cookie dough you can use chocolate chips but chopped chocolate is traditional. I like to use a combination of bittersweet (or semi-sweet) chocolate with milk chocolate chips and chopped chocolate. But use what you like and want!
- Flour: You could swap the bread flour and cake flour for all purpose flour but this will make the cookies less soft and chewy.


My cookies look beautiful when they come out of the oven. As they cool, they go flat. What am I doing wrong?
Always flatten a little bit when they come out of the oven. Make sure to cool on a wire rack. If they are spreading too much for your liking, then I would chill the cookie dough for an hour up to overnight to really help the cookies from spreading.
Thank you so much for the great article on cookies. You took a lot if time and effort into writing this very knowledgeable cookie problem solving article. I will try your info and see if I can revolve my cookie debacle. Ty
thank you so much Terry! I’m so glad you found it helpful!!
This helped me with my science experiment! Thanks!
Oh that’s amazing to hear Sarah! That makes me so happy!!
Lots of good info my cookie are always flat throw them out will try your tips want crispy but not gooie inside
aw thank you Irene!
You have some great content here, but I found it difficult to read with so many grammatical errors. I realize that time may be an issue with your writing, but there are websites that will proofread you copy for free.
Hi Jes, thanks for the feedback. With a full time teaching job, and running this blog on the side, and growing a human right now sometimes those errors can happen. I never claimed to teach English! But thanks I’ll be sure to check those out.
You are wonderful! I made the chocolate chip cookies exactly as the recipe says. I weighed the flours and sugars and even weighed my dough balls after I scooped it out and did one sheet at a time. In between I put the bowl back in the fridge. I can’t attach a picture or I would. I’m soooo happy with my NON-FLAT cookies!
Aw I’m so glad the tips worked out for you Donna!!
Been baking my mom’s oatmeal cookie recipe for years and recently they’ve been so flat! So today after making sure I had all the measurements exactly right and with a little help from my daughter (I have my right arm in a cast) put one pan in. They IMMEDIATELY spread.
Although when beating the shortening & sugars my daughter had added the water and eggs too soon, (impatient kid!) I had a feeling it wasn’t just that. So I checked my baking soda and found it was old! Oh, and I’d also stuck them in the oven without chilling them.
But since there’s still some dough left. So we’ll see if the extra chill time will help this batch (even slightly).
Better luck next time!
I’m so glad you find the post helpful Jules! And yes with cookies it can take practice and hopefully chilling your cookies worked out 🙂
Thank You for the great tips! My cookies all of a sudden were flat? I couldn’t understand what I might be doing wrong, Because I use the same brand and careful in my measurements. You gave me the solution!!! Thank You!
I don’t have room in my fridge for 3-4 sheets of scooped cookie dough. If I’m in need of a ridiculous arm workout, will I get the same effect if I chill & then scoop?
Totally get it! Just let the dough soften for 20-30 minutes before scooping!
My big old cookie puddles will be perfect next time. Thanks for the informative and funny blog post!
Hi Laken! I’m so glad you liked the post and found it useful 🙂
Been baking chocolate chip and oatmeal cookies almost exclusively on and off for awhile now, both are coming out quite okay; that said however, your scientific sounding ‘fixes’ and tips will very likely add that extra something to my limited variety of baked cookies at present as well as to a more expanded repertoire sometime in the future (should I get that itch). Thanks.
Aw thank you David! I love seeing comments like this 🙂
OMG, you are fricken AMAZING!! I love (and very much needed) the detail and understanding you explained here. Thank you soooo much!! Now my kids can look less disappointed when they walk into the kitchen!!
Awwww thank you Cher!! This means so much to hear. I’m so glad you found this post helpful…and your kids will love the cookies that come out of your kitchen!
Love these tips!! So helpful!
Thanks Kelly 🙂