Pumpkin Dinner Rolls
This Post May Contain Affiliate Links. Please Read Our Disclosure Policy.
These pumpkin dinner rolls are what your holiday table needs this year. A soft, fluffy dinner roll that is 100% whole wheat, sweetened with honey, pumpkin puree, and pumpkin pie spice. These pumpkin bread rolls are a perfect addition to your Thanksgiving bread basket.

I don’t know about you but when it comes to Thanksgiving I’m all about the side dishes, and the bread basket. Sure I’ll eat the turkey. It’s there. But to me it’s never the star.
And every year I insist on making these homemade dinner rolls. But this year I decided let’s mix things up a bit and make pumpkin rolls. Because why not, right? I mean I use pumpkin puree to make my pumpkin pie, why not make my rolls at the same time.Yes please.
Ready To Take Your Baking To The Next Level?
Join the Ultimate Baking Bootcamp and master essential techniques like mixing methods and the why behind every recipe! Whether you’re a beginner or looking to refine your skills, this step-by-step class will help you bake with confidence and create flawless desserts every time. Start your baking journey today!

Why These Are The Best Rolls
- 100% Whole Grain – I made these with white whole wheat flour. I love white whole wheat flour. It’s still 100% whole grain, but a softer variety of wheat then the regular bags of whole wheat flour.
- Naturally sweetened – These rolls are made with honey. I’ve been on a roll (pardon me for the puns!) lately and love baking with natural forms of sugar. And homemade bread rolls and honey go perfectly together.
- Make Ahead – The best part of bread rolls is that you can freeze these baked, or unbaked. Making them a perfect make ahead side for your holidays.
Ingredients Needed
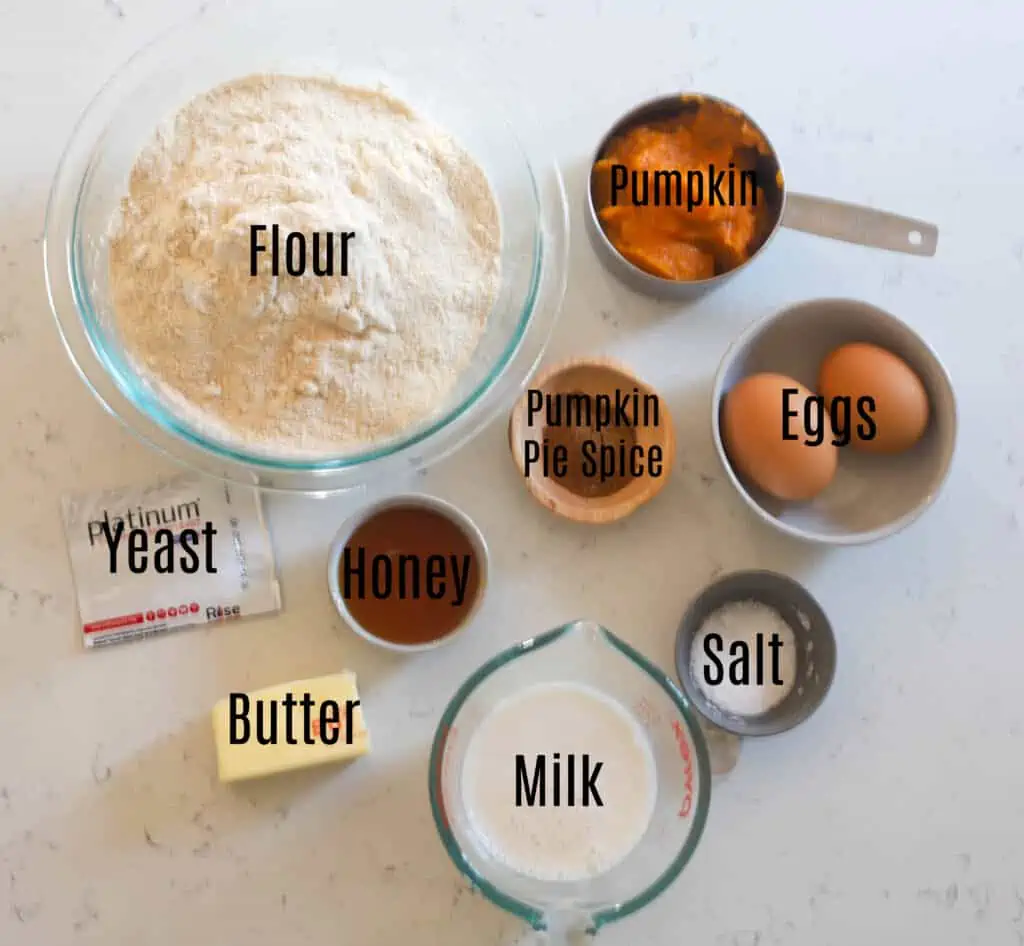
Ingredients Notes
- Milk – I used whole milk in these rolls but other milk would work. You want to make sure to warm your milk to 110oF to proof the yeast before it’s added to the rest of the ingredients. I just warm mine in the microwave until it’s warmed. Just be careful, it’s too hot it will kill your yeast!
- Yeast – I used Red Star Instant Yeast and proof it first in the warm milk. Start with quality yeast and you will end up with quality bread! Make sure your yeast hasn’t expired and check those expiration date on the package.
- Honey – You could also use sugar.
- Pumpkin puree – Make sure you use puree and not pie mix which has added ingredients. And make sure it’s room temperature.
- Pumpkin pie spice – I’ll give you substitutions in the recipe if you don’t have on hand!
- White whole wheat flour – You can always substitute this with whole wheat flour instead. I recommend weighing your flour instead of by volume, for best accuracy. Too much flour added can result in dense bread rolls instead of fluffy ones.
How To Make These Rolls
Proof Your Yeast
Start with heating your milk. I do this in the microwave, but a saucepan works too. You want the milk to be 110oF. Any warmer and it will kill your yeast. You want to add the yeast to the warmed milk and let it sit and get all bubbly for about 5 minutes.
No foam or bubbles? This could be that your milk was too warm or your yeast has expired. If after 5 minutes, still nothing – then it’s best to throw it out and start over!

Make Your Dough
Combine the rest of the dough ingredients in a large bowl. Add the yeast mixture and knead using the dough hook attachment or stir together in a bowl if mixing by hand. This dough will be very sticky, soft, and wet. You might be tempted to add more flour, but this will end up in a tough dry roll in the end.

Let the dough rise.
Since this dough is whole wheat, it won’t be all stretchy and “dough like” so you want to scrape the dough in a lightly greased bowl, and allow it to rise for 60 to 90 minutes, until it’s puffy though not necessarily doubled in bulk.

Shape the rolls.
Transfer dough onto a well floured surface. Flour your hands as well. This is a very soft, sticky dough. Flatten the dough into a large rectangle. Divide the dough into 12 equal pieces. Round each piece into a smooth ball.

Time for a second rise!
Space 12 rolls into a greased 9″ x 13″ pan. Cover the pans, and allow the rolls to rise until they’re crowded against one another and quite puffy, about 1 hour. Uncover the rolls and gently brush them with the egg wash.

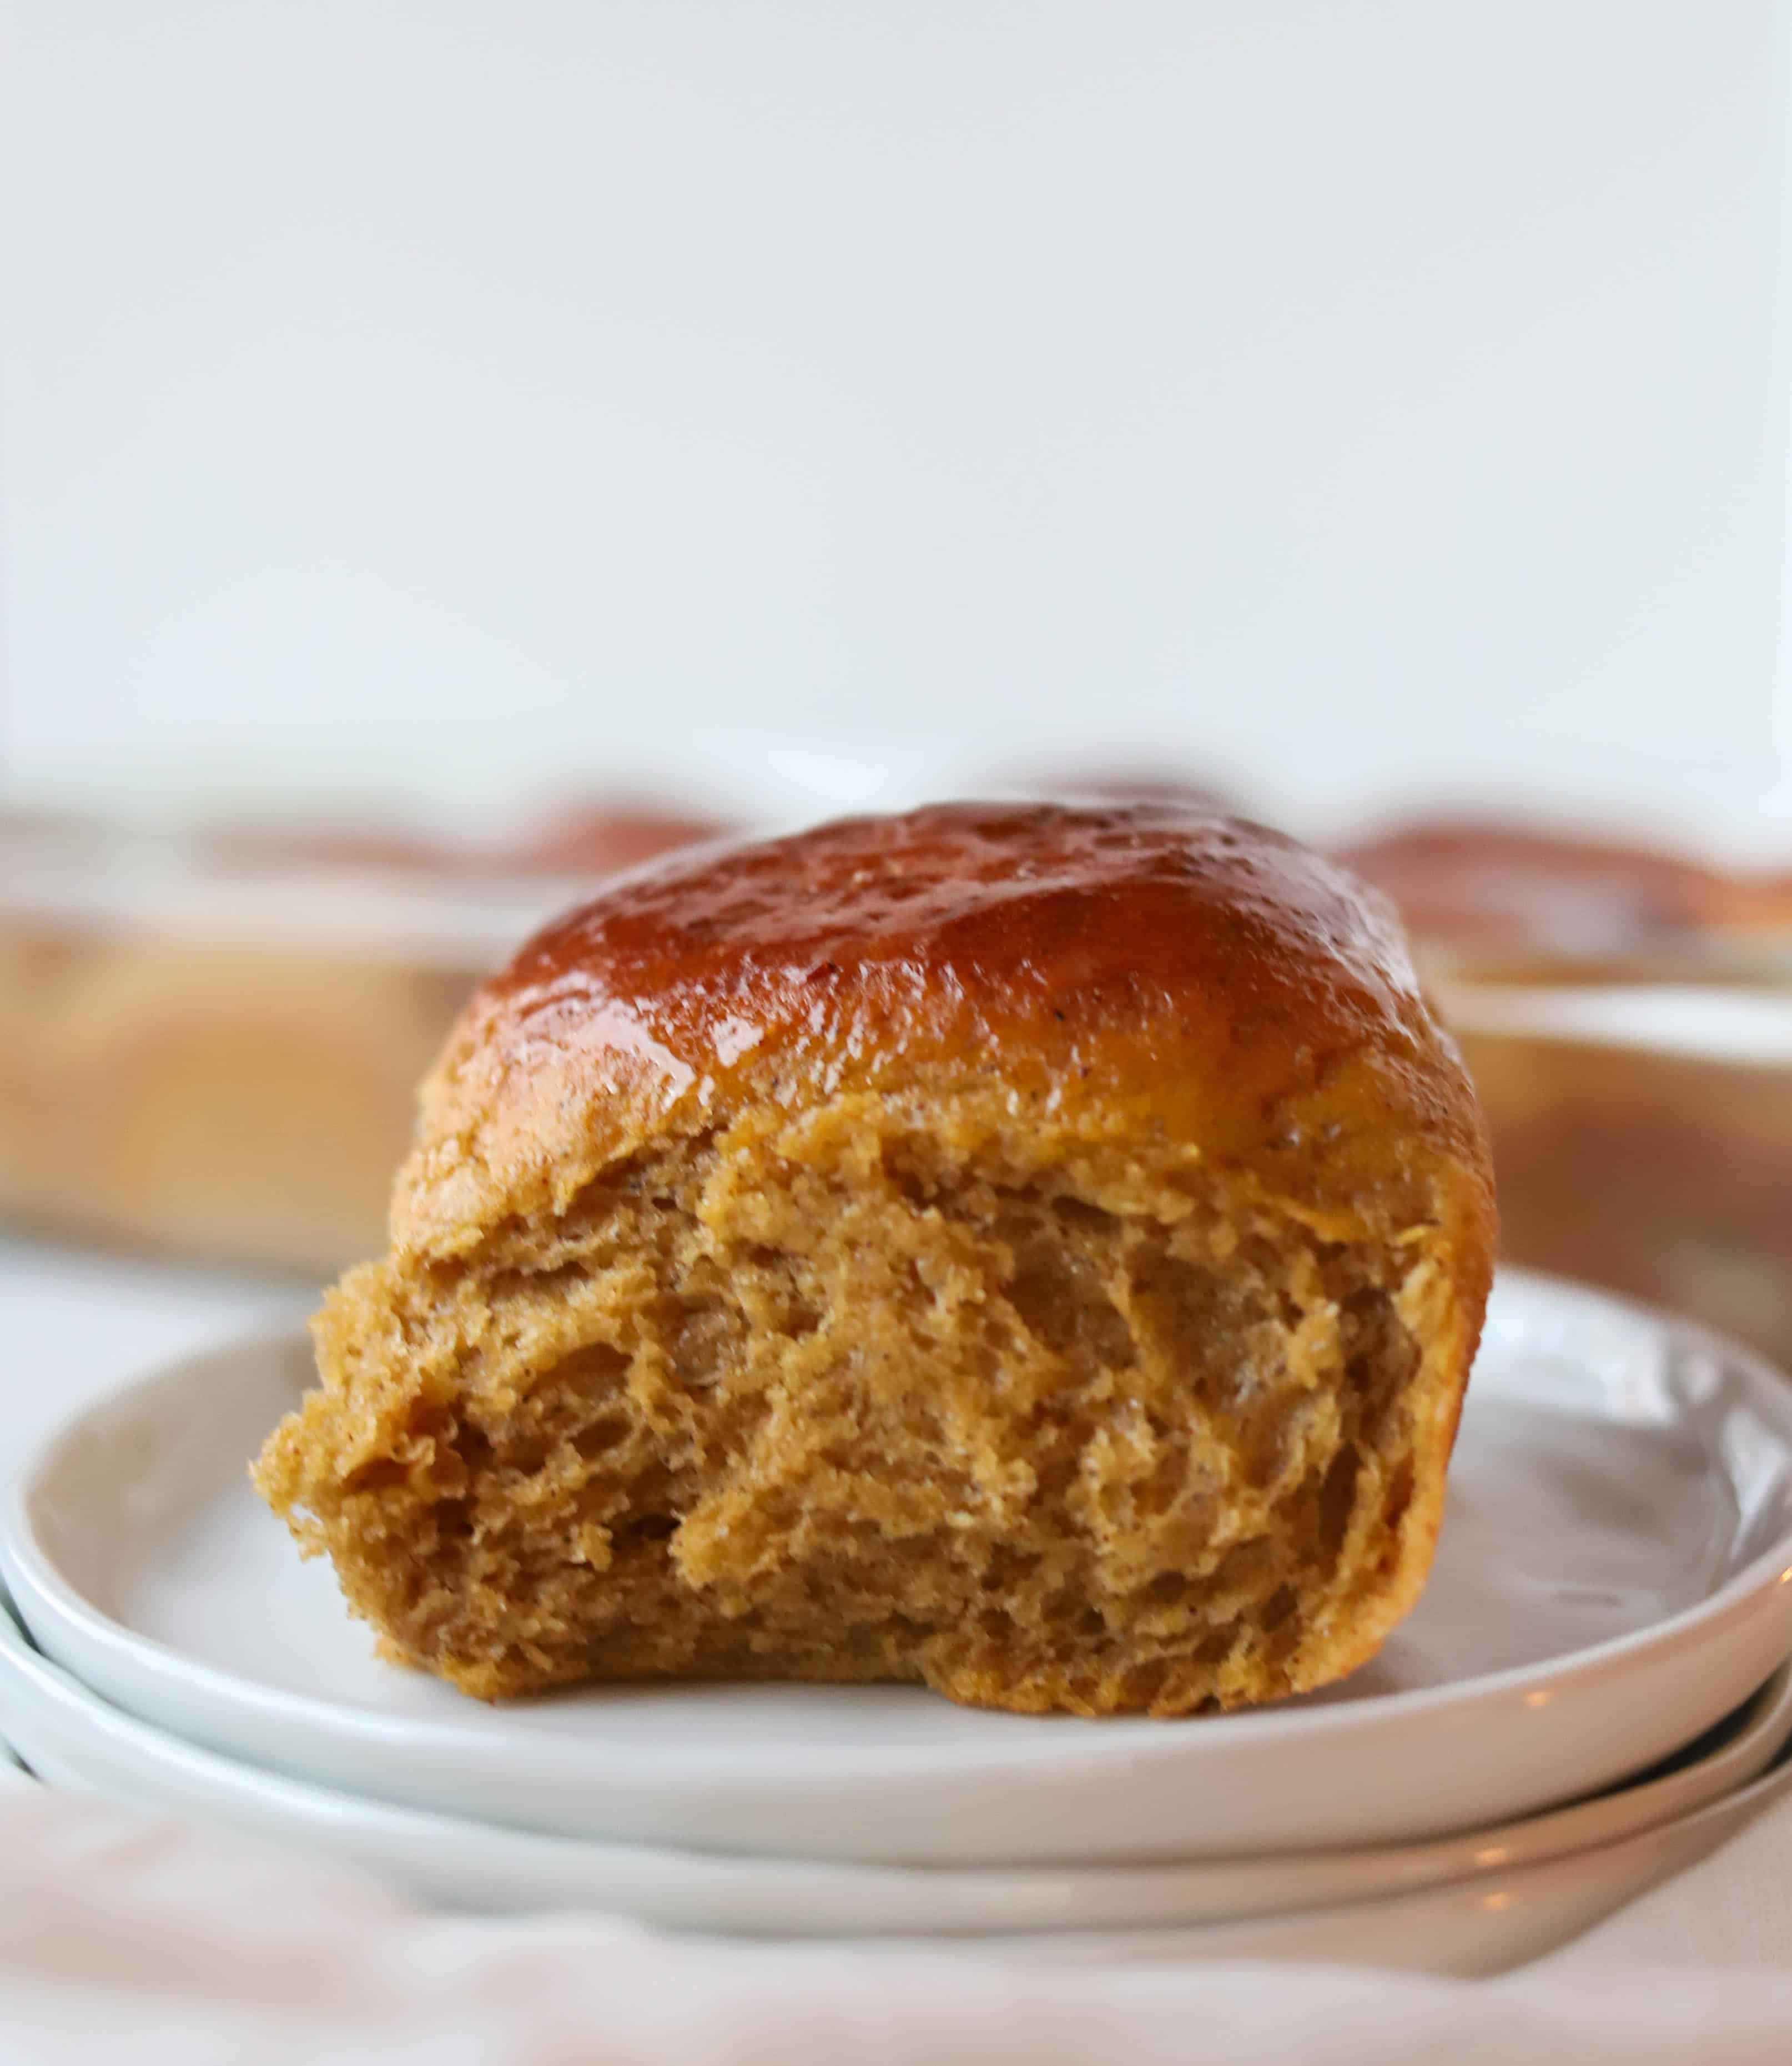
It’s bake time!
Pre-heat oven to 375oF. Bake rolls for 25 minutes. If the top of rolls are browning too much, tent loosely with tinfoil. A digital thermometer inserted into the middle of a center roll should register at least 190°F. Remove the rolls from the oven, and brush with melted butter. After a couple of minutes, turn the rolls out of the pan onto a cooling rack.
I suggest you serve these warm but you can also store completely cooled rolls, well-wrapped, at room temperature for several days. Or you can also freeze these for longer storage.

Recipe FAQ’s
I’ve only made these in a 9×13 pan, but you could divide the rolls between two round cake pans or a small sheet pan.
My kitchen (and house) is notoriously cold! Thank you electric heat. So if your house is cold like mine, your bread may take longer to rise than normal. You make your own bread proofer by preheating your oven to 150F, then turn your oven off and place your bowl of dough in the oven and let it proof in there.
There’s nothing like warm rolls for your holiday dinner, right? But getting the timing right sure can be tough. So to keep them warm try warming some dried beans in a kitchen towel in the microwave for 1-2 minutes then keep the beans wrapped in a towel and place in the bottom of a bread basket and place your rolls on top. Voila! Warm. Rolls. Every. Time.
You can freeze these dinner rolls after they are shaped for up to 3 months. Once frozen you can transfer to a bag. When ready to bake, place them into a greased pan and let thaw/rise at room temperature until thawed and risen (about 4-5 hours). Or you can freeze baked rolls. Let them cool and then place in a freezer bag. When ready to enjoy thaw at room temperature or in the fridge and reheat.
You can make the dough the night before and shape the rolls. Then place in your fridge overnight. When ready to enjoy the next day take them out of the fridge (about 3 hours ahead of time), and let rise at room temperature for about 1-2 hours before baking.


Recipe Tips
- Watch that milk! Make sure your milk is the correct temperature for the yeast. The yeast is a living thing and too hot of water will kill it. And too cold will never wake it up, leaving you with rolls that don’t rise! Major kitchen bummer. Check out my yeast 101 post to learn more.
- Use a scale. For best accuracy use a kitchen scale to measure your flour. This is a soft, sticky dough and you might be tempted to add more flour to the dough. But don’t! Just keep the surface and your hands floured as you shape the rolls. Adding too much flour can result in a dry dinner roll not a soft fluffy one!
- Handle the dough as little as possible. Yes it’s a soft sticky dough. You will be tempted to add more flour when shaping. Just keep your counter and hands well floured, and handle the dough as little as possible. The more you handle it, the stickier the dough will get.
- Let the dough rise in a warm place. My kitchen is notoriously cold. Ok, my house is! So I try to find the warmest room, or pop in an oven I pre-heated 15oF oven that you let warm up. Just turn the oven off before popping the bowl of dough in.
More Recipes To Check Out
What You Need To Make These Pumpkin Dinner Rolls
- 9×13 baking pan <– I love my Pyrex glass dish, but a metal one works as well.
- Red Star Platinum Yeast <– My go to yeast!!
- Stand Mixer <– You can try making it by hand but it’s much easier to make in my Kitchen-Aid with a dough hook attachment.
Master The Art Of Baking!
Don’t miss out on the chance to elevate your baking skills! Join the Ultimate Baking Bootcamp today and unlock the secrets to creating perfect desserts every time. With expert guidance, step-by-step lessons, and insider tips, you’ll be baking like a pro in no time. Sign up now and start mastering your baking!
Pumpkin Dinner Rolls
Ingredients
- 1 cup (240 mL) milk heated to 110oF
- 2 1/4 teaspoons instant yeast I used Red Star Platinum
- 1/3 cup (105 g) Honey
- 8 tablespoons (113 g) unsalted butter softened
- 1/2 teaspoon kosher salt
- 2 teaspoons pumpkin pie spice or substitute 1 1/4 teaspoons cinnamon + 3/8 teaspoon cloves +3/8 teaspoon ginger
- 2 large eggs room temperature
- 3/4 cup (170g) pumpkin purée
- 4 cups (482g) White whole wheat flour
- 1 egg + 1 Tbs. water for the egg wash
Instructions
- Combine the warmed milk and yeast in a small bowl and let it sit and get foamy for 5 minutes.
- Combine all of the dough ingredients in a large bowl of your stand mixer (or large mixing bowl if making by hand) Add the yeast/milk mixture. Stir the mixture together until it comes together into a soft, sticky dough.
- Place the dough in a lightly greased bowl, and allow it to rise for 1.5 to 2 hours, until it's doubled in size.
- Transfer it to a floured work surface. Flour your hands.
- Divide the dough into 12 equal pieces. Round each piece into a smooth ball, or shape into knots.
- Space 12 rolls into a greased 9" x 13" pan.
- Cover the pan, and allow the pull-apart rolls to rise until they're crowded against one another and quite puffy, about 1 hour. Towards the end of the rising time, preheat the oven to 375°F.
- Uncover the rolls and gently brush them with the egg wash. Bake the rolls for about 25 to 30 minutes until golden brown, tenting them with foil for the final 5 to 10 minutes of baking if they appear to be browning too quickly. A digital thermometer inserted into the middle of a center roll should register at least 190°F.
- Remove the rolls from the oven, and brush with melted butter. After a couple of minutes, turn the rolls out of the pan onto a cooling rack.
- Serve warm. Store completely cooled rolls, well-wrapped, at room temperature for several days; freeze for longer storage.
Notes
- Make Ahead: You can make the dough the night before and shape the rolls. Then place in your fridge overnight. When ready to enjoy the next day take them out of the fridge (about 3 hours ahead of time), and let rise at room temperature for about 1-2 hours before baking.
- Freezing: You can freeze these dinner rolls after they are shaped for up to 3 months. Once frozen you can transfer to a bag. When ready to bake, place them into a greased pan and let thaw/rise at room temperature until thawed and risen (about 4-5 hours). Or you can freeze baked rolls. Let them cool and then place in a freezer bag. When ready to enjoy thaw at room temperature or in the fridge and reheat.
- Different Pans: I’ve only made these in a 9×13 pan, but you could divide the rolls between two round cake pans or a small sheet pan.
- Proofing: You make your own bread proofer by preheating your oven to 150F, then turn your oven off and place your bowl of dough in the oven and let it proof in there.
- Keeping the rolls warm: Warm some dried beans in a kitchen towel in the microwave for 1-2 minutes then keep the beans wrapped in a towel and place in the bottom of a bread basket and place your rolls on top.
- Freezing: You can always freeze your rolls unbaked before the final rise. Just shape them and then freeze them. Just be sure to cover them well with plastic wrap and a final layer of tin-foil. When ready to bake, you need to let them thaw overnight in the fridge. Then let them rise at room temperature for an hour and bake as normal. Or freeze them baked as well! Let them cool completely first, then wrap the rolls in plastic wrap and then in tin-foil or a plastic bag. Then thaw at room temperature and reheat in a 300F for 7-8 minutes.
- Watch that milk! Make sure your milk is the correct temperature for the yeast. The yeast is a living thing and too hot of water will kill it. And too cold will never wake it up, leaving you with rolls that don’t rise! Major kitchen bummer. Check out my yeast 101 post to learn more.
- Use a scale. For best accuracy use a kitchen scale to measure your flour. This is a soft, sticky dough and you might be tempted to add more flour to the dough. But don’t! Just keep the surface and your hands floured as you shape the rolls. Adding too much flour can result in a dry dinner roll not a soft fluffy one!
- Handle the dough as little as possible. Yes it’s a soft sticky dough. You will be tempted to add more flour when shaping. Just keep your counter and hands well floured, and handle the dough as little as possible. The more you handle it, the stickier the dough will get.