
Raspberry Pie
This Post May Contain Affiliate Links. Please Read Our Disclosure Policy.
This homemade raspberry pie recipe is simple to make! The raspberry filling is made with three simple ingredients and an easy homemade pie crust. Top with a scoop of vanilla ice cream for a delicious raspberry pie everyone will love!

Last Thanksgiving dinner, I asked everyone what pies they wanted me to make. I have a bit of a reputation for making all the pies and way too many of them. I try to make all the pies that everyone wants. From classics, to cream pies, to fruit pies – yes I get all the requests.
My dad wants a blueberry pie so I whipped up this blueberry crumble pie for him! My mother always requests a chocolate pie so I made this chocolate cream pie for her. My brother requests cherry so this cherry crumb pie was on the menu. And of course you can’t forget this Dutch apple pie, pecan pie, and pumpkin pie (my husband’s favorite!).
But my sister – she’s a fruit pie kind of girl. And the pie she requested? Raspberry. I hadn’t made just a raspberry pie before so I was up for the challenge. A pie featuring just juicy raspberries tucked into a buttery pie crust? Delicious, right?
After a few attempts I knew I had nailed it. The first attempts were just too…sour. What gives? Ahhh, the addition of lemon juice. Now I know that many raspberry pie recipes add in lemon juice but I found the tartness of the fresh berries didn’t pair well. It was too tart. Whereas, lemons are a wonderful addition to a blueberry pie it just wasn’t needed in this homemade raspberry pie filling.
I found that with just sugar, raspberries, and cornstarch to thicken was all it needed. I paired this pie with my new favorite pie crust (also just 3 ingredients!) my salted pie crust. I found the salted butter gives way to a much flakier pie crust. So with just six ingredients this homemade fresh raspberry pie was ready.
Bake Pies With Confidence!
If you’ve ever struggled with shrinking crusts, runny fillings, or pies that just didn’t wow—you’re not alone. But here’s the good news: you can bake pies that look beautiful, slice cleanly, and taste bakery-worthy… without the stress. Inside my Pie Perfection eBook, you’ll learn how to:
- Master buttery, flaky crusts (no soggy bottoms here!)
- Choose the right thickeners for fruit fillings that hold
- Avoid common pie mistakes with my step-by-step guides
- Bake seasonal favorites all year long—from classic apple to no-bake summer pies

Ingredients Needed
For the full recipe and ingredient amounts refer to the recipe post at the bottom. Here is the list of ingredients with a few notes to make mention of!
Pie crust:
- All purpose flour
- Salted butter – You can use unsalted butter and add a bit of salt. I do find that salted butter yields a much flakier crust due to the higher water content. Make sure the butter is cut into cubes and chilled. You need the butter cold so it stays firm and solid and doesn’t melt into the flour creating a gummy pie crust.
- Cold water -It must be super cold to keep the butter cold. I like to place a few ice cubes in the water to keep it chilled when using it.
For the pie filling:
- Raspberries – You can also use frozen raspberries. Thaw and drain any excess liquid so the filling isn’t runny.
- Granulated sugar
- Cornstarch – You can also use tapioca starch. This ingredient is necessary to thicken the filling.
- Egg wash: This helps brown the crust. I like to use 1 large egg mixed with 1 Tablespoon water . You can read more here about what is an egg wash and find some alternative options if you have an egg allergy.
- Coarse sugar, for sprinkling on top -Optional but worth it!
How To Make Raspberry Pie
We will start by making my 3 ingredient pie crust that uses salted butter for maximum flakiness. You can always use a different pie crust or store-bought if you’re short on time.
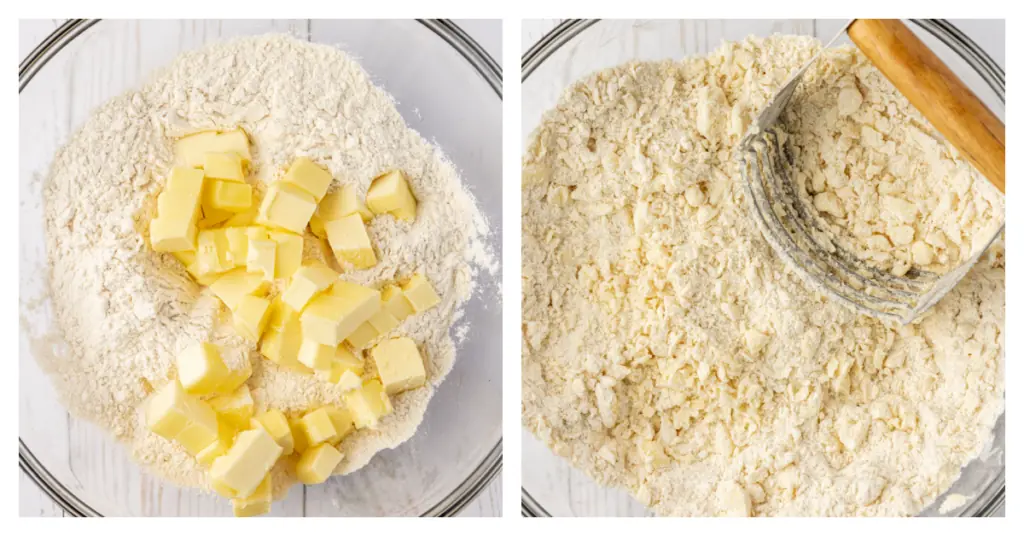
Make pie crust. In a food processor add flour. Scatter butter pieces over top and pulse butter until mixture resembles coarse cornmeal. You should see pea-sized pieces of visible butter in the flour.
Remember we want things cold, cold, cold here so the butter doesn’t melt into the flour until it hits the oven. It’s when the pie crust gets to the oven the butter then melts and the water steams pushing apart the flour layers creating a beautiful flaky pie crust!
If using a food processor, pulse a few times to cut the butter in. If making by hand use a pastry cutter to cut the butter in. You can also use just your fingertips and squish the butter pieces until they are smaller.
Heather’s Baking Tip
Do not overwork the dough. Overworking the dough will make it tough. If you’re making the pie curst in a food processor be sure to use the pulse feature so you don’t over work it.
Sprinkle 6 tablespoons of the ice water over the mixture. Remember we want the water super cold so it keeps the butter solid and firm as well. Stir the dough together using a spatula, until the dough sticks together if making by hand or pulse with the food processor.
Test the dough by squeezing some together with your fingertips. If it sticks together, then do not add more water. If it does not, then add the remaining 2 tablespoons water one tablespoon at a time.
You don’t want to add all the water at once but work it in a little at a time. You will find each time each pie crust will need varying amounts of water based on how much the butter was worked in. So go slow. You can always add water but you can’t take it away!

Chill the dough. I like to use a clean dish towel and turn the dough onto it. Bring the edges of the towel and twist it. This will bring the dough together into a cohesive mass.
If you find your dough is a bit dry at this point you can sprinkle a bit of water over the dough and work it in. Or try a spray bottle and spritz the dough.

Divide dough in half, shape and flatten into 4-inch discs and wrap each in plastic wrap. Chill for at least 1 hour (up to 3 days ahead of time).
Chilling is key to firm up the butter again, and allow the gluten in the dough to relax to make it easier to roll out. While the pie crust is chilling we can make our filling.

Make filling. In a large mixing bowl with a wooden spoon or spatula stir together raspberries, granulated sugar, and cornstarch.

Prep oven. Adjust oven rack to lowest position, place rimmed baking sheet on oven rack and heat oven to 400°F (205oC). We bake on a lower rack to help create a beautiful browned bottom crust. No soggy bottoms here friends!
Roll out pie crust. On a lightly floured counter roll out one disc of dough into a 12-inch circle.
Heather’s Baking Tip
When rolling out the dough it’s important to keep the surface and rolling pin lightly floured. I also like to move the dough around a bit making sure it’s not sticking as I go. You can always pop the pie crust back in the fridge again if it’s warming up too much or sticking on you. Your fridge is your friend!

Transfer pie dough to pie plate. Fold the dough in quarters, and then transfer to your 9” pie plate. Carefully unfold the dough, and tuck in with your fingers.
Another approach is to roll it around your rolling pin and roll it out over the pie plate.

Add filling. Spoon the raspberry mixture into the pie crust into an even layer. If your filling is extra juicy be sure to drain the excess liquid as you spoon it into the pie crust. Leave the extra juice behind in the bowl.
You could always boil it down on the stovetop and reduce it and add to the filling. Just make sure its cool before you do. I haven’t tried this but if you do let me know how it goes in the comment section.

Top with second crust. Remove the second disc of dough and roll out into a 12” circle. Place dough on top of filling. Fold excess dough under edge. Crimp pie edges. Cut four slits into top of pie crust. The slits are important to allow steam to escape as it bakes.
For the top crust you can also make a lattice top if you want which will naturally vent the filling as it bakes (and it’s also super pretty!)

Egg wash. In a small bowl, stir together the egg and water. Brush the top crust with egg wash with a pastry brush. Sprinkle top of crust with coarse sugar, if using.

Bake pie. I like to bake in my lower third of the oven so the bottom crust gets nice and browned.
Place pie on large baking sheet (to catch drips) and bake for 30 minutes in a preheated oven (400oF). For easy cleanup you can always line the pan with aluminum foil.
Reduce oven temperature to 350°F and continue to bake until juice bubbles and the top crust is deep golden brown, 30 to 40 minutes longer.
This high heat to start is going to give that crust a beautiful golden color but we don’t want to bake it at that high of a temperature the whole time just to start.
How Do I Know When It’s Done?
The pie is done baking when the crust is golden brown and the filling is bubbling. This means that the filling has gotten hot enough to activate the thickening power of the cornstarch. If the filling isn’t bubbling yet bake a little longer.
If pie crust edges is browning too much, cover with tinfoil or pie shield. Transfer pie to wire rack; cool in the fridge to help firm up the filling, at least 4 hours. Cut into wedges and serve.

Serving Tip
Allow the baked pie to cool completely before slicing and serving. This will help to prevent the filling from running out. I like to make my pie the day before and allow it cool overnight.
You can serve this pie as is on a plate and everyone is going to love! But like any pie I like to serve with a dollop of homemade whipped cream or a scoop of vanilla ice cream.

Recipe FAQs
To freeze this pie, let it cool completely first. Wrap the entire pie tightly in plastic wrap, then add a layer of aluminum foil to protect it from freezer burn. Freeze for up to 2–3 months. When ready to serve, thaw the pie overnight in the refrigerator. For best texture, let it sit at room temperature for about 30 minutes before slicing.
Yes! This pie is a great make-ahead dessert. You can bake it 1–2 days in advance, let it cool completely, then cover and store it in the refrigerator. If serving later, remove it from the fridge about 30 minutes before serving so the filling softens slightly and the flavors really shine.
More Recipes To Try
If you’re craving more pie, be sure to try my peach crumble pie – it’s my Dad’s favorite and always a winner in the summer time!
And for another pie with minimal ingredients and prep my lemon pie with a graham cracker crust is sure to be a winner at your table!
Ready To Bake Pies With Confidence?
Imagine making a homemade pie from scratch that everyone raves about! Grab my Pie Perfection eBook and learn how to master flaky crusts, flavorful fillings, and picture-perfect pies—no stress, just sweet success.
👉 Get The Ebook Here!

Raspberry pie
Ingredients
Pie crust:
- 2 ½ cups (300 g) all purpose flour spooned and leveled
- 1 cup (2 sticks, 226 g) salted butter cold and cut into pieces
- ½ cup (120 ml) cold water
For the pie filling:
- 5 cups raspberries fresh or frozen (thawed)
- 1 cup (200 g) granulated sugar
- ¼ cup (28 g) cornstarch
- 1 Tablespoon (14 g) butter cut into small pieces
- Egg wash: 1 large egg mixed with 1 Tablespoon water
- Coarse sugar for sprinkling on top
Instructions
- Make pie crust. In a food processor add flour. Scatter butter pieces over top and pulse butter until mixture resembles coarse cornmeal. If using a food processor, pulse a few times to cut the butter in. If making by hand use a pastry cutter to cut the butter in. You can also use just your fingertips and squish the butter pieces until they are smaller. Sprinkle 6 tablespoons of the ice water over the mixture. Stir the dough together using a spatula, until the dough sticks together if making by hand or pulse with the food processor. Test the dough by squeezing some together with your fingertips. If it sticks together, then do not add more water. If it does not, then add the remaining 2 tablespoons water one tablespoon at a time. 2 ½ cups (300 g) all purpose flour 1 cup (2 sticks, 226 g) salted butter ½ cup (120 ml) cold water
- Chill the dough. I like to use a clean dish towel and turn the dough onto it. Bring the edges of the towel and twist it. This will bring the dough together into a cohesive mass. Divide dough in half, shape and flatten into 4-inch discs and wrap each in plastic wrap. Chill for at least 1 hour (up to 3 days ahead of time)
- Make filling. In a large mixing bowl with a wooden spoon or spatula stir together raspberries, granulated sugar, and cornstarch. 5 cups raspberries 1 cup (200 g) granulated sugar ¼ cup (28 g) cornstarch
- Prep oven. Adjust oven rack to lowest position, place rimmed baking sheet on oven rack and heat oven to 400°F (205°C).
- Roll out pie crust. On a lightly floured counter roll out one disc of dough into a 12-inch circle.
- Transfer pie crust to pie plate. Fold the dough in quarters, and then transfer to your 9” pie plate. Carefully unfold the dough, and tuck in with your fingers.
- Add filling. Spoon berry filling into the pie crust into an even layer (leaving any extra juice behind in the bowl), Top with the small pieces of butter. 1 Tablespoon (14 g) butter
- Top with second crust. Remove the second disc of dough and roll out into a 12” circle. Place dough on top of filling. Fold excess dough under edge. Crimp pie edges. Cut four slits into top of pie crust.
- Egg wash. In a small bowl, stir together the egg and water. Brush the crust with egg wash. Sprinkle top of crust with coarse sugar, if using. Egg wash: 1 large egg mixed with 1 Tablespoon water Coarse sugar
- Bake pie. Place pie on large baking sheet (to catch drips) and bake for 30 minutes at 400°F. Reduce oven temperature to 350°F and continue to bake until juice bubbles and crust is deep golden brown, 30 to 40 minutes longer. If pie crust edges is browning too much, cover with tinfoil or pie shield. Transfer pie to wire rack; cool in the fridge to help firm up the filling, at least 4 hours. Cut into wedges and serve.
Notes
- Make ahead: Assemble the pie and wrap it tightly in plastic wrap. Refrigerate the pie for up to 24 hours. When you are ready to bake the pie, bake as directed. You can also bake the pie the day before and allow to cool and set up (this is what I recommend so the filling has time to properly set up).You can make this pie up to 2 days ahead of time.
- Storage: Cover and store at room temperature or in the fridge. You can serve cold or at room temperature. You can store leftovers for up to 3 days. Wrap the cooled pie in plastic wrap or tinfoil. You can also store in the fridge for longer – up to 5 days.
- Freezing : Yes you can freeze any pie leftovers for up to 3 months. Wrap well or store in a freezer bag in an airtight container. Thaw at room temperature overnight in the fridge before serving.


Just wondered if you are supposed to thaw the raspberries first before adding the sugar etc.?
Rhonda
Great question, Rhonda! Yes, if using frozen raspberries, you’ll want to thaw and drain them first to remove any excess liquid so the filling isn’t runny. Hope you love the pie!
Thanks for sharing such a delious raspberry pie recipe.
The tips for using a towel to twist dough and folding dough into quarters before transferring to pie dish put fun back into making pie crust for me again. And the butter crust with egg wash and sugar was the best. Pie recieved great reviews from guest visiting 😋
Thank you so much for your kind words—I’m thrilled you loved the pie! 🥧💖 Your excitement about the dough tricks (the towel twist is a game-changer, right?!) and that flaky butter crust made my day. Nothing beats hearing it was a hit with guests too—mission accomplished! Happy baking, and hope you find more joy in pie-baking ahead. 😊
Amazing! This pie recipe is awesome! I didn’t make the pie dough I just bought some pre-made dough. Tip: when mixing the filling try not to crush too many of the raspberries it makes the filling go wet and when you cut the pie it will be very watery and spill out.
Thank you so much! I’m so happy you enjoyed the pie! 😊 And great tip about the raspberries! To help prevent a soggy pie, I also recommend preheating the oven before rolling out the dough and baking in the lower third for an evenly browned crust. Placing the pie plate on a preheated baking sheet can help, too. Happy baking!
Hello, I have not actually tried this myself but I have a farm stand and cottage bakery and this is a hit! I made one and then got 2 more orders. Love that you used a butter pie crust! Thank you!
-Joanna, Tucker Brook Farm Potsdam, NY
Thank you so much, Joanna! I’m so glad to hear the raspberry pie has been a hit at your farm stand. Love that you’re getting orders for it! 😊
Heather- it is Harvest season here in Northern Idaho. My neighbor gave me fresh raspberries and I tried your recipe. I cooked it for 30 minutes at 450, then put foil over the pie to prevent extreme browning and baked for another 30 minutes per your instructions. The center seems liquidy. I’m hoping that after it cools, it will be perfect and I can serve it to the field crew. The Gay Farm Cook (Todd)
Hi Todd, starting at 450°F is quite high; the recipe begins at 400°F and then the heat is reduced. Pies need ample time to set after baking, so it’s best to let them cool completely before cutting. This helps the filling thicken properly. I hope it worked out well for you!
This is the BEST raspberry pie I’ve ever had! I made it over the weekend and my whole family loved it!
aw that’s great Tayler!! I’m so happy loved it!
I haven’t had raspberry pie in forever! It’s raspberry season here, and I’m saving this recipe for when I get to go picking!
I hope you love it 🙂 enjoy raspberry picking!
This is literally the best! Nothing better than a good classic raspberry pie and this did not disappoint! Thank you so much!
thanks Ned! I’m so glad you loved it!!
I’ve never tried raspberry pie but it looks and sounds delicious. I can’t wait to try this one.
thanks Chenee! You’re going to love it 🙂
There’s nothing quite like homemade pie! I love that the filling can be made with just three ingredients. The dollop of vanilla ice cream on top was the perfect addition!
thanks Vicky!