
Food Processor Pie Crust
This Post May Contain Affiliate Links. Please Read Our Disclosure Policy.
This easy food processor pie crust recipe comes together in minutes and creates the best homemade pie crust! Making pie crust in your food processor is a quick, efficient way to make pie crust. Use my tips to make this perfect pie crust in your food processor.

If you asked me years ago if I made my pie crust in the food processor I would have told you hands down, absolutely NOT. And I believed that making pie crust in your food processor didn’t make a good of pie crust like making it in a bowl by hand. But I have seen the light. The food processor is 100% hands down your best friend when making pie crust.
Making your pie crust recipe in a food processor is cuts down on the prep time of making a homemade pie. But for beginners it’s easy to add too much water and overwork your dough leaving you with a tough, chewy pie crust in the end. But I’m going to show all my tips and tricks today so that doesn’t happen to your dough!
I love using this method for any of my pie crust recipes – my single crust pie recipe, all butter pie crust, or my double crust pie recipe. If you follow my tips and tricks for making pie crust using your food processor can 100% result in a just a good of pie dough than if you made it by hand. No one will know the difference trust me. And you’ve saved yourself a ton of time and effort making food processor pie crust.
Bake Pies With Confidence!
If you’ve ever struggled with shrinking crusts, runny fillings, or pies that just didn’t wow—you’re not alone. But here’s the good news: you can bake pies that look beautiful, slice cleanly, and taste bakery-worthy… without the stress. Inside my Pie Perfection eBook, you’ll learn how to:
- Master buttery, flaky crusts (no soggy bottoms here!)
- Choose the right thickeners for fruit fillings that hold
- Avoid common pie mistakes with my step-by-step guides
- Bake seasonal favorites all year long—from classic apple to no-bake summer pies
Table of contents
Does a food processor make pastry?
Yes! And wonderfully so, in much less time than making pie crust by hand. Food processor pie crust is quick, and easy and makes a wonderfully flaky pie crust.
But you do have to be careful as this powerful appliance can also overwork your dough if you’re not careful. Don’t worry I’ll show you how to not to do that, so you end up with flaky pie crust in the end.
Is it better to make pie crust in your food processor or by hand?
You can make your pie crust by hand, or in your food processor. Whether it’s food processor pie crust or pie crust made by hand using a pastry cutter, both do a great job of making homemade pie crust.
I used to be very anti-food processor for my pie dough. Why? Did I think I was going against all grandmas everywhere? Sure there’s a risk of overworking your dough making food processor pie crust. But if you use the pulse feature you should be all set and get a perfectly flaky pie crust.
If you’re really nervous about overworking your dough in the food processor, then you can always transfer the flour mixture to a mixing bowl and stir your water in with a rubber spatula. But I love using my food processor for how fast it comes together.
Is pie crust better with butter or Crisco?
For a flavorful flaky crust, I recommend using all butter, but you can also use a combination of butter and shortening. I do not like using all vegetable shortening (aka Crisco) because it doesn’t have any flavor compared to using butter.
Using shortening, however, has it benefits. It contains no water so it can create a tender crust. Because of it’s higher melting point, it tends to hold its shape better which makes its easier to work with making a lattice pie crust, or any fun, pretty pie crust designs. The edges and designs will keep their shape while baking. It’s also perfect if you need to make a vegan pie crust for someone since it’s made from vegetable oil. But shortening has zero flavor.
Butter, on the other hand, brings all the flavor. I mean butter makes it all better doesn’t it? Butter contains water, which can result in the water turning to steam. That steam will push apart the flour layers, puffing up your crust and creating one lovely flaky crust. A nice light texture can be achieved with all butter. Butter is 80-85% fat, and 15-20% water. Whereas, shortening is 100% fat.
However, butter has a lower melting point than shortening or lard, and therefore can be tougher to work with. So if it gets too warm, it can become too soft to work with and tear easily. If you do choose butter, just make sure to chill your dough if it looks like it’s becoming soft and tearing.
Ingredients Needed
All Purpose Flour – I use all-purpose flour for a tender, flaky pie crust. I find cake flour makes too tender of a crust, and bread flour is too chewy.
Salt – I love and bake with fine sea salt as opposed to kosher salt because it has a finer texture. And I prefer sea salt over table salt because it has better, pure salt taste, and mixes in easily. But that being said, either kosher salt or table salt will work. Kosher salt you may want to mix in a little more because it’s larger in granules, and use a little less table salt because it’s finer in texture.
Granulated Sugar – This is an optional ingredient. You are only adding one tablespoon of granulated sugar. This doesn’t sweeten the crust but helps with browning and tenderizing the crust. You can always leave it out and the pie crust is still fantastic.
Unsalted Butter and/or shortening – You can use all butter or half butter and shortening for your food processor pie crust recipe. I bake and use unsalted butter, so I can control the salt, but if you use salted butter than simply reduce or omit the extra salt. You need to make sure your butter is COLD before using it so it doesn’t melt into your pie dough and helps create flaky layers. I cube up my cold butter, and then pop it into the freezer for about 15 minutes before I start.
Water – You need ICE water to make a flaky pie crust. I like to place a few ice cubes in measuring cup with the water, and then I’ll measure out the ice water a tablespoon at a time.

How Do You Make Pie Crust In The Food Processor?
Combine the all purpose flour, salt, and sugar (if adding) into the bowl of a food processor. Pulse a few times to combine it.
Scatter the cold, cubed butter over the flour mixture.
Give it a few quick pulses until most of the butter pieces are pea-sized.
Add your ice water a tablespoon at a time, pulsing in between. You can if you want transfer the dough mixture and stir the water in using a rubber spatula, but I prefer to make it all in my food processor.Most pie crust recipes call for a varying amount of cold water, and this is due to how well the fat was cut in. So it always vary. I start with the minimum called for.
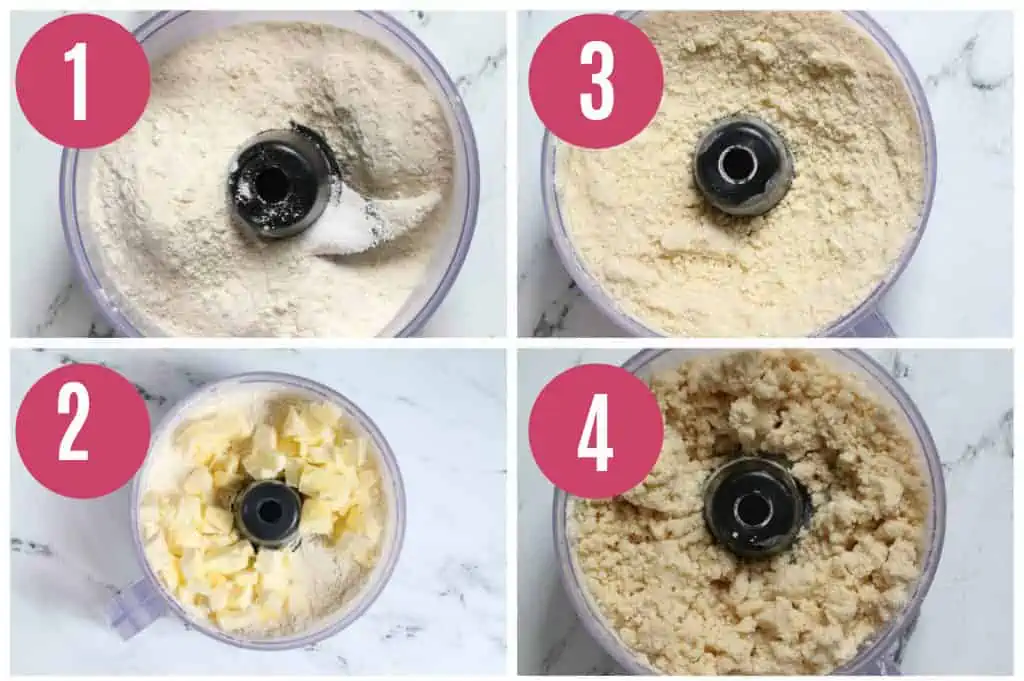
I like to give it a “pinch test” to see if it holds together at this point. If it doesn’t, then I add another tablespoon of cold water and repeat. It will still be crumbly at this point and we will bring the dough into a ball in a second, but you shouldn’t see any large pockets of the flour mixture not mixed in.

5. Dump the contents of the dough onto either plastic wrap or a clean towel. I like to dump onto a clean towel and then twist up into a “beggar’s purse” and it form a ball of dough. If it’s a double crust, divide the dough in half and wrap up two pieces.

6. The dough should come together at this point. If it doesn’t hold together you can also sprinkle on a little extra water (a spray bottle works great) and work in the extra water this way. Wrap and chill the pie dough. Refrigerate for at least 1 hour, or up to 2 days.

Heather’s Baking Tips
Cold ingredients is key. Ice cold butter, ice cold shortening, cold ice water. The reason? Cold keeps the fat (aka the butter) from melting and becoming absorbed into the dough. The butter needs to remain solid, and coated in flour. In the oven, the butter then will melt and the water in the butter will turn to steam pushing apart the layers of flour creating those flaky layers.
Chill Your Dough. Your dough needs to chill before you roll it out to help firm up the butter. It also gives a chance for the gluten in the dough to relax so it’s easier to roll out. And if you find as you are rolling out your dough, that the dough is getting sticky and springing back on you, chill your dough in the refrigerator again for 15 minutes.
- Do Not Overwork Your Dough. Once you start adding the water to the food processor pie crust, you want to add a little at a time and use the pulse feature to combine so you don’t add too much water. And you want to just pulse it until it forms a crumbly mixture. Pinch the dough with your fingers and see if it holds together, so as not to add too much water. Then stop using the food processor. If you continue to pulse you will overwork your dough causing too much gluten to form and making for a tough, chewy pie crust in the end.
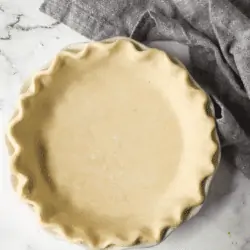
How To Roll And Crimp Your Pie Dough
Once your pie dough is chilled, you can roll out your dough. To properly roll your dough and place into your pie plate I recommend using a pastry mat. I love the non-stick surface and the measurements so I can ensure I’ve rolled enough.
Sprinkle your surface with a bit of flour. You just want to slightly flour your surface so you don’t incorporate too much extra flour into your dough.
Roll out your dough onto your lightly floured work surface. If your dough is sticking you can always pop it back into the fridge. If your dough is breaking, it may be too dry. Add a few sprinkles of water to the dough.
To see if your dough has been rolled out large enough, turn your pie plate upside down. The pie dough should be larger than your pie plate.
Using your rolling pin, roll your pie dough over the pin so it’s completely rolled around your rolling pin.
With your pie dough rolled around the pin, transfer dough to the pie pan.
Trim the overhang with a pair of kitchen shears, leaving about a 1 -inch overhang.
For a single crust: Fold the extra pie dough under creating an edge. For a double crust, repeat steps 1-6 and fold both top and bottom dough under to create an edge.
Crimp the edges. For 4 easy ways to crimp and decorate your pie crust, read this post.
At this point, I like to pop my crust into the fridge to firm up the crust and butter. I do this for 30 minutes. At this point you can fill with parchment paper and blind your pie crust or proceed with the rest of your pie recipe.

Pie Crust Troubleshooting
Soggy Bottom – This could be from baking your pie crust too high up in the oven. I always recommend baking your pies in the lower third of the oven. Also use a glass pie plate so you can see the bottom. I find if I use a ceramic dish I end up with a soggier pie crust.
Pie crust is crumbly. Your food processor pie crust is too dry. You need to add a little more water. A spray bottle works best for this.
Pie crust breaks when transferring to your pie plate – Transfer the food processor pie crust carefully by rolling the crust over your rolling pin, or folding into quarters first. The good thing is you can usually patch it back together with some scraps or press it back together
Pie crust shrinks when it bakes. The food processor pie crust may have been too warm. I like to chill my pie crust at 3 stages – after mixing together, after it’s shaped into the pie plate, and once more when it’s completely assembled to make sure the crust is perfectly cold before baking. If it shrinks during blind baking, it could be because you didn’t fill up the pie plate enough with your pie weights or dried beans.
Pie crust is pale (under baked). Throw it back in the oven for longer! Make sure to brush the crust with an egg wash to help with browning. Just mix an egg with 1 tablespoon of water and then brush on before baking.
Pie crust is tough. You probably overworked your dough. Or added too much water. Unfortunately there’s no real fixing it at this point. Just add some extra ice-cream or scoop of whipped cream on top. Pie crust takes practice!
Recipe FAQs
I use the standard metal blade that comes with my food processor and my dough turns out great. If your food processor comes wit a dough blade, you can also try using that.
Yes a standard 8 cup food processor will be large enough to make a typical double crust pie.
You can make pie crust the day before and refrigerate it for up to 2 days. When you go to use it, if it’s been refrigerated for a day or longer you may need to let it sit at room temperature for several minutes to make it easy to roll out.
We need to refrigerate the pie dough after making it to relax the gluten strands. This will help make the pie crust tender and also easier to roll out. It will also help to cut down on any shrinking during the baking process because it will chill the butter again making for a flakier pie crust.
You can make pie crust the day before and refrigerate it for up to 2 days. When you go to use it, if it’s been refrigerated for a day or longer you may need to let it sit at room temperature for several minute to make it easy to roll out.
You can also freeze your discs of pie dough for up to 3 months. Let them thaw overnight in the refrigerator before rolling out and using.
Pie Recipes And Pie Baking Tutorials To Check Out
Ready To Bake Pies With Confidence?
Imagine making a homemade pie from scratch that everyone raves about! Grab my Pie Perfection eBook and learn how to master flaky crusts, flavorful fillings, and picture-perfect pies—no stress, just sweet success.
👉 Get The Ebook Here!
Food Processor Pie Crust
Equipment
Ingredients
- 2 ½ cups (300 g) all purpose flour *spooned and leveled
- 1 Tablespoon granulated sugar *optional
- 1 teaspoon salt
- 1 cup (2 sticks, 226 g) unsalted butter cold and cut into cubes
- 6-8 Tablespoons water *ice cold
Instructions
- Process flour, sugar, and salt together in food processor until combined, about 5 seconds. 2 ½ cups (300 g) all purpose flour 1 Tablespoon granulated sugar 1 teaspoon salt
- Scatter butter over top and process until mixture resembles coarse cornmeal, about 10 pulses. Butter pieces should be about "pea-sized". 1 cup (2 sticks, 226 g) unsalted butter
- Sprinkle 6 tablespoons of the ice water over the mixture. Pulse to combine. I like to pinch a piece of the mixture together at this point to see if it holds together, if it's still dry and crumbly side then add in remaining ice water 1 tablespoon at a time, pulsing to combine. 6-8 Tablespoons water
- Dump the pie dough mixture out onto a clean towel (or you can do this onto a large piece of plastic wrap) and bring up the ends of the towel into a "beggar's purse" and twist the towel.
- Divide dough into 2 even pieces. Wrap each portion of pie crust up in plastic wrap and flatten each into a 4-inch disk. Refrigerate for 1 hour.
- Before rolling the dough out, let it sit on the counter to soften slightly, about 10 minutes. (If you are getting a jump on the holidays, you can refrigerate it for up to two days or freeze it for up to a month). If frozen, let the dough thaw overnight in the fridge and roll out the next day.


10/10 best way to make a pie crust from scratch, especially for beginners!
That makes me so happy to hear! I totally agree—it really takes the intimidation out of pie crust. So glad you loved it! 😊
My dough was way too dry. Okay, so I get it, add more. But this recipe has so many words in it & I don’t see the temperature to cook the crusts or how long. I’m sure it’s in there somewhere but I don’t have the patience for it. Please put that in the recipe itself.
Hi Deb, if your dough is too dry then yes you will need to add more water – sorry I can’t give an exact amount as it will vary as you will cut the butter in differently than then next person. I’m sorry you found the recipe was too wordy but I find the most people have difficulty with making pie dough so I tried to be helpful as possible. And this is just the recipe for the crust – you would then go ahead and use it in your pie recipe (so no temperature for cooking the pie crust would be given as each pie recipe would be different).
I made this pie but that recipe was for mixing in a stand mixer. Don’t have one but I do have a pastry cutter and off I went. When it came time to add the water. I had 2 cups of water in ice. It said cold, it was cold. I put in 7 tablespoons and it was dry as a desert. I added another 7 tablespoons one tablespoon at a time. Still dry. I added more water to the ice and then drained the ice. I didn’t measure because I knew I had a long way to go. I added a cup of more of water and it was finally dough that I could manage. It tasted great but I don’t know why it took so much water. This is the 3rd recipe with the same ingredients but I do have a food processor and I am going to try it but I can’t imagine it’s going to help my water problem. In the end… the crust tasted delicious.
Hi Mugsy, the amount of water can vary based on how much the fat (butter, shortening or lard) was worked in. And it’s easy to over add water. I always measure out a little more water than called for and add the ice cubes. Then measure out the water one tablespoon at a time (not adding the ice). Many times the dough will look like it needs more water but doesn’t. I recommend the squeeze test – simply grab some of the dough and give it a squeeze to see if it holds together. If it’s still dry and crumbly then continue to add a little water at a time and testing. Hope that helps!
I worked the butter in for a long time with my pastry cutter. I usually just wind up going in hands first but decided to try the pastry cutter and I used the pastry cutter at least 4 times as long as I use my fingers. The dough was dry as a bone after adding water. I could pull up handfuls of flour but there was absolutely no resemblance to dough but even with all that water the crust was great.
Hi Mugsy – I do find that when making by hand I do need to add more water than if using a food processor because I just can’t work it as much. But glad the crust was still great!!
Hi, I like the look of this recipe and am going to try it – thank you for knowing 120g is a cup of flour! I see this wrong in too many places. Can we substitute cold, cubed vegetable shortening 1:1 for the butter?
Hi Rolf! You’re so welcome 🙂 and yes you definitely can replace shortening 1:1 for butter. Enjoy!
What temperature and how long to bake
Food processor pie crust?
Hi Pam, that will depend on the pie recipe you use the crust for. Once the crust is made go ahead and use it for your favorite pie!