
Apple Pie Recipe
This Post May Contain Affiliate Links. Please Read Our Disclosure Policy.
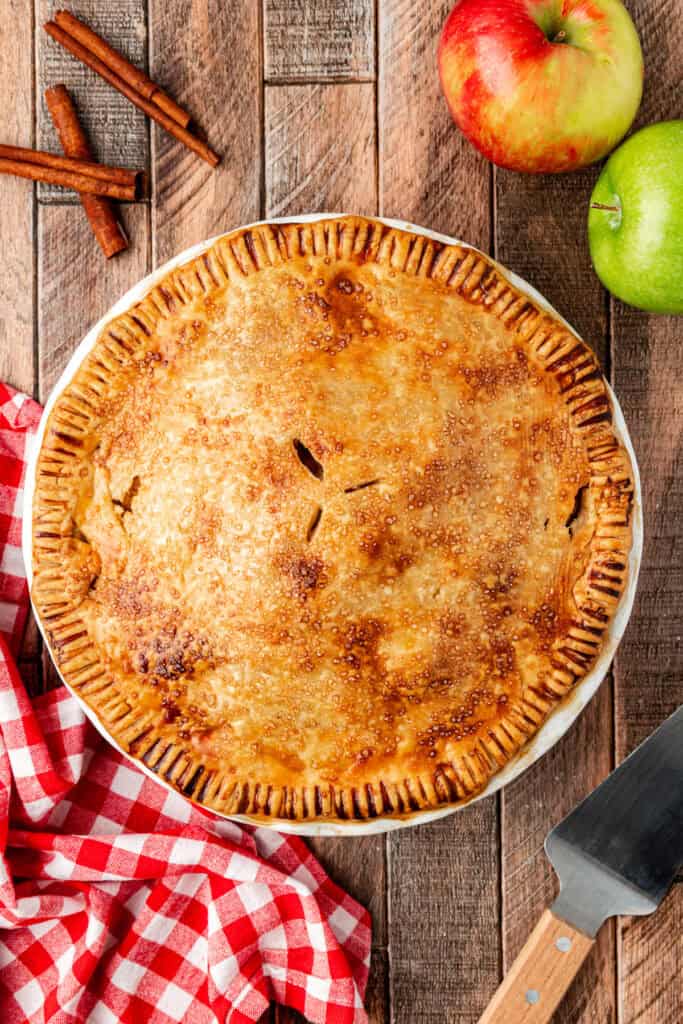
This is the best apple pie recipe will be the star of your Thanksgiving table. Perfect apple taste, texture, crust flaky, buttery and baked perfectly. If you’re looking for an old fashioned apple pie recipe like Grandmas used to make that is foolproof then try this recipe.

When Fall hits I just can’t help baking up all the delicious apple recipes – from Puff Pastry Apple Turnovers, Salted Caramel Apple Bars, Apple Crisp (With Oat Topping), or my Apple Cranberry Crisp. And of course, a classic apple pie!
Like my apple hand pies , mini apple pies made in a muffin tin and my Dutch apple pie with streusel topping. But today we’re making a classic apple pie.
I totally get it if making an old fashioned apple pie from scratch has you running scared. I was intimidated at first with making pies from scratch. But honestly it doesn’t have to be.
Love baking pies? Learn which pies to refrigerate, how to use pie birds, and how to blind bake a crust for the perfect pie every time!
This easy apple pie recipe with a perfect flaky pie crust is my go to apple pie recipe every Thanksgiving. It’s a classic apple pie, like the kind I grew up on. Except with homemade pie crust (sorry Mom!) but no boxed pie crusts for me.
It’s an old fashioned apple pie – meaning its a double-crust pie, with cinnamon-spiced apples. Pie perfection if you ask me. Now who brought the vanilla ice cream, because we’re gonna want it!
Bake Pies With Confidence!
If you’ve ever struggled with shrinking crusts, runny fillings, or pies that just didn’t wow—you’re not alone. But here’s the good news: you can bake pies that look beautiful, slice cleanly, and taste bakery-worthy… without the stress. Inside my Pie Perfection eBook, you’ll learn how to:
- Master buttery, flaky crusts (no soggy bottoms here!)
- Choose the right thickeners for fruit fillings that hold
- Avoid common pie mistakes with my step-by-step guides
- Bake seasonal favorites all year long—from classic apple to no-bake summer pies
Ingredients Needed
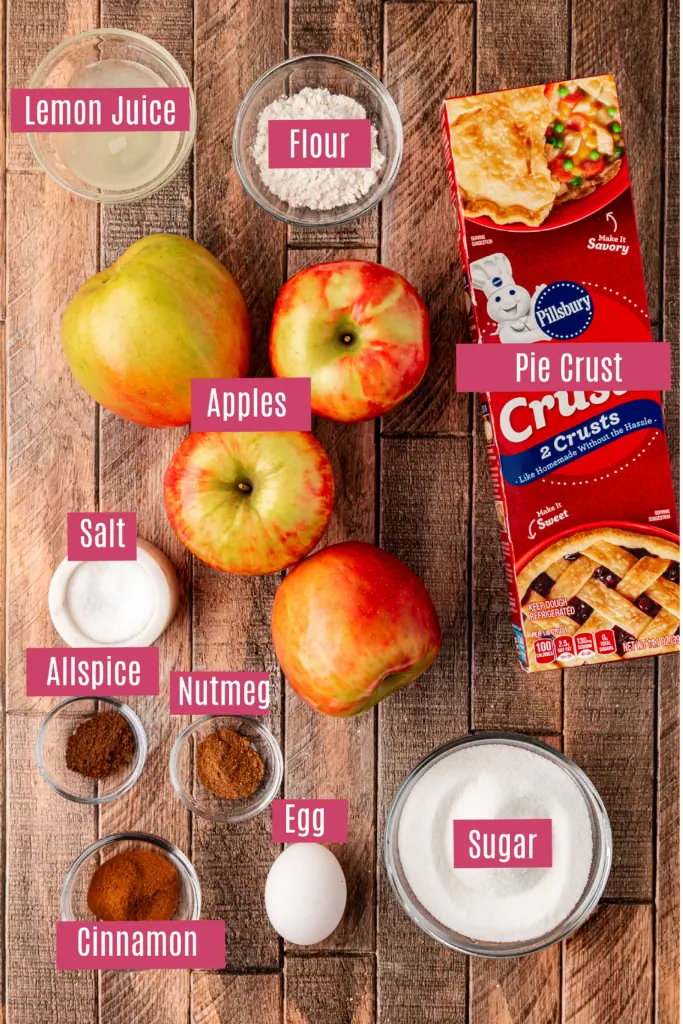
- Pie crust – You will need 2 crusts for this pie. You can use a store-bought or a homemade double pie crust recipe. Or even a gluten-free pie crust .
- Salt
- All-Purpose Flour
- Apples – I love using Granny Smith apples or Honeycrisp apples. I also love mixing in some Cortland apples (a softer, sweeter apple for a bit of contrast). You want to peel core and slice your apples for this homemade apple pie recipe. An apple peeler will cut down on the time to peel, core and slice the apples.
- Lemon Juice – Lemon juice will help keep the apples from browning . Fresh lemon juice or bottled lemon juice will work just fine.
- Spices – I use cinnamon, nutmeg, and allspice in my old fashioned apple pie recipe to give that true apple pie flavor! But you could also use apple pie spice.
- Sugar
How To Make Apple Pie
Make your pie crust
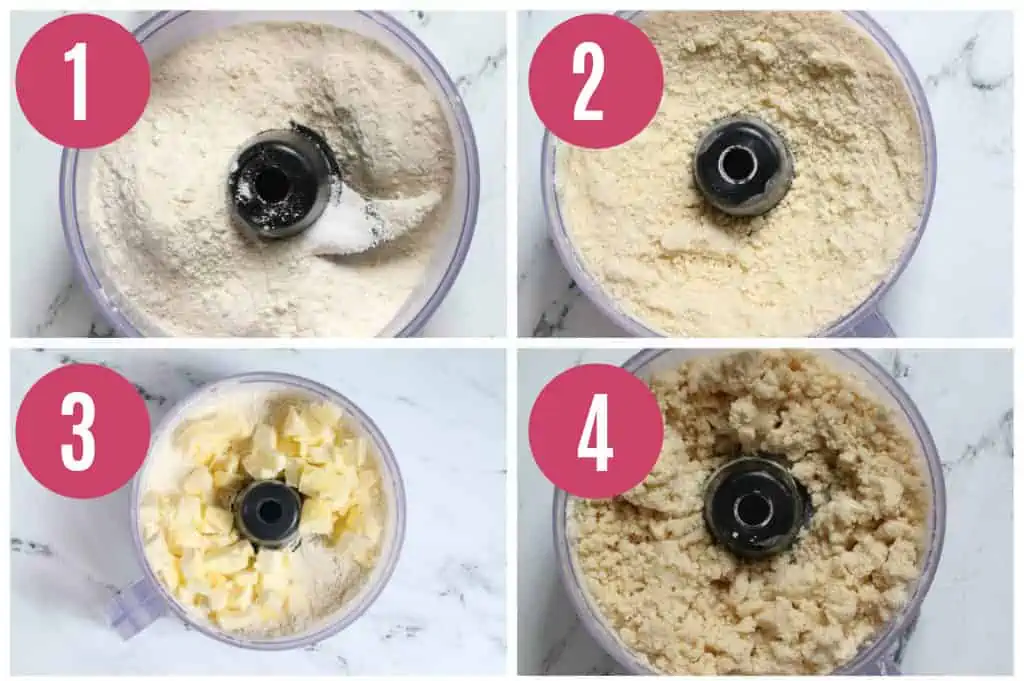
You can make your double pie crust by hand using a pastry blender, or in a food processor. I used to make it all the time by hand, but have started opting for my food processor to make my pie crust because it’s just so quick and easy.
- Combine the flour and salt. In a food processor combine the flour and salt and pulse to combine.
- Add the butter. Scatter the butter over the top. You want to make sure it’s cubed and COLD.
- Pulse. Pulse until the butter and fat are pea-sized.
- Add cold water. Sprinkle in the cold water with the food processor running and stop until the mixture comes together and is crumbly.
Chill Your Pie Crust
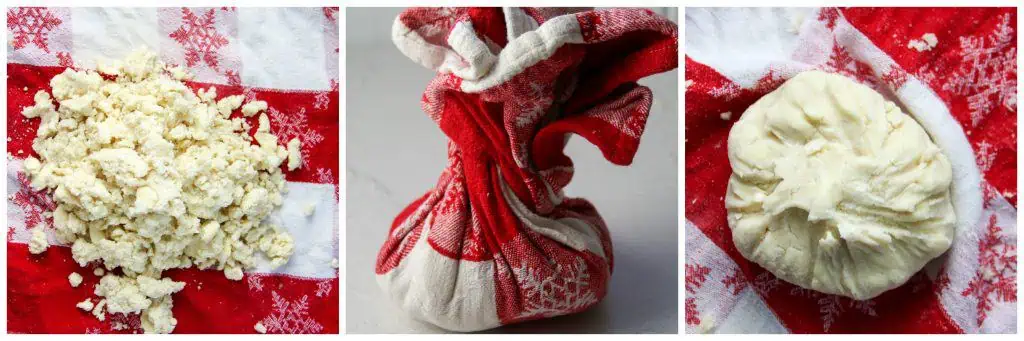
If your pie crust has enough water added, you should be able to squeeze the pie crust with your fingers and it should hold together. If it’s still dry and crumbly, add a little bit more water.
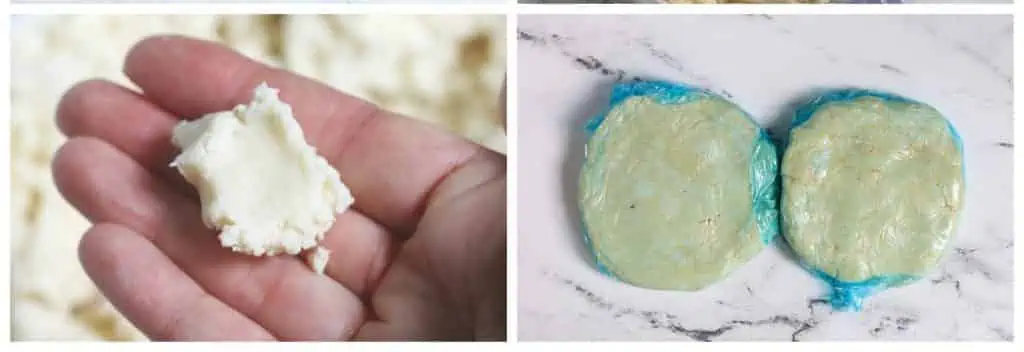
You want to then dump the contents onto plastic wrap and press together into a cohesive round ball of dough. Divide dough in half and wrap up into a disc and refrigerate for at least 30 minutes.
This step is crucial! Your pie crust needs to be COLD before you start. You want to keep that butter solid as long as possible. I chill mine for 30 minutes (up to 1 hour).
My New Pie Trick
Dump the pie crust into a clean dishtowel. Bring up the edges of the towel and twist it like a little purse. This will squeeze the dough together inside into a perfect round disc of dough. Divide the dough in half and wrap in plastic wrap.
If it’s been in the fridge longer, then you may need to let it sit for a few minutes at room temperature to let it soften slightly so you can roll it out.
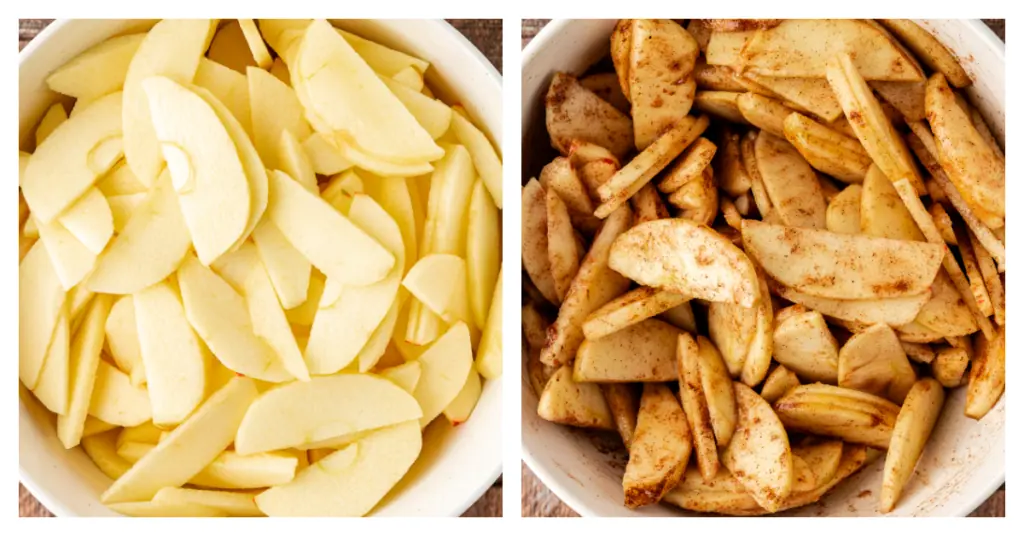
Make apple filling. Peel, core and cut apples in half, and in half again width-wise; cut quarters into 1/4-inch slices and toss with lemon juice.
Combine the sliced apples with granulated sugar, all-purpose flour, salt, cinnamon, nutmeg, and allspice. Toss dry ingredients with the sliced apples until apples are evenly coated.
Assemble Pie Crust
Roll out pie crust and place in pie pan. Using a lightly floured surface and rolling pin, roll out the pie crust to a 12″ circle.
Fold the pie crust in quarters or roll it over your rolling pin.
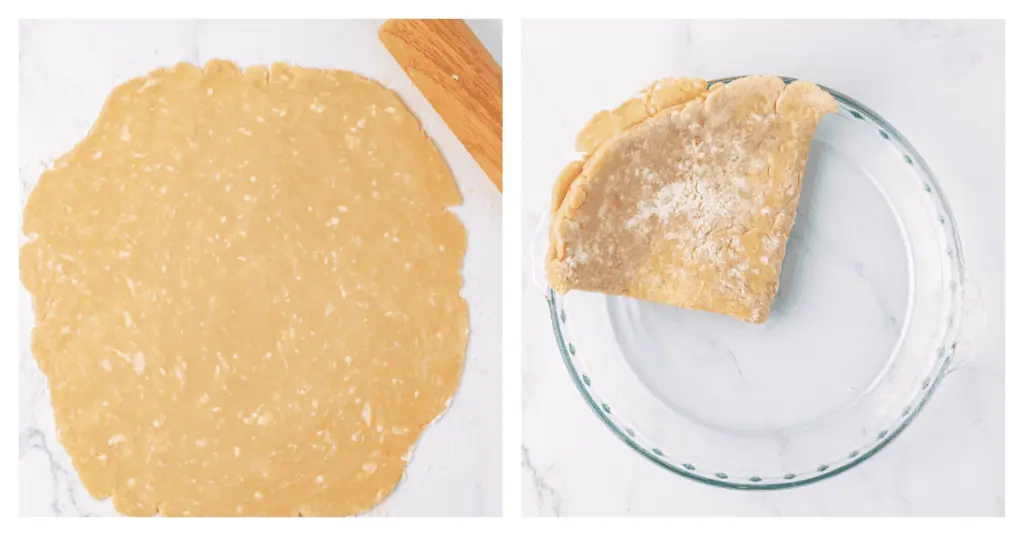
Unfold (or unroll) the pie crust into your 9 inch pie plate and tuck into the bottom. I like to use either a metal plate (for a nice, browned crust) or a glass pie plate so I can see the bottom of the crust.

Heather’s Baking Tip
If when you go to roll out the dough it’s dry and crumbly. Your crust needs more water. I like to use a spray bottle to lightly spritz the crust and gently work the extra water in this way.
Bake the apple pie:
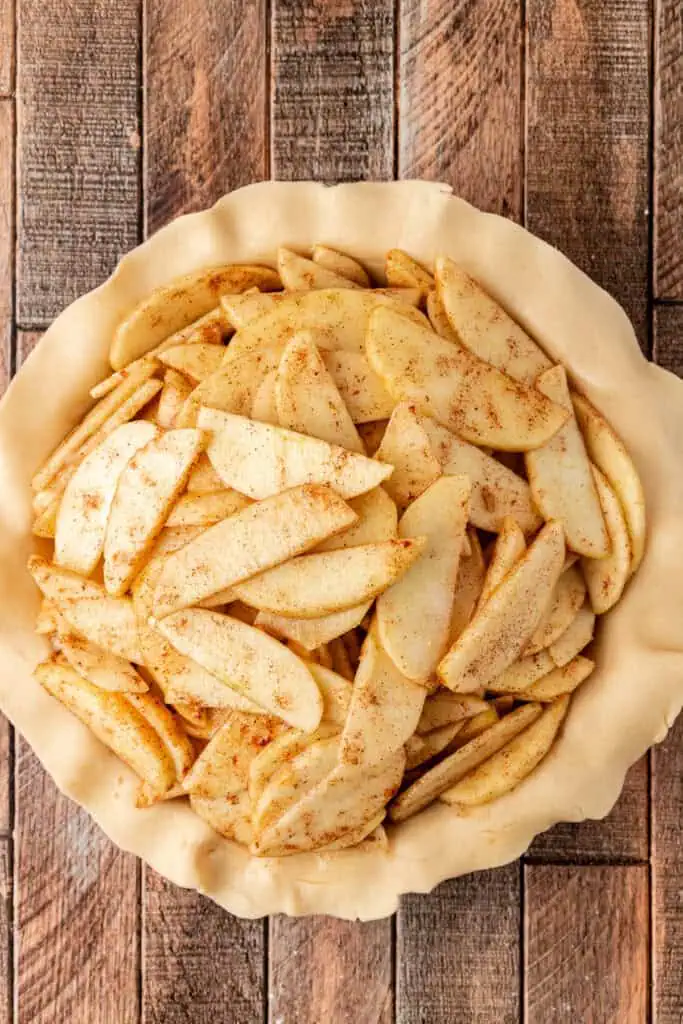
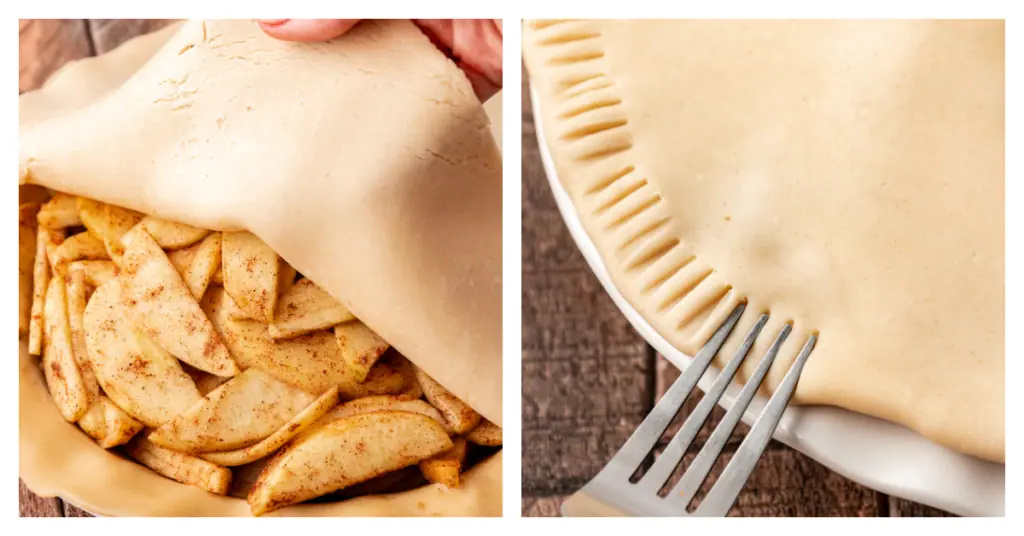
Add apple pie filling to crust. Turn your sliced apple pie fruit mixture, discarding juices, into chilled pie shell and mound slightly in center.
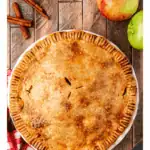
Roll out top pie crust. Roll out the second portion of pie dough and place on top, crimping the edges under or use a fork to press to seal.
Make sure to cut a few slits in the top of the crust to steam vent the filling as it bakes. You can roll it out and keep it simple or make a How To Make A Lattice Pie Crust. Optional step: I then chill the pie for 30 minutes before I bake it.
Before baking, I brush the top of the pie crust with an egg wash and sprinkle on some raw sugar (turbinado sugar).
Don’t Want To Crimp?
Crimping can be a bit more difficult for beginner bakers, so if you’re new to baking pies and not ready to tackle the crimping for this old fashioned apple pie, you can decorate your pie crust edges in lots of easier ways. The easiest way it to press the crust edge down with a fork to make crimped edge. Or try one of these other fun ways to decorate your pie crust edge.
Bake the pie. Bake the pie in the lower third of your oven. This ensure a crispy bottom crush, so the bottom crust gets baked and doesn’t end up soggy.
Bake on a baking sheet. Place a rimmed baking sheet under your pie lined with aluminum foil to catch any juices from your apple pie if they bubble over.
Before baking First cook the pie at 425oF for about 25 minutes to make the top crust nice and golden. Then lower the heat to 375oF and cook the pie for an additional 30-35 minutes until the juices are bubbling underneath.
Use a pie shield to protect the pie edges. Or you can use aluminum foil as well to help protect the edges of the pie crust, or top of the pie if it’s browning too much. Remove in the last 10-15 minutes so they can brown.
I think it’s always best to make your pie the day before to allow it to cool and set up properly! Make your old fashioned apple pie the day before to allow it to cool and set up. Once cool, wrap well, and store at room temperature ready to be served the next day!

How To Tell When The Pie Is Done?
Your apple pie has baked long enough when the top crust is golden brown and the juices are bubbling underneath (check this through the steam vent slits cut on top and sometimes the sides). If you’re using a glass pie plate, you can also tell if the bottom crust is also browned underneath (make sure you’re baking on the lower third of your oven to help with browning the bottom crust for this reason.)
Serving Suggestions
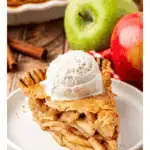
Once the pie is baked it’s time to serve up a slice of pie and enjoy! I love serving it with a scoop of vanilla ice cream. You can also serve with a scoop of homemade whipped cream.
And for even more indulgence try serving with a drizzle of caramel sauce!

Storage Instructions
You can keep this old fashioned apple pie, covered at room temperature for up to 3 days or in the refrigerator for up to a week.
If you want to get a jumpstart on your holiday baking, then freezing your homemade apple pie is your best bet. After you assemble your apple pie, you want to freeze the pie uncovered until it’s frozen. It’s best to freeze in a metal or ceramic pie plate. A glass pie plate may break going from freezer to oven.
Once frozen, wrap in 3 layers of plastic wrap and then in a final layer of tin-foil. Be sure to label the pie with what it is, date frozen, and baking instructions. When you are ready to bake, you do not need to thaw it. Un-wrap the pie and bake straight from the freezer according to the instructions (as long as it’s NOT glass!). You may need to add a few additional minutes of baking time at the end for the pie to bake through completely.
Note: If using a glass pie plate, then thaw the pie overnight in the freezer, otherwise the glass could explode in the oven, if you go from freezer to oven.

More Popular Thanksgiving Recipes To Try
When it comes to Thanksgiving I can’t just make one dessert! Are you the same? Tell me I’m not alone. So here are some of my favorite Thanksgiving desserts to try.
Of course you can’t beat making a Dutch apple pie, deep dish apple pie or easy eggless pumpkin pie. But if you don’t want to serve pie try my pumpkin bundt cake!
Of course I can’t skip making my favorite no knead dinner rolls to serve with dinner! But if yeast has you intimidated you can always make my easy butternut squash bread or my 3 ingredient biscuits to serve.
For more Thanksgiving inspiration, check out 28 Thanksgiving Recipes To Try!
Ready To Bake Pies With Confidence?
Imagine making a homemade pie from scratch that everyone raves about! Grab my Pie Perfection eBook and learn how to master flaky crusts, flavorful fillings, and picture-perfect pies—no stress, just sweet success.
👉 Get The Ebook Here!

Homemade Apple Pie Recipe
Ingredients
- 1 double crust recipe *store-bought or homemade
- 3-4 pounds apples (about 8 large), peeled, cored, and sliced (see note)
- 1 tablespoon lemon juice
- ¾ cup (150 g) granulated sugar plus additional sugar for sprinkling on top of crust
- 2 tablespoons all-purpose flour
- ¼ teaspoon salt
- 2 teaspoons ground cinnamon
- ½ teaspoon ground nutmeg
- ½ teaspoon ground allspice
- 1 egg beaten lightly with 1 tablespoon water (egg wash)
Instructions
- Prepare pie dough. Make the pie dough and refrigerate for at least one hour.
- Make apple filling. While the pie dough is chilling, make the filling. In a large bowl, stir together apples, and lemon juice together. Stir in sugar, flour, salt and spices until evenly coated. 3-4 pounds apples 1 tablespoon lemon juice ¾ cup (150 g) granulated sugar 2 tablespoons all-purpose flour ¼ teaspoon salt 2 teaspoons ground cinnamon ½ teaspoon ground nutmeg ½ teaspoon ground allspice
- Roll out pie dough. Remove one portion of dough from refrigerator (if refrigerated longer than 1 hour, let stand at room temperature for 10-15 minutes in order to roll it out easily.). Roll out dough on lightly floured surface to a 12-inch circle (about 1/8-inch thickness). Transfer dough to a 9-inch pie plate. I like to do this by folding the curst into quarters, or rolling over a rolling pin and then rolling out over into the pie plate. Leave excess dough that overhangs the pie plate for now and refrigerate while you prepare the apple filling. 1 double crust recipe
- Add apple filling. Spread apple mixture into prepared pie crust. (discarding juices). Mound slightly in the center.
- Finish assembling dough. Roll out second piece of dough to 12-inch circle and place over apple filling. Fold top crust under the bottom crust. Flute edges or crimp with a fork. Cut 3-4 slits into the top pie crust with a sharp knife to steam the apple filling while it bakes. Optional step: Refrigerate pie again for 30 minutes to help firm up the crust. Nearing the end of the 30 minutes, preheat oven.
- Preheat oven. Adjust oven rack to lowest position and preheat the oven to 425°F. Line a baking sheet with aluminum foil (to catch any drips), and place a baking sheet into the oven on the lowest rack to heat. Remove pie from the refrigerator and brush the pie crust with egg wash and sprinkle on additional sugar. 1 egg
- Bake pie. Bake until top crust is golden, about 25 minutes. Reduce oven temperature to 375°F; continue baking until filling is bubbling and crust is deep golden brown, 30-35 minutes longer. If the pie crust edges is getting too browned, cover with aluminum foil or a pie shield. Transfer pie to wire rack; cool to room temperature, at least 4 hours before serving.
Video
Notes
- Storage: You can make this apple pie the day before, covered at room temperature and serve the next day. Or you can make and store the fridge for up to 3 days in the refrigerator. Any longer and I freeze slices for up to 3 months.
- Freezing a whole assembled pie: If you want to get a jumpstart on your holiday baking, then freezing your pie is your best bet. After you assemble your pie, you want to freeze the pie uncovered until it’s frozen. It’s best to freeze in a metal or ceramic pie plate. A glass pie plate may break going from freezer to oven. One frozen, wrap in 3 layers of plastic wrap and then in a final layer of tin-foil. Be sure to label the pie with what it is, date frozen, and baking instructions. When you are ready to bake, you do not need to thaw it. Un-wrap the pie and bake straight from the freezer according to the instructions (unless it’s a glass pie plate which could shatter – thaw overnight in the fridge if so before baking). You may need to add a few additional minutes of baking time at the end for the pie to bake through completely.
- Freezing leftover pie: You can also freeze leftover slices for up to 3 months. Wrap well and place in an plastic bag or airtight container. Thaw overnight in the refrigerator, and then serve (you can always warm back up in the oven or microwave before serving, which is what I recommend!)
- Pie Crust: You can use a store-bought pie crust, or make your own homemade double pie crust, or you could also use my all butter pie crust recipe as well.
- Apples: I like to use a combination of two different apples – Granny Smith and then a sweeter apple like Cortland, Honeycrisp, or Golden Delicious all have worked wonders. You can also just use 100% of one kind of apple – Granny Smith, Honeycrisp or Golden Delicious are all great options if only using one kind of apple. I don’t recommend MacIntosh (get too mushy), or Red Delicious (lacks flavor). JonaGold, Gala, or Pink Lady are also great options.
- Adapted from Cook’s Illustrated


Apple pie is a warm, comforting dessert with a perfect balance of sweetness and spice
Now this is an old fashioned apple pie and we love it!! All the right ingredients and the best tasting!!
aw thank you Dale!
It will be a first for me.
1. Is the Food Process blade the regular metal cutting blade?
2. Is the pie juicy or juicy-ish?
3. What changes will the pie have if I just the bottom crust, besides less crust?
I’m a very detailed cook and hope soon to be baker too. I loved that you were so detailed.
Thank you.
Hi Natalie! to answer your questions: 1. Yes the metal blade. 2. the juicy level will depend on the apples you use. 3. Not sure if there was a typo here? Not quite sure what you means?
When making a two crust apple pie how do I avoid soggy bottom? Help!!!
Hi Bonnie! Soggy bottoms are the worst aren’t they?! Make sure you bake your pie in the lower third of your oven so the bottom gets darker. I recommend using a glass pie plate, I always find ceramic pie plates never get as crispy and I can see through the bottom. Cast Iron or metal is always a good option too. You could also pre-bake the bottom crust before you start I’ve seen some apple pie recipes do this as well. You could also cook down your pie filling first which helps take out some of the moisture – I do this with my deep dish apple pie. You can also read my 9 Tips to prevent a soggy pie crust. Hope that helps 🙂
I JUST decided to include apple pie on our Thanksgiving menu this year, thanks for the recipe!
perfect timing!
This is just a yummy apple pie recipe with a beautifully flaky crust!! Loved it!
Thanks for your sweet feedback, Keri! 😀
Such a classic dessert. Perfect with a big spoonful of vanilla ice cream.
in the ‘a la mode’ mode
This apple pie turned out perfectly! Love the flaky crust!
excellent news!
Thanks for the ease of this! Don’t like difficult desserts, was fun to make with my kids too! Loved it.
great to hear! so fun
We loved this recipe!! It turned out sooooo yummy and I have never had such a successful and delicious flaky pie crust. Amazing!! Thank you!
Oh I’m so glad to hear it Alicia!!
Apple pie is always such a classic. You can never go wrong making this dessert. Sure to be loved by all!!
Thanks Gloria! It’s always the first one to be gobbled up on Thanksgiving…ok yes that pun was intended 🙂
Beautiful apple pie! I love the the top crust and the ingredients.
Thanks!! And it freezes well too..so one less thing I need to make for Thanksgiving!
Such a lovely pie and one of the ultimate classics to have!
Thanks!! I agree it’s not Thanksgiving unless there is an apple pie!
I love simply made pies. Apple pie with a scoop of ice cream is all I need.
I’m so the same way! Nothing wrong with a classic 🙂
Love me some classic apple pie during this time of the year and this looks like a winner! What a beautiful lattice too 🙂
Thanks Tiffany!!! I feel the same this time of year I need a classic apple pie..happy thanksgiving!