This Post May Contain Affiliate Links. Please Read Our Disclosure Policy.
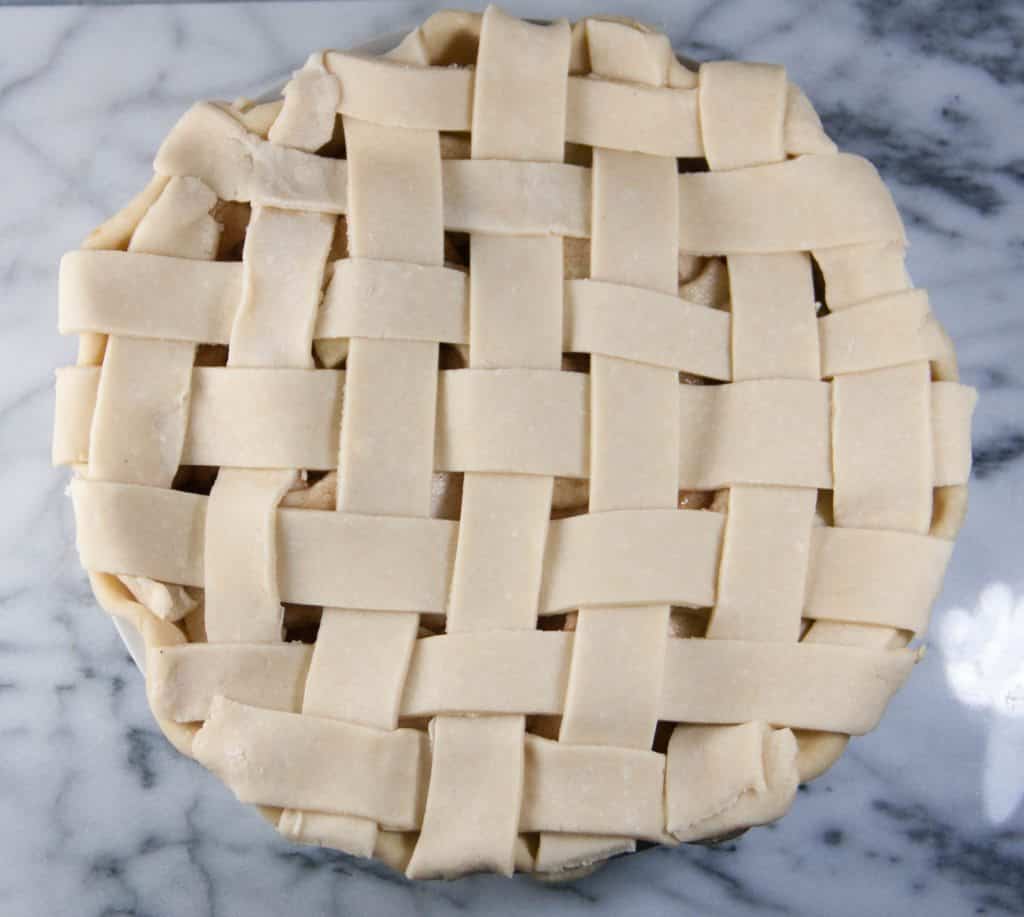
Learn how easy it is to make your own double pie crust recipe in this pie crust baking tutorial!

The holidays call for pie. And what is a pie unless it has a perfectly flaky buttery crust? Just not worth serving at the holiday dinner table if you ask me.
If you have “piedoughfromscratchaphobia” aka the fear of making pie dough from scratch then let me pass on a few of my learned wisdoms from making pie dough. Before you know it you will be rocking out your own double pie crust.
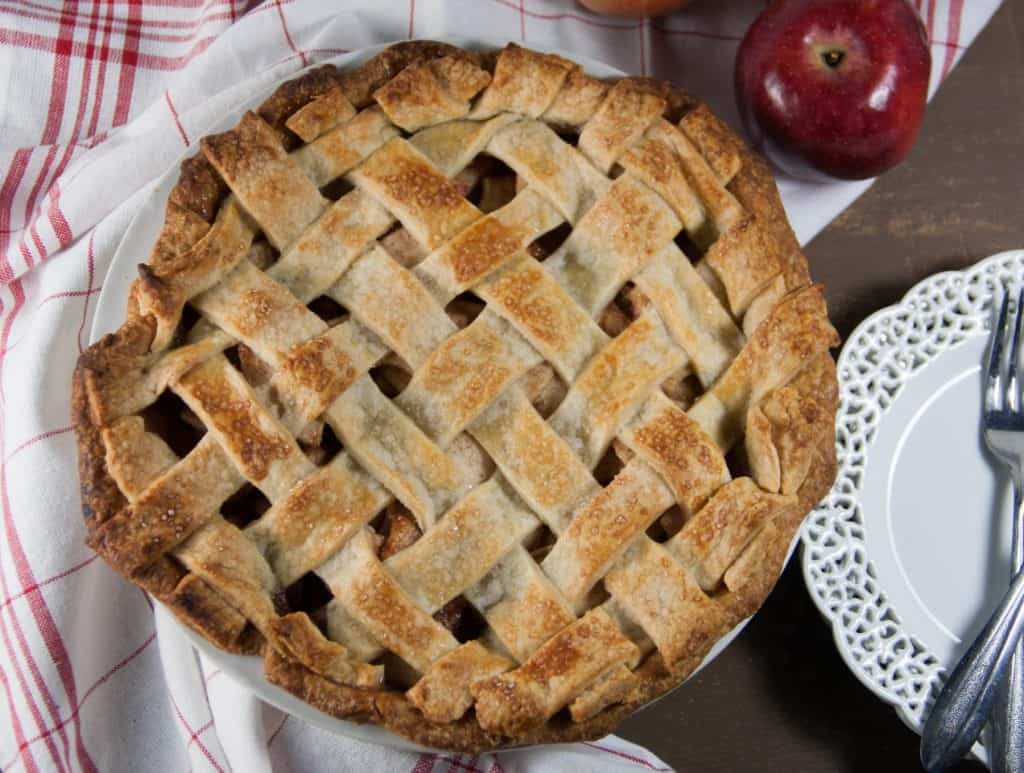
A double pie crust, of course, is what you would want to make if you’re making let’s say an old fashioned apple pie. Of course you can always make a double pie crust, and just use half the dough to make a pie that only requires a single pie crust on the bottom like a Pumpkin Pie (Made Without Evaporated Milk), or a Pecan Pie Without Corn Syrup. Either way a homemade pie crust will make all these pies the best ever for your Thanksgiving table!
What Is A Double Pie Crust?
Ok first off let’s establish what the heck we are talking about. Double pie crust is simply a double batch of pie dough.
I always recommend making a double pie crust even if all you need is one pie crust. You can freeze the second half and have it on hand for whenever you need it! It’s like mixing once, baking twice you know?
What Do I Need To Make A Double Pie Crust?
- All-purpose flour – Regular AP flour has the right protein content to make a tender, yet sturdy enough crust to roll out.
- Salt – A little salt is always necessary to help bring out all the other flavors. I used kosher salt, which has nice pure salt taste but a larger granule than table salt. If you use table salt, use less.
- Sugar – I like to use just a little sugar in my pie crust. Sugar helps to interfere with gluten development. This helps to create a tender crust. But too much sugar can actually make it too tender to roll out. So I add just a tablespoon.
- Shortening – Shortening has a higher melting point than butter, which means it’s easier to incorporate into your crust. And if you’re making a pretty design for your top crust it will hold it’s shape better. Make sure it’s very cold!
- Butter – Of course, butter adds ALL the flavor. But you need the butter to be very, very, very cold! Colder the better. I also use unsalted butter. Salted butter will add too much salt.
- Ice Cold Water – I like to take a measuring cup and add a few ice cubes to it and fill it up with water. Then I add a tablespoon at a time of the ice cold water.
What Tools Do I Need To Make This Double Pie Crust Recipe?
Believe it or not, you don’t need much. You can make a pie crust in a food processor or as I am going to show you by hand in a bowl.
If you are new to making pie crust, I recommend making it by hand. It gives you more control and you are less likely to overwork your dough.
You will need:
- Mixing bowl – Metal or glass is preferred. Plastic tends to retain odors and grease over time.
- Measuring spoons <– I love my new magnetic double-sided set!!!
- Kitchen scale (I recommend using this to measure the ingredients and to evenly divide your dough)
- Pastry blender– I used this to incorporate my shortening
- Kitchen grater (in this tutorial I incorporated my butter using the grater, but you can also cube the butter up into small chunks as well)
- Food processor if you don’t want to make it by hand!)
Tips For Making This Double Pie Crust Recipe
- First off, cold is key. Cold butter, cold shortening, cold water. Now, I have heard Martha Stewart goes to the lengths of even chilling her flour. I haven’t gone that far, but hey the colder the better right? The reason being? Cold keeps the butter and shortening from melting. Wait, don’t you want them to melt? Yes. Just not in your hands as your mixing the dough. You want them melting in the oven creating pockets of steam that then creates flaky layers.
- Chill Your Dough. If you find as your are rolling out your dough to be getting sticky, take a break and chill your dough again. After your rolled out and placed it in your pie pan, chill it again. Getting the hint? Cold. Is. Key! Secondly, shortening creates flakiness. Butter imparts flavor. If shortening gives you the heeby jeebies, you can use all butter in your dough. I simply recommend making it by hand if you do. You are less likely to overdo it by hand then in your food processor and therefore still getting the flakiness one desires. I’ve made this pie dough before and had great results.
- Do Not Overwork Your Dough. This pie dough however I decided to use shortening and my food processor. I had quite the list of pies to make for Thanksgiving and I knew the food processor was speed things along. If you don’t want to use your food processor you can easily use a pastry cutter. I have done both. If you do use your food processor, just be very carefully to NOT OVERDO IT. Less is more people. Less is more. If you are not sure, then STOP. You can always bring it all together with your hands before letting it chill and relax in your refrigerator.
- Divide Your Dough UNEVENLY. Say what?! Yes it’s a double crust. But the bottom crust will always need more dough to fill the bottom of your pie pan then the top crust. So make one disc slightly larger and make that your bottom crust.
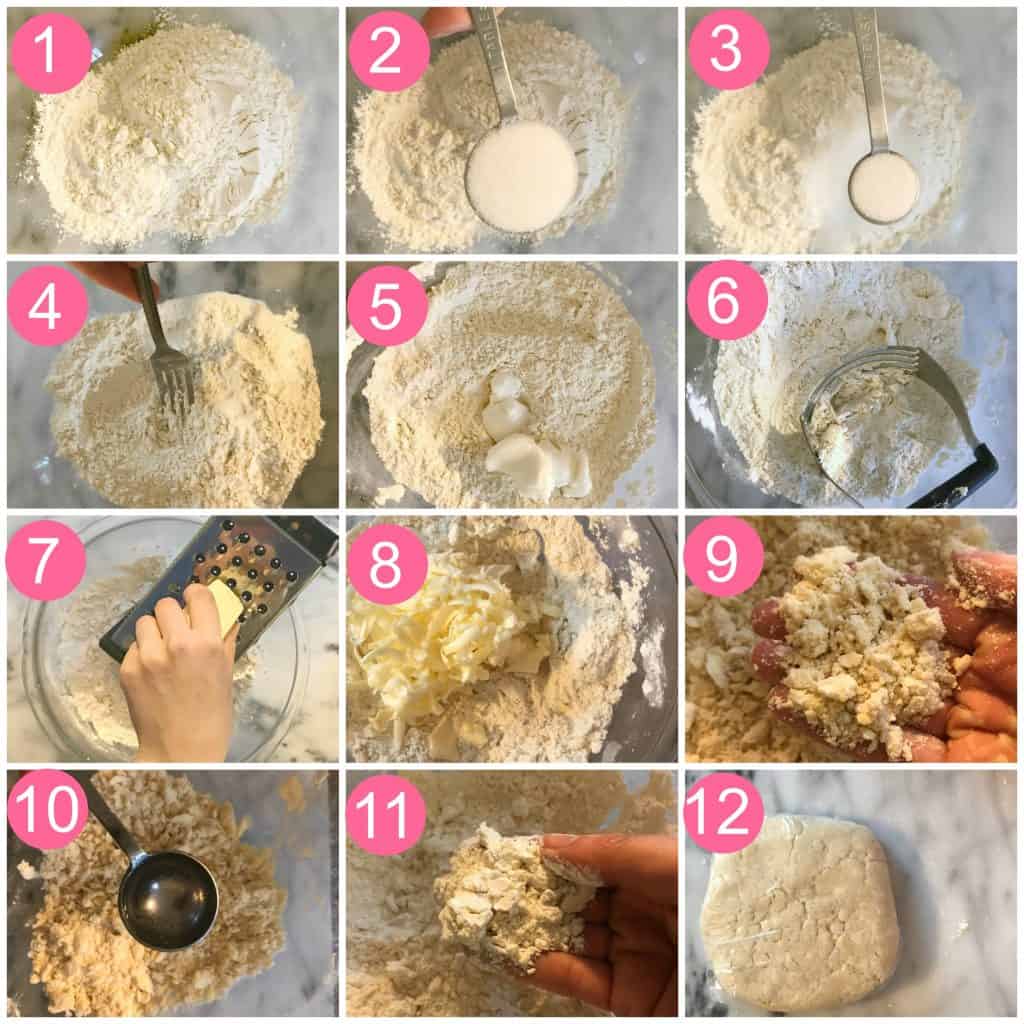
How To Make This Double Pie Crust By Hand
Before we begin. It’s super important your to talk about temperature when making a pie crust. Your ingredients should be COLD. Cold, Cold, Cold. You want cold butter. Cold water. Cold shortening. I have even heard of people putting their flour in the freezer (although I don’t get that far). Just make sure before you begin, your ingredients are cold.
Steps 1-4: Measure out your all purpose flour (properly measured), 1/2 teaspoon salt and a tablespoon sugar. For proper accuracy, it’s best to use a kitchen scale. Then go ahead and stir with a fork.
Step 5 and 6: Add your shortening. Mix in the shortening with a pastry blender.
Step 7 -9: Grate in your butter. Then fluff the mixture together with your fork. Your mixture should be crumbly and butter evenly incorporated.
Pro Tip: You want your butter to be very cold (frozen is best!)
Step 10 and 11: Add in a tablespoon of ice water one at a time and then stir. The amount of water you add will vary depending on the weather (and humidity). So add one tablespoon at a time, and then stir together. You want the dough to look shaggy but then when you squeeze the dough it should stick together.
Step 12: If making a double crust, then divide the dough (again a kitchen scale works best for this) and shape into a round disc and wrap in plastic wrap. And refrigerate for at least 30 minutes!
Pro Tip: Line your counter with plastic wrap. Then pour the pie dough contents on to the plastic wrap. Use the plastic wrap to smush the pie dough together. The dough will come together and you won’t need to toughen the dough and heat up the butter.
Pro Tip: Divide the dough, but not quite in half. I find I always need a little bit more crust for the bottom crust. So I like to divide the dough so one disc is slightly larger.
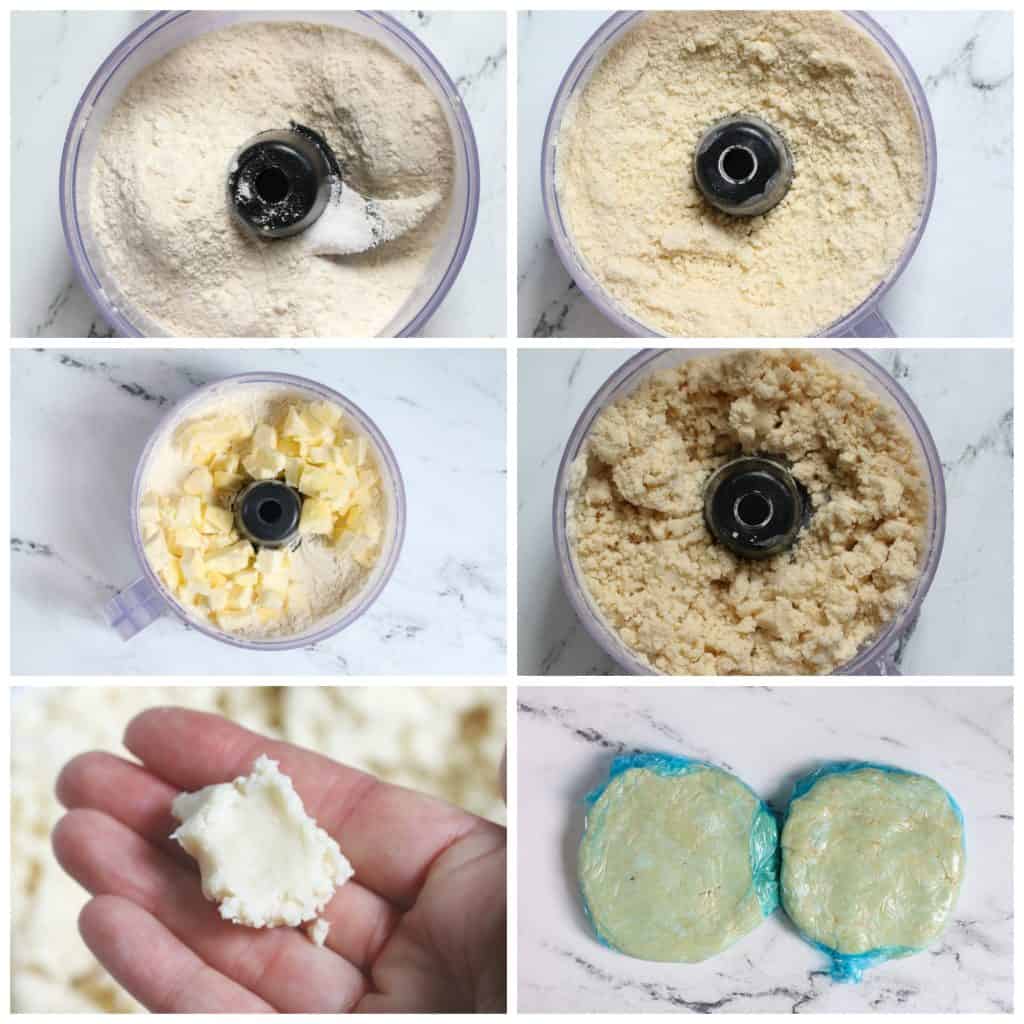
How To Make This Double Pie Crust Recipe In Your Food Processor
I used to think making crust in my food processor was just wrong. Well, turns out I was wrong. Using your food processor makes things super speedy. As long as you don’t overmix. Two tricks:
- Use The Pulse Feature. Do not just turn it on and let it run. Do this and you are likely to overmix your dough! Instead pulse it a few times and gradually work the ingredients in.
- Stir the water in by hand. If you are afraid of adding too much water. Aren’t we all?! Then empty the crust mixture into a separate bowl and stir your water in with a spatula. This will give you a better feel for the dough and you are less likely to add too much water.
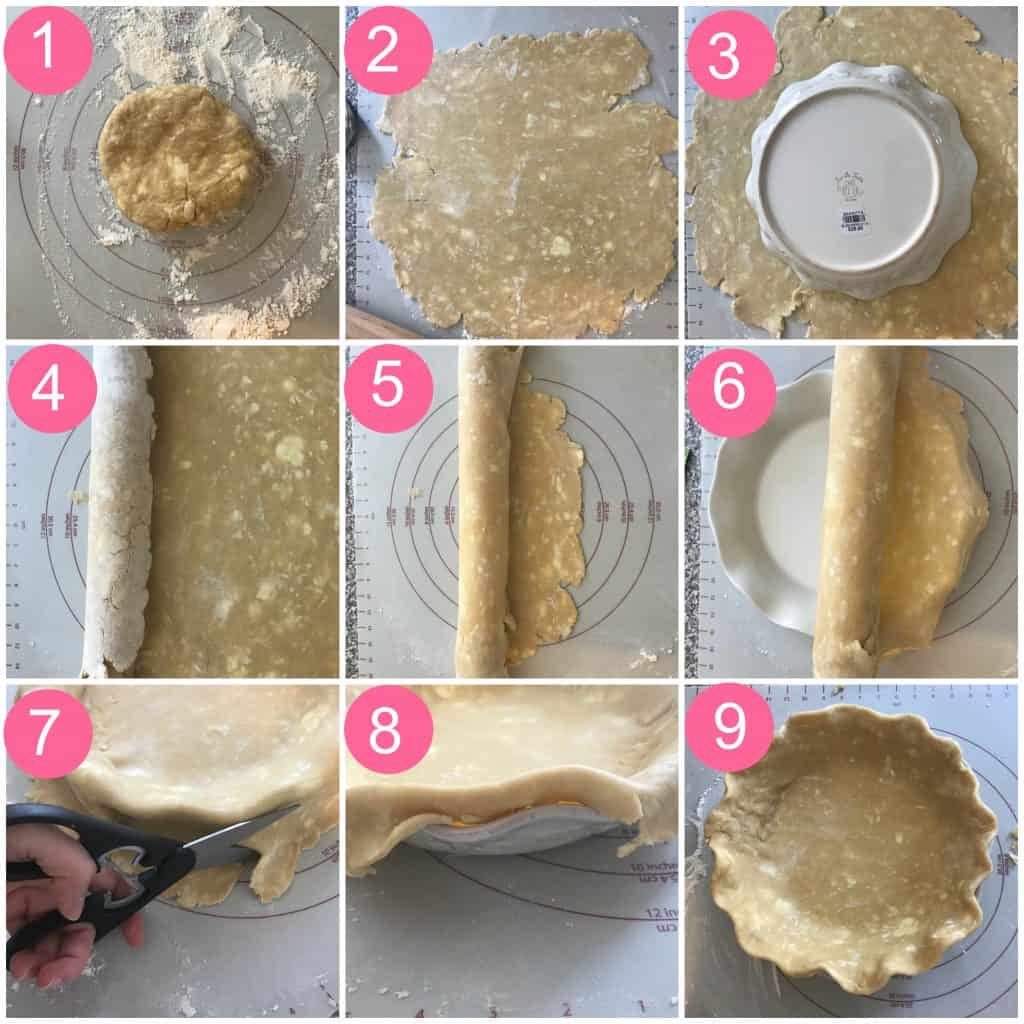
How To Roll And Crimp Your Pie Dough
To properly roll your dough and place into your pie pan I recommend using a pastry mat. I love the non-stick surface and the measurements so I can ensure I’ve rolled enough.
Step 1: Sprinkle your surface with a bit of flour. You just want to slightly flour your surface so you don’t incorporate too much extra flour into your dough.
Step 2: Roll out your dough.
Pro Tip: If your dough is sticking you can always pop it back into the fridge. If your dough is breaking, it may be too dry. Add a few sprinkles of water to the dough.
Step 3: To see if your dough has been rolled out large enough, turn your pie plate upside down. The pie dough should be larger than your pie plate.
Step 4 and 5: Using your rolling pin, roll your pie dough over the pin so it’s completely rolled around it (like a roll of paper towels!)
Step 6: With your pie dough rolled around the pin, roll it out over the pie plate.
Step 7: Trim the overhang with a pair of kitchen shears, leaving about a 1 -inch overhang.
Step 8: For a single crust: Fold the extra pie dough under creating an edge. For a double crust, repeat steps 1-6 and fold both top and bottom dough under to create an edge.
Step 9: Crimp the edges. For 4 easy ways to crimp and decorate your pie crust, read this post.
Double Pie Crust Recipe FAQ’s-
Why Do We Need Our Butter To Be Cold In A Pie Crust?
Butter accomplishes a few things. Sure flavor is important. But it helps to stop gluten from forming. And butter helps to create flaky layers.
If the butter is too warm it will be absorbed into the flour. We need some butter to coat the flour. This helps the flour from forming two much gluten.
Flour contains two proteins, gliadin and glutenin, that when mixed with water form gluten. Gluten forms this network that can help trap gasses and provides structure to our baked goods. But too much gluten means that we end up with a tough structure in the end.
So the fat that’s added to the recipe actually will coat the flour and prevent the flour from interacting with the water in our recipe.
But some pieces need to remain large and visible. That means these pieces, not worked into the dough will melt in the oven giving off the water that’s in the butter turning to steam. Steam will then escape and push apart our flour layers creating a flaky crust.
Why Does The Water Vary In The Recipe?
So I was always told that the water amount varies because it depends on the weather that day. The humidity in the air. Well, apparently that’s wrong. It has to do with how much of the butter (or fat) is cut into the flour. Just as we learned above, the butter’s job is to block the flour from getting along with the water.
So the amount of water to bring the dough together will always vary a little bit depending on how much of the butter is worked in.
I like to add the minimum amount, and then test the dough by pinching it between my fingertips to see if it forms a solid mass. If you still see lots of crumbs not mixed in, that means you probably need to add a little more water. I like to err on the side of less. If I find that I’ve added too little later, I just spritz my dough down with a water bottle if needed and work in a small extra amount.
Do I Need To Grate The Butter?
I’ve done it both ways. Either grated, then frozen. Or just simply cubed up small and then chilled. Either works really well.
Why Do I Add Shortening?
I know shortening can make people a bit squeamish, but it’s on of the few times that I swear by shortening. Shortening has a higher melting point than butter so it’s easier to incorporate than butter and will help to create those flaky layers.
Shortening will also be easier when creating a decorative pie crust because it holds it’s shape better during the baking process!
Why Do You Refrigerate The Dough Before Rolling It Out?
We need to refrigerate the pie dough after making it to relax the gluten strands. This will help make the pie crust tender and also easier to roll out.
It will also help to firm up the fat again and cut down on any shrinking during the baking process.
My pie dough is crumbly and dry!
Oh I’ve been there. You are so afraid of adding too much water you add too less! If when you go to roll out your dough you find it’s crumbling and dry. Sprinkle on some water. I prefer to use a spray bottle and spritz on water. It adds just a light mist. Then I work the water into the dough.
Afterewards, I like to chill my dough again to let the dough warm up after I’ve played with before I roll it out.
Can I Make Pie Crust Ahead Of Time?
Absolutely you can! And I highly recommend you do. Your dough needs to chill anyway, so why not make it advance. You can make pie crust the day before and refrigerate it.
Or freeze your discs of pie dough for up to 3 months. Let them thaw overnight in the refrigerator.
What if I just need a single pie crust?
If you’re making a Easy To Make Eggless Pumpkin Pie, or Old Fashioned Coconut Cream Pie where you just need the bottom crust, then I recommend using my Single Pie Crust Recipe.I find dividing the dough in half for this recipe doesn’t give me enough crust for the bottom crust.
For More Pie Tutorials Check Out These Posts:
- 4 Tips For Perfect Pie Crust
- 20 Tips To Make The Best Pie From Scratch
- How To Blind Bake A Crust
- 9 Must Have Pie Baking Tools
- How To Make A Lattice Pie Crust
Other Pie Recipes to Try
- Pear Cranberry Crumble Pie
- Easy to Make Eggless Pumpkin Pie
- How to Make a Lattice Pie Crust
- No Bake Peanut Butter Pie
- Fresh Cherry Galette
- Old Fashioned Coconut Cream Pie
Let’s Connect!
I created this fun little group on Facebook and I’d love for you to join! It’s a place where you can ask questions, and see what’s new with Boston Girl Bakes. Share your own recipes and participate in the monthly baking challenges.
If you like to check it out, you can request to join HERE.
And be sure to follow me Instagram and tag #bostongirlbakes so I can see all the wonderful recipes YOU make from this blog. You can also subscribe to my newsletter so you never miss a delicious recipe again! I also share sometimes helpful tips, free guides, and exciting news there first so be sure to subscribe to my e-mail list below.
Ingredients
- 2 1/2 cups (300 g) all-purpose flour
- 1 tablespoon granulated white sugar
- 1 1/4 teaspoon kosher salt
- 8 Tablespoons vegetable shortening cut into 1/2-inch pieces and chilled
- 12 Tablespoons unsalted butter cut into 1/4-inch pieces and chilled
- 6-8 tablespoons ice water
Instructions
- Process flour, sugar, and salt together in food processor until combined, about 5 seconds. Scatter shortening over top and process until mixture resembles coarse cornmeal, about 10 seconds. Scatter butter over top and pulse mixture until it resembles coarse crumbs, about 10 pulses.
- Transfer mixture to large bowl. Sprinkle 6 tablespoons of the ice water over the mixture. Stir and press dough together, using a stiff rubber spatula, until dough sticks together. If dough does not stick together, stir in remaining ice water 1 tablespoon at a time.
- Divide dough into 2 even pieces. Turn each piece of dough onto sheet of plastic wrap and flatten each into a 4-inch disk. Wrap each piece tightly in plastic wrap and refrigerate for 1 hour. Before rolling the dough out, let it sit on the counter to soften slightly, about 10 minutes.

Comments & Reviews
Type your question or comment below, and tap "Post Comment". I welcome constructive criticism, but please be respectful. Rude or inappropriate comments will not be published. Thank you!Baking isn't always easy! So if you had any issues, I'd appreciate the chance to help you troubleshoot before you rate.